
Table of Contents (my way of apologizing for the fact my reviews are detailed):
– Background
– Physical Description and Illumination
– Reticle
Close Quarters Reticle Features,
Ranging Using the Mil-Dots:
Ranging Using the Width Brackets
Ranging Using the Power Ring Method
Drop and Wind Compensation
– Comparative Optical Evaluation
– Speed Testing and Discussion of Contributing Factors
– Mechanical Testing and Turret Discussion
– Summary and Conclusion
Background:
Optisan is known for precision optics throughout Europe were they are famous for their commitment to product development and innovation. Though you have likely not heard of them in the US before reading this article, it is very unlikely that you have not seen their products, as they are a large manufacturer with a variety of mainstream clients. Optisan has built a reputation for high quality products, such as the MTC-Viper scope line, and attention to detail in all aspects of European design and have the endorsement shooters like World Hunter Field Target champion Gary Cooper. Optisan is a global manufacture with ISO9000 certified manufacturing facilities in three countries.
That brings us to my association with Optisan: an important point as you will soon see. As I have mentioned before, that last day of SHOT Show, where I walk around the whole exhibition looking for shiny things to catch my eye, has always proved the most profitable. Two years ago I happened upon Optisan’s booth, looked through an optic, scribbled a little bit in my notebook, and started to leave when I was stopped by Lily. She wanted to know what I thought and I obliged. Being as I ramble on, this took a few hours and at the end of it, I was designing a reticle for them. Optisan had been looking for a knowledgeable individual to help them align the features of a new scope line to be released in the U.S. with the desires of the U.S. market. My experience in reviewing scopes of the 1-(n)x class for the last four years proved the resume for this job. Two years later, I have created what I believe to be the best reticle design for the 1-(n)x scope class and have a patent pending on it. The scope, in conjunction with the reticle, are designed to truly enable the shooter to utilize the full effective range of the modern sporting rifle platform. 3-Gunners will love it. I will now review that scope, admittedly not in a completely unbiased way.
Physical Description and Illumination:
What you see before you is a late generation prototype of the CX6 1-6x24mm optic with the Mudskipper 3 reticle. The optical platform and mechanicals on this prototype are complete and final, though the markings and finish differ from the production version. The prototype I have was supplied with the excellent set of metal flip lens caps that will be included with the production version. These are screw on, indexable, and when fully open are almost flat to the tube. They are second only to Leupold’s $80 per set Alumina caps and are far beyond anything else.
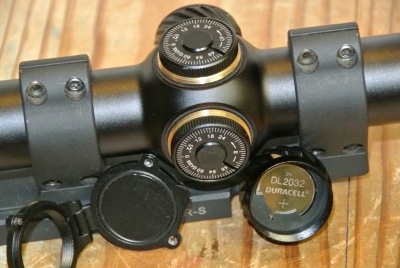
At 10.5″ long and 17.5oz, the CX6 would be about average in dimension for a 1-4x scope: putting it on the good side of average for a 1-6x. It features low profile turrets, and a euro style diopter that is smooth but a bit on the light side. The power ring feel is perfectly smooth and exactly the right stiffness with a throw of 180 degrees. The illumination control is in the usual location on the left side of the saddle. It offers six intensity levels of red illumination with off points in between. The knob houses the CR2032 battery and rotates smoothly and with the precise amount of force you would want. The lowest setting is just visible in a dark room and therefore probably a bit much for night vision. The highest setting is visible in daylight, but not bright. It is a reflected illumination system and the brightness is perhaps just above average for that type of system. The entirety of the reticle is lit when illuminated. One of the two caps for the adjustments holds a spare battery. This cap is slightly higher than the other and can be affixed to either the elevation or windage knob.
The overall build quality of the CX6 looks very good. The machining is clean and everything rotates smoothly. The Optisan name is even intricately engraved into the eyepiece housing by what appears to be a very small end mill. This is a nice touch.
Reticle:
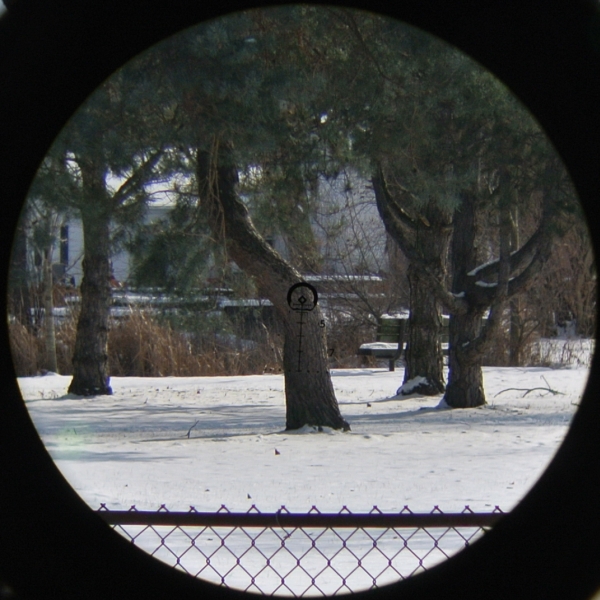
To me, the reticle is the most interesting problem of rifle scope design. It is interesting because, unlike most other design problems, more cost does not equate to a better product. You can enhance the clarity of your scope by buying better glass or, more importantly, better grinding and coating; you can boost your magnification ratio by adding glass with a high index of refractivity; and you could (though I don’t know of any scope companies who do) minimize distortions by adding aspherical lens elements as many cameras do. All of these enhancements are primarily cost limited; a reticle is basically not. One engraved reticle is not significantly more expensive to make than another, yet the difference to the scope’s utility is usually far greater than the difference between high cost glass and low cost glass. The problem of reticle design is one of limited real estate and divergence of application. Speed often conflicts with flexibility, as well as accuracy, and every element you add to the design may serve to interfere with any other element or may just confuse the user. It is a pure engineering challenge in two dimensions: a balancing act that you can’t buy your way out of. Those who have read my reviews know that few scope makers produce what I would term a success in this endeavor. Because of this, I began toying with designs myself four years ago. The Mudskipper 3 reticle (patent pending) in this Optisan CX6 scope is the first product of those efforts. I believe that it offers the best balance of ranging, distance compensation, and close quarters features for the short to mid range tactical scope of any design extant.
The first thing to understand about the short to mid-range tactical scope is that it is being asked to do a few fundamentally very different things. At close range it is expected to provide a quick, easy to acquire, aiming point that does not have to be very precise. At longer range it is expected to aid the user in both calculating range and compensating for the drop and wind drift of the projectile at that range. These calculations and compensations should preferably be somehow precise, quick, and easy to do. It is therefore not surprising that there is a high degree of difficulty involved in putting together a system that fulfills all of these requirements with a few scratches on piece of glass. The way I tackled this problem was to break it down into modes of use. There are three rangefinding modes, two distance compensating modes, and one close quarters mode. Each of these modes required reticle features which were then sorted out such that, wherever possible, a reticle feature was adapted to be used in more than one mode and, where conflicting, that conflict was mitigated to the greatest extent possible.
Close Quarters Reticle Features:
First I will talk about close quarters use since this is the primary function of 1-6x scopes. Through my extensive testing and reviewing experience, I have found that the key elements to speed with respect to reticle design (in the absence of bright dot illumination) are a relatively clear field of view and few large central elements. In this scope, there are two central elements: a thick scalloped circle and a thick diamond. In order to gain the function of a clear field of view, all other elements in the reticle are very thin. Furthermore, the top vertex of the diamond forms a nice precise 100-yard zero for those who, like me, demand a precise primary aiming point in an optic. The center of the diamond feature is therefore offset below the 100-yard zero. I have also offset the center of the circular element. This is because the aiming point for close quarters targets should be below the 100-yard aiming point, owing to vertical offset of the scope from the rifle bore. This is only done in one other scope design that I am aware of, but it is a definite improvement on other aiming point designs. The overall effect of these design choices is that this scope is very fast at 1x: faster even than many bright dot illuminated scopes.
The Mudskipper 3 reticle offers three different modes for determining target range. Two of these you will no doubt be familiar with, though you will never have seen them combined in this way. The third mode will bring back an old and forgotten good idea in a new form. I think that the easiest way to properly convey to the reader each of these modes is to walk the user through using each one in the manner that might be approached in the owner’s manual. While the reticle is designed to be easy to use and uncluttered, its combination of a number of systems does render explanation necessary. I apologize in advance for the length of this section: I made the decision to sacrifice brevity to understanding.
Ranging Using the Mil-Dots:
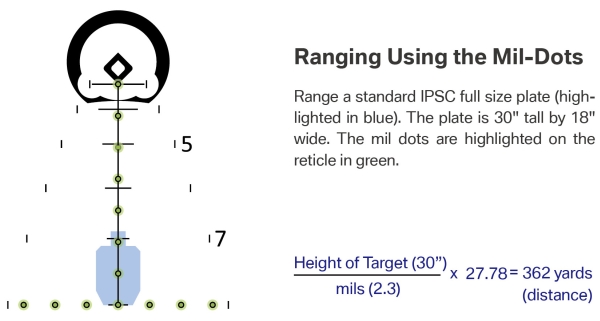
The first mode of determining range is the mil-dot mode. To this end, a string of vertical mil-dots and a string of horizontal mil-dots have been incorporated in this reticle design. These dots are calibrated to be the correct distance apart when the scope is set to 6x magnification. At this power, the dots are spaced 1 mil center-to-center, with the outside diameter of the dots being .1mil. One mil is 3.6″ at 100 yards or 10cm at 100 meters: it is an angular measurement and therefore is also 36″ at 1000 yards and 1m at 1000 meters.
These dots may be used to estimate the range based on either a vertical or horizontal dimension where the actual size of a target is known. To accomplish this, the target should have its width or height in mils measured with the scope set on 6x. This dimension (in mils) will be input into one of the following ranging equations along with the target’s actual size (in inches or yards):
Ranging Using the Width Brackets:
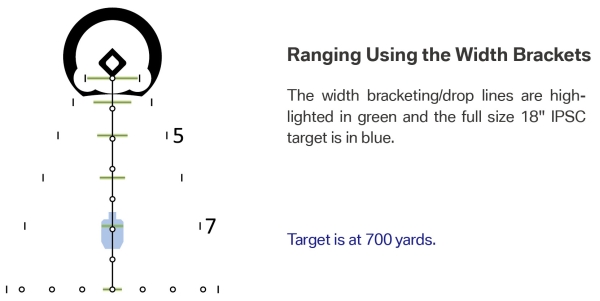
The second mode of determining the range of a target is to use the set of brackets calibrated to represent an 18″ width at distances from 300 to 800 yards. There exist in the market today many scopes that offer a ranging feature based on the width of an 18″ full size IPSC plate target at distance. Most of these scopes also integrate this ranging feature with the distance-compensating drop lines. Though this ranging method is woefully inaccurate; it is the fastest, is familiar to most shooters, and takes no extra space since drop lines of some type must be incorporated for distance compensation purposes anyway. For these reasons, this feature has been added to the Mudskipper 3 reticle. In order to use this feature you should bracket the 18″ wide dimension within the drop line of appropriate width at 6x. That line corresponds to the distance of the target. Only two of these lines are directly labeled: 5 for 500 yards and 7 for 700 yards. Lines exist from 300 to 800 yards and the identity of unlabeled lines may be inferred from their neighbors. In the below example, the width bracketing/drop lines are highlighted in green and the full size 18″ IPSC target is in blue.
Ranging Using the Power Ring Method:
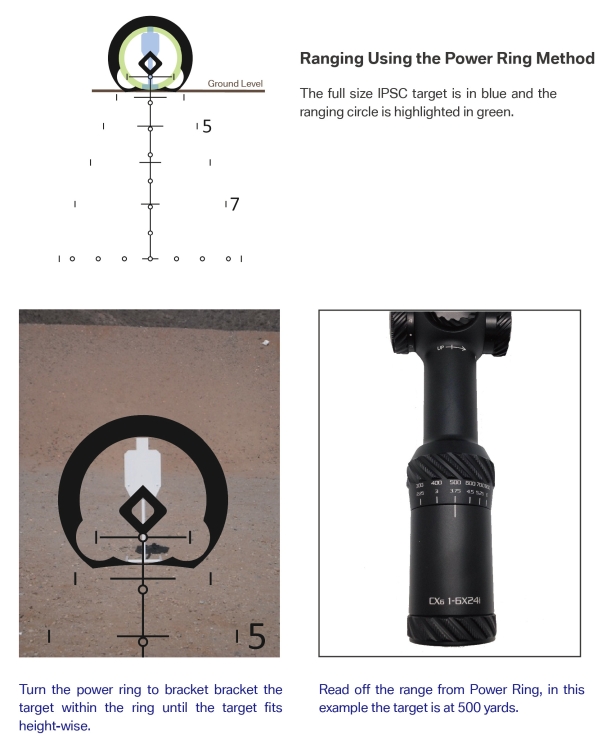
In addition to the first two relatively common ranging modes already mentioned, this scope also offers a third and much less common method. Although originally developed during the Cold War and used in flagship optics by both sides of the conflict; power ring ranging has only occasionally appeared in products since. This ranging method offers a remarkable combination of accuracy and speed, and it works because in a 2nd focal plane scope, the relationship between the size of the target and the size of the reticle is not fixed but rather changes in a predictable manner with changes in magnification. In this implementation, the inner diameter of the large circle where not scalloped away is calibrated to be 5′ 10″ at whatever distance is labeled on the power ring. In practical shooting competitions, the target is often placed at about this height for reasons we will not here discuss. This can be true for full size IPSC steel, but is more often true for the more popular smaller targets, such as 10″ square plates. To range such targets, the user need only bracket the target within the ring and turn it until the target fits height-wise. The range can then be read off the power ring with excellent precision. In the below example, the full size IPSC target is in blue and the ranging circle is highlighted in green. You will note that the target is suspended on a post so that it is the correct height above the ground. Prepare yourself to be amazed by the speed, ease, and accuracy of rangefinding using the power ring method. This method offers a better compromise of speed and accuracy than either of the aforementioned methods in that it doesn’t compromise either.
Drop and Wind Compensation:
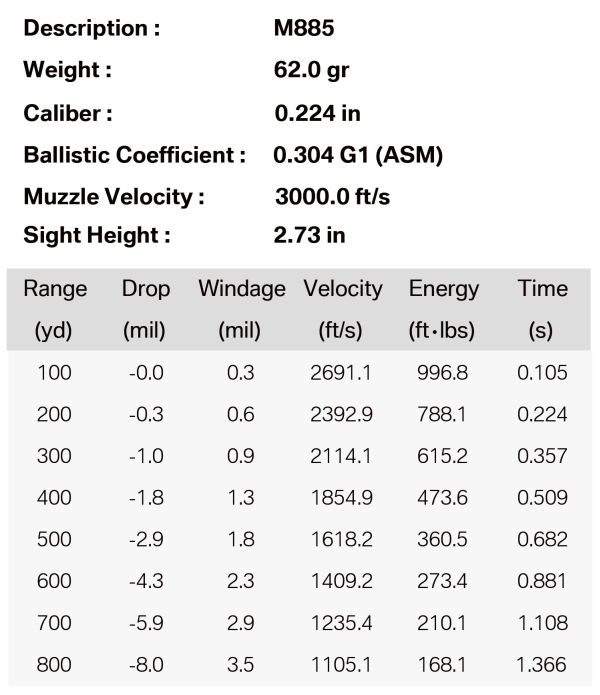
Though knowing the range to a target is nice, it is merely a means to an end. That end is to be able to compensate for the drop of the bullet due to gravity and the drift due to wind. Though the mil-dots in this reticle may be used to accomplish this and represent the first of the two distance compensation modes (the 100-yard point of the diamond is exactly 1 mil above the first dot), this reticle is primarily designed and calibrated for use with the M855 62gr .223 cartridge fired from a 16″ barrel AR15. The exact ballistic table used is given below for the edification of the more advanced reader. This reader, who I expect also hand loads his or her own ammunition, will be pleased to know that SierraTM makes an affordable 65gr .224″ GameKingTM bullet with a BC of .303 that can be loaded to be virtually indistinguishable from M855. It is also of note that the ballistics of this specific cartridge do not differ extraordinarily from those of the popular 55, 69, or 77 grain .223 loadings, or even from many .308 cartridges. It may be used without too much difficulty on all of these cartridges, though there will be some error due to the differences between the rounds. Shooters planning on using these or different cartridges should consult the table below in comparison with a similar table for their own cartridge. This will allow the user to be cognizant of, and adjust for, the exact magnitude of difference to be expected at each range.
Using the target range calculated by one of the above methods and the wind speed whose calculation I will not go into at this juncture, the user may compensate for the drop and drift using the drop lines and 10 mph windage bars engraved in this reticle. These drop and drift compensating features are supplied for between 300 and 800 yards. In the below example, a target at 700 yards with a 5 mph left to right 90o crosswind is being appropriately targeted using the drop lines and 10 mph windage bars on the reticle. The drop lines have been highlighted green, the ISPC full size target blue, and the 10 mph windage bars pink.
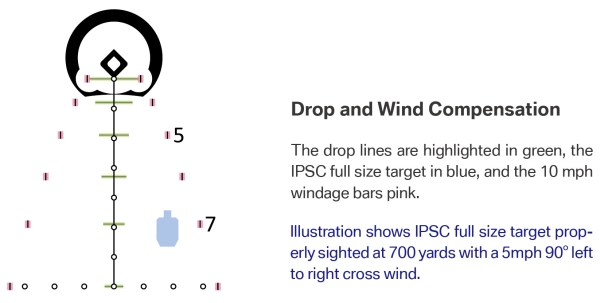
Optisan CX6 with Mudskipper 3 reticle at 6x engaging an IPSC target at 700 yards with a 5mph 90degree left to right cross wind using M855 ammunition fired from a 16″ barrel.
Comparative Optical Evaluation:
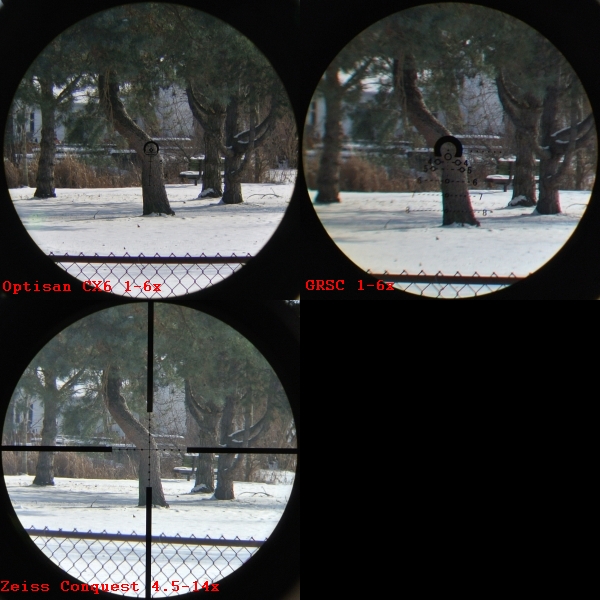
I had this scope during the time I did the 1-8x reviews and I evaluated its speed and illumination at that time. However, I made the mistake of not also evaluating its clarity, distortion, color rendition, and other aspects of the view at that time. This was a mistake because when I evaluated the 1-8x scopes it was summer and warm and nice. When I did the Optisan CX6 evaluation today, it was 10 degrees with snow on the ground. The advantage of this is that snowy conditions are tough on optics. It is bright, your pupil shrinks, and I think this makes the eyebox seem much smaller. There is also bright light reflecting off the snow from all directions. If the optic is going to have a stray light problem, you can bet it shows up on a snowy day. The only thing that is made more difficult to evaluate is the color rendition since pretty much everything is either white, black, or brown. For comparisons to the Optisan CX6 I brought out the GRSC 1-6x, a Zeiss Conquest 4.5-14x, and, because I still have it for the moment and it is pretty, the Leupold CQBSS. All scopes were set at 6x for all the comparisons except distortion, which is more important at 1x because it can interfere with the proper merging of images from both eyes but is relatively unimportant at 6x.
The first thing that I noticed in my testing was that the difficulty in conditions highlighted the differences in the size of the eyebox at 6x in the scopes. The Optisan and Leupold felt roomy and comfortable; though not to the extent of the 44mm objective traditional long range Zeiss scope. Large objectives can translate into large eyeboxes. The GRSC was cramped under these conditions and difficult to accurately assess with regard to resolution because very little movement was necessary to detrimentally effect its clarity. Similarly roomy was the Optisan field of view, which was far larger than both the GRSC and Leupold although smaller than the Zeiss.
I came to the conclusion, after a good deal of time evaluating, that the Optisan CX6 has slightly better clarity than the GRSC and is significantly better than the Zeiss. Not surprisingly, the Leupold is the best. It was really very hard to make a judgment between the Optisan and the GRSC because they seemed to be very close and the difficulties with regard to eyebox that the GRSC was having in these conditions added a further complication. In the end I gave the edge to the Optisan mostly because in the event two scopes look very close but the image always appears at top clarity though one and only fleetingly though the other, I think you have to go with the better user experience.
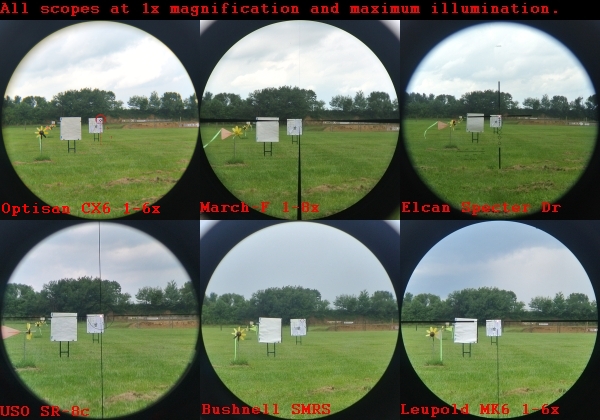
None of the scopes in this testing have major issues with any of the usual optical problems. Chromatic aberration was a little more visible on the Optisan and GRSC than on the other two but not by much, and it was certainly not a big problem, especially given the conditions of testing being absolutely ripe for it. Neither the Optisan nor any of the other scopes displayed much in the way of the (very poorly named) curvature of field. Lastly, the Optisan is outstanding with regard to pincushion or barrel distortion. The field is amazingly flat. This is especially important at 1x where it gave this optic a significant edge in speed testing. I believe the Optisan CX6 has the flattest field of view at 1x of any magnified optic I have tested.
The last two things to talk about are color rendition and glare. Today’s conditions were great for testing glare and terrible for comparing color. From what I can tell, the CX6 color rendition is relatively neutral. It is certainly not as green loving as the CQBSS, which can find the moss on tree bark even in the winter. Whether it lies right in the middle or a little bit towards the preferences for greens, I’m not sure. As for the ability of the CX6 to handle off-axis light: it is exceptional. I was unable to create any artifacts or washout of the reticle at any angle from the sun. Given how the objective is recessed in the design and further recessed by the flip-up lens cap housing, I believe this excellent performance was achieved the old-fashioned way: by simply shading it.
The question I asked myself going into this project (and that I have been asking myself for some time as the quality of Chinese produced optics continues to improve) is whether the Chinese can produce optics that are competitive with the Japanese but at a more attractive price. Though in the primary comparison in this evaluation we are comparing a second focal plane optic (the $600 Optisan) with a first focal plane optic (the $1,000 Japanese GRSC), not a totally fair comparison, the second focal plane Optisan is unquestionably better optically on balance. It is clear to me that the Chinese are now quite capable of invading the mid-priced market and, given the price difference, I expect they will dominate it in fairly short order.
Speed Testing and Discussion of Contributing Factors:
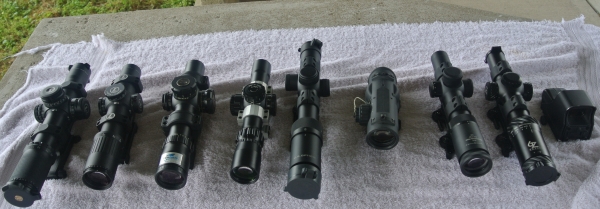
Over the course of the last couple of reviews, I have had the opportunity to evaluate, in cooperation with eight or nine different testers, some fourteen different optics featuring a 1x setting by engaging close quarters targets. For this testing I use an air-soft AR-15 and pie pans: I’m not made of money. It’s a lot of fun and you can go though thousands of rounds for the cost of a fast food dinner.
What I have found after doing all of this testing is that what counts in an optic for close quarters speed is not exactly what you would expect. A distortion-free image is the dominant factor. Specifically, the field of view must be flat and magnification very close to a true 1x must be maintained. This is because the merging of images from the right and left eyes is paramount. Distortion, such as pincushion or barrel, or an image that is too large or too small will make that process difficult and disorienting. Following distortion in importance is the combination of reticle and illumination system. I say combination because what is needed, which is a relatively open field of view with one or more difficult-to-miss central features, can be accomplished either with the reticle or with a bright illuminated dot. Lastly, the eyebox of the optic must also be large enough that some movement of the shooter’s head is accommodated. While bigger is certainly better in this area; there is, in effect, a law of diminishing returns: at some point, the eyebox is simply big enough and making it larger has little benefit.
The performance of the Optisan CX6 with Mudskipper 3 reticle in close quarters testing was excellent, especially for a scope that features traditional reflected illumination. The CX6 had the least pincushion or barrel distortion in any scope I have ever tested. This, combined with an accurate 1x setting, allowed for a seamless merging of images between the right and left eyes which was described as very comfortable by testers. Furthermore, the central circular and diamond figures in the Mudskipper 3 proved to be sufficiently thick to hold the shooter’s focus while all the other features proved sufficiently thin to be ignored. This allowed for the quick and easy establishment of aiming point despite the lack of a daytime bright dot type illumination system. Lastly, the eyebox of the CX6 was on the larger side of the optics tested and proved sufficient.
The cumulative effect of all these factors was that the CX6 with Mudskipper 3 reticle finished reliably well above average in the speed testing. There was little disagreement among the testers on this point: with the scope even finishing first in the opinion of a tester who was not me. Most testers were not aware during the testing and review process that they were talking to one of the scope’s designers.
Mechanical Testing and Turret Discussion:
The Optisan CX6 features exceptionally low profile capped turrets that protrude less than 1/4″ from the saddle. The turrets have .5″ per 100 yard clicks and have a sliding zero indicator/scale that is held in place by friction and only visible from above. 44″ per revolution of travel is present and the indicator is labeled with this as well as the direction of aim point movement. The clicks are easily audible and also tactile; though they are very mushy and the extremely low profile format requires ungloved hands to manipulate them. In short, these are unadulterated zeroing turrets. They are designed to be used only during the zeroing process and are therefore as small, light, and unobtrusive as possible. All distance compensation is designed to be done via the reticle. The turrets serve their purpose well but would be totally unsuitable for anyone desiring to compensate for distance using only these adjustments.
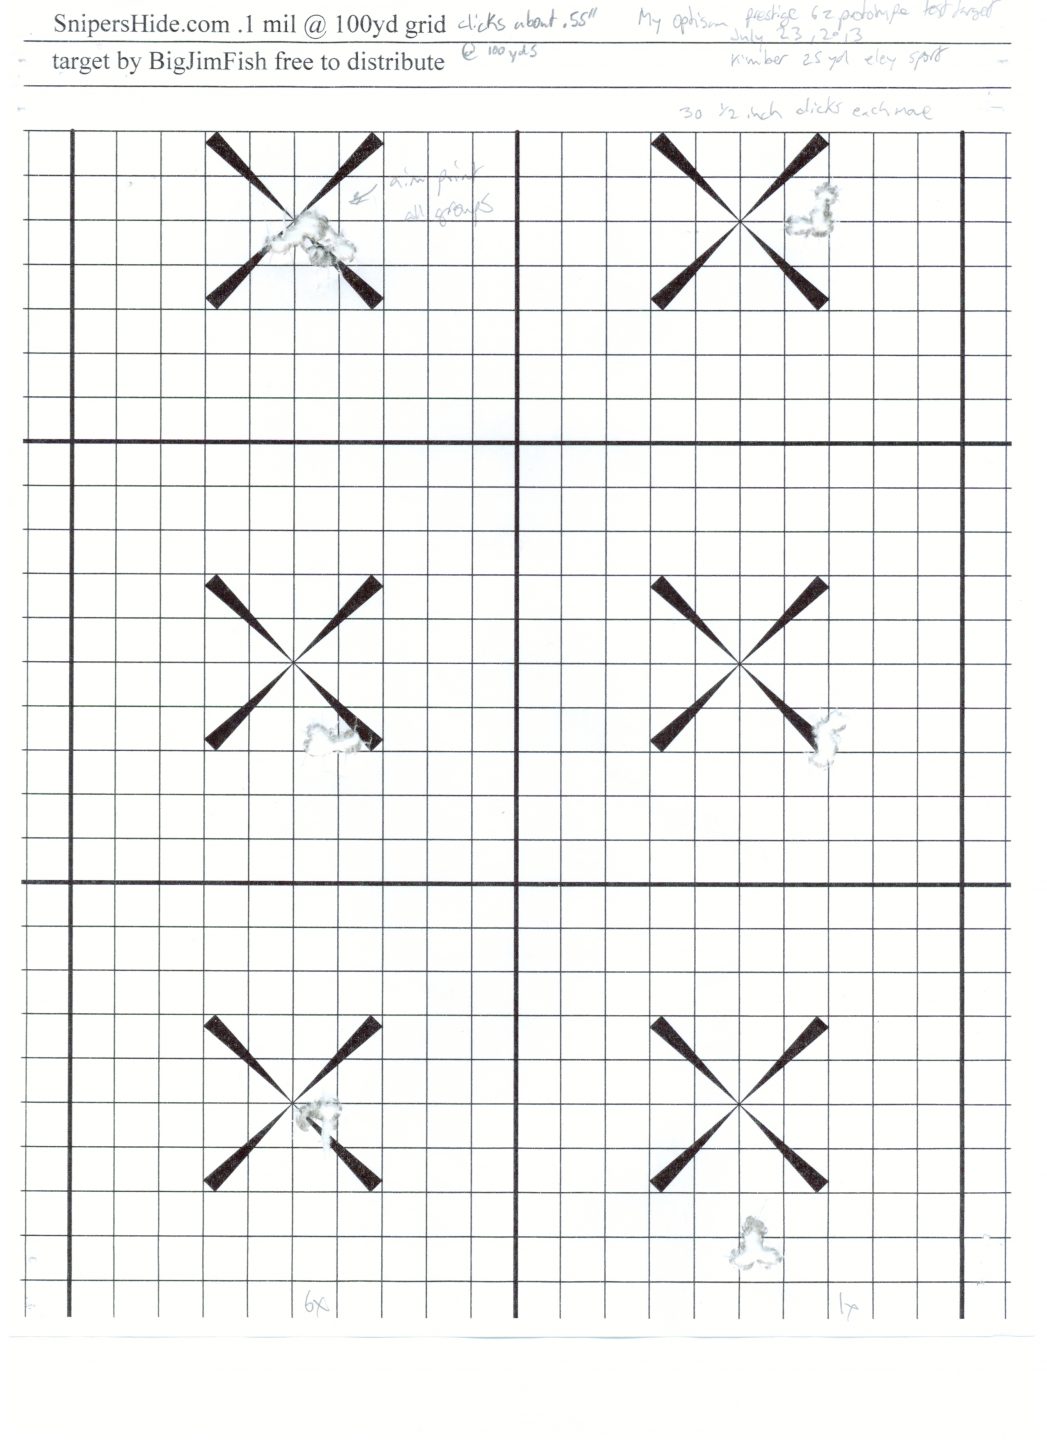
For the adjustment testing of the Optisan CX6 and other scopes being reviewed this year, I made up the new target shown below. I spend a good deal of time shooting at my local 100-yard range with scopes that are adjusted in mils. It annoyed me that I could not find a target made on a mils at 100 yards grid. I therefore made one and, furthermore, made it have six bulls so that I can shoot a box and power change test on the same target. The grid on the pictured target is .1 mil at 100 yards. I will make the PDF of this target available just as soon as I can figure out a way to get the CAD program to make a PDF of the correct size. (It seems to be able to print out the correct size, but the PDF is not right. I will have to use some printer plug in.)
A box test checks for the accuracy in magnitude and independence in direction of the adjustments. To perform this test, the shooter aims at the same place when firing all shots, but moves the adjustments between groups such that a box is formed by the groups fired with the last group landing back atop the first. This box should be square and the corners (i.e. the groups) should be the correct distance from each other as dictated by the scale of the scope’s adjustments. In this instance, I obviously used a mil target with inches per 100 yard adjustments and therefore the relative positions of the groups to the x’s will not be expected to line up and a measurement will be necessary. The box formed by the CX6 is nice and square with the last group landing well atop the first, indicating adjustments are independent and return to zero. However, the distance of one group to the next was about 4.125″ instead of the 3.75″ dictated by .5″ at 100 yard clicks. This means that the clicks are more like .55″ than .5.” I have been told that this issue with the magnitude of the click adjustment is present only on the prototype and has been fixed in the production version. Either way, people using the adjustments only for zeroing, as they are intended on this optic, will not be inconvenienced by this.
In a power change test, the rifle is fired at two different targets with one being shot at maximum magnification and the other at minimum. The targets are then compared to measure the shift with regard to point of aim when the power is changed. Shift is expected with a second focal plane scope but a front focal plane scope should exhibit no shift. The CX6 exhibited a shift of roughly 4 MOA down when going from 6x to 1x. Since this is a second focal plane scope and shift is intrinsic in all second focal plane scopes when the adjustments are in any position except absolutely centered, this test has no real meaning except to remind the user that with any second focal plane rifle scopes, all precision work should be done at the same power and that should be the power the scope is zeroed on. The reticle of this scope is calibrated for this to be the maximum magnification of 6x.
Summary and Conclusion:
I was apprehensive about this project at the start. Prior to SHOT Show, I had never heard of Optisan and the 1-6x prototype that first year was not confidence inspiring. I agreed to design a reticle for them because I figured it might be an interesting experience and I had only my time to lose. It turned out to be a whole lot more time than I anticipated but also a much better product.
The optics in the CX6 turned out much better than I expected. In virtually all aspects of optical evaluation, it betters products from the leading Japanese manufacturer selling at the $1,000 price point and its flatness of field at 1x leads all scopes I have tested, contributing greatly to its outstanding speed. I am also more pleased than I expected to be with the final reticle design. I did not have the luxury of having multiple prototypes made with which to hone fine design elements, such as the line widths, or with which to test novel features, such as the overlapping of the drop lines and mil dots or the power ring ranging feature. In the end, the power ring ranging proved to be faster and more accurate than I imagined it could be and the only change I would have made to the rest of the design would be to decrease the line width on the drop-indicating numbers. Given how many designs littered the cutting room floor, such satisfaction with the first physical product was not anticipated.
The only downsides to this scope are the slightly errant adjustment increments, the brightness limitations inherent with all reflected illumination systems, and the relative newness of the Optisan label in the American market. These first two factors are heavily mitigated by the reticle design and the third, well, nobody gets to start out as a household name with a huge distributor network. With scopes like this, I expect that will come soon enough.
Here is Your Pro and Con Breakdown:
Pros:
Mudskipper 3 reticle, the best close to mid range reticle ever designed
One of the fastest scopes tested
Distortion is minimal, has the flattest field of view at 1x I have tested so far
Clarity well above its price point
Build quality looks and feels high
Really excellent metal scope caps are included
At $600 it is affordable
Cons:
Adjustment increment is not accurate on the prototype (I am told they are on the production scopes)
Reflected illumination is never daytime bright
New brand

