
BigJimFish
Written: Sept 15, 2024
Table of Contents:
– Introduction
– Unboxing,Look, and Feel
– Optical Performance
– Laser Performance
– Other Onboard Sensors
– Ballistic Software
– Summary and Conclusion
– Background on Ballistics Calculation, Modeling, and Applied Ballistics Elite
– Background on How Laser Rangefinders Work
– Background on the Challenges of Getting Optical Performance from a LRF Bino
– Background GPS Mapping with BaseMap:
Introduction:
As you already know, the Sig Kilo 10K-ABS HD Gen II is Sig’s follow up to their blockbuster first generation Sig Kilo 10K-ABS HD rangefinding binoculars that I reviewed in 2022. At their release, the 10k’s more than doubled the effective range of any competing 905nm rangefinding product, added a first in class 304×256 pixel AMOLED display, featured a reticle that could be zeroed by the user, included Applied Ballistics Elite baked in, and could be used in concert with Sig’s Ballistic Data eXchange 2.0 system to automatically send range and drop compensating information to a BDX scope that would then illuminate pixels on the scope to indicate the aim point corrected for drop. For more on that, please reference my article on SmartScopes and the Sig BDX 2.0 system. I highly recommend this article as the BDX 2.0 system is a revolutionary product making successful long range target engagement remarkably simple and significantly more difficult to mess up under the stress of the moment. Of course, the Gen II 10k’s are part of the BDX 2.0 ecosystem just as their predecessors were.
With the second generation of Kilo 10k-ABS HD rangefinding binoculars, Sig looks to address the two largest points of users feedback. These were the blue tinted image caused by the notch filter for the display and the difficulty of manually adjusting wind speed and direction when using the binoculars without the smartphone app.
Having done a number of reviews on laser rangefinders with ballistic software integration now, I have identified some core background information that I believe is important to subject but not unique to any one product. I have moved this information to these background sections following the conclusion where they can be found by anyone who has not read any of my previous reviews but skipped by those who have read a previous review containing the same information such as the Leica Geovid Pro 32 review or Sig Kilo10k-ABS Gen I review. Future laser rangefinder reviews will also contain this information in this format. I think this will go a long way to streamlining my often overly long product reviews and I may try something similar on scope reviews in the future.
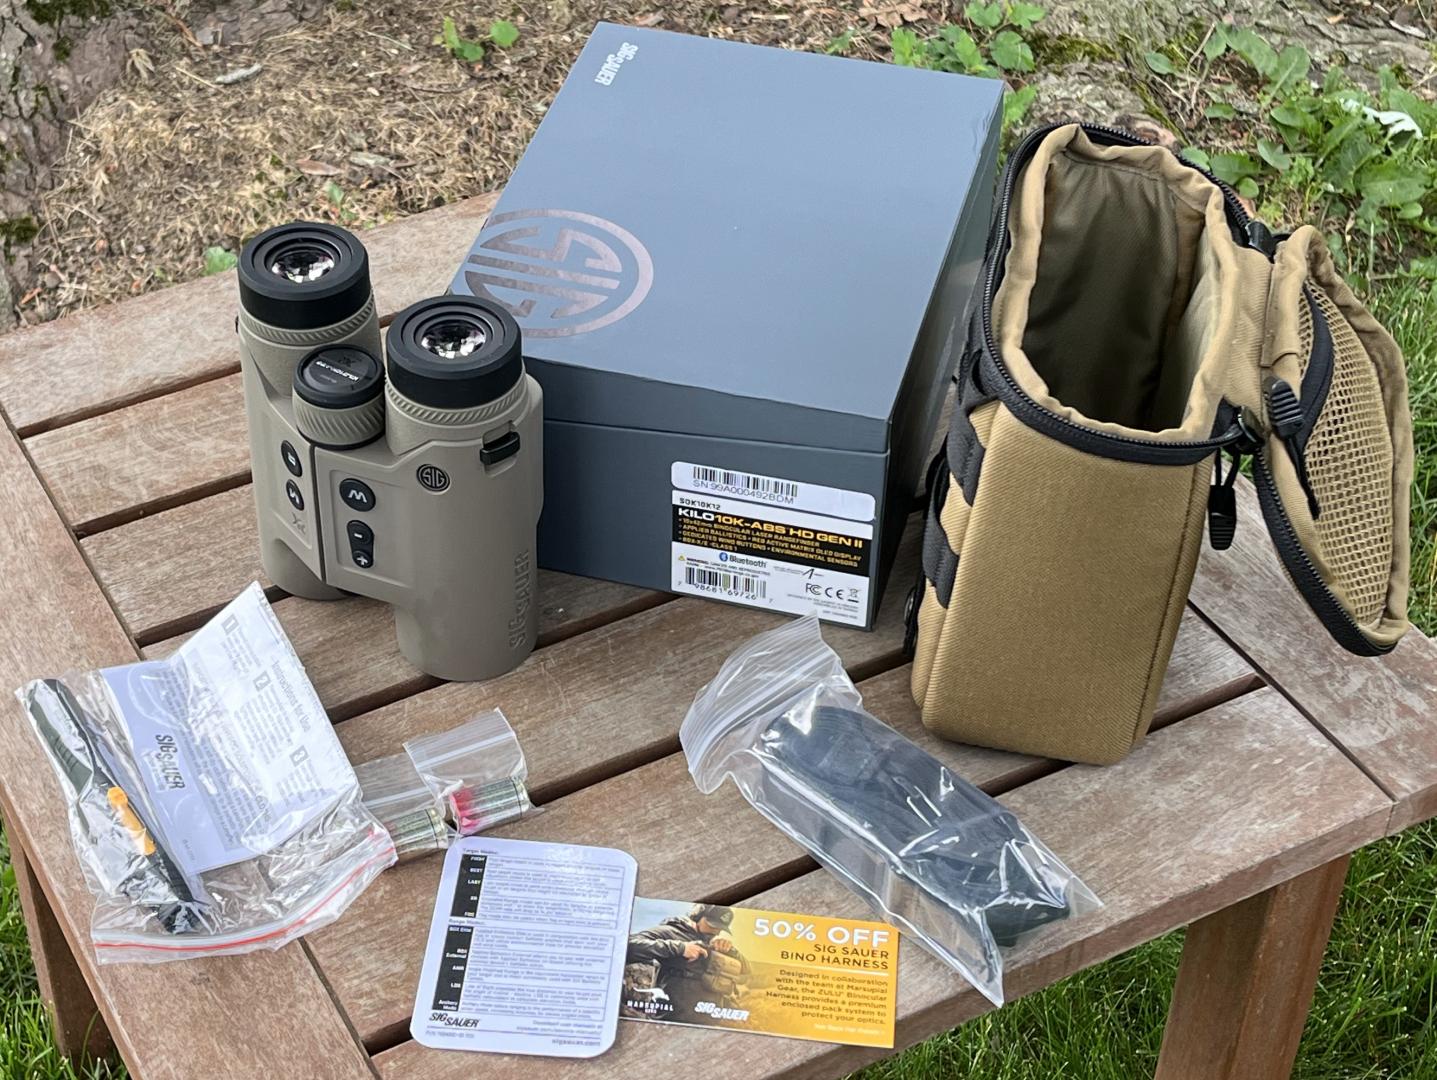
Unboxing, Look, and Feel:
Any user of Sig’s products will be unsurprised to learn that the Sig Kilo 10K-ABS HD Gen II binoculars come in a very nice looking premium Paperboard box with a hinged lid. Inside the box, the contents have changed a bit from the first generation 10k units. While the two included C2 batteries are the same, a lens pen has been added and the small owners manual has been replaced with a nice laminated reference guide with a nice quick explanation of some of the modes and a QR code to link to the manual. Oddly, the card looks about credit card / wallet size but is actually about 20% larger. I understand that having a wallet marks me as over the hill these days so I suppose that size differential will be meaningless to most users but it still seems strange to me. When using the link to the manual on the not quite wallet size card, you land at a prompt that directs you to all Kilo series manuals. Sig’s manuals are quite excellent and I highly recommend reading though the whole 10k manual. It contains many screenshots of the binoculars and application menus and is quite helpful in navigating the device. It is also likely to answer any questions you might generate that I did not address in this review. Sig’s manuals are, without question, the best in the industry.
Probably the most meaningful change in terms of included extras from the first generation is the omission of the WeatherFlow wind meter. This is probably not too surprising as integration of Calypso ultrasonic wind meter functionality within Applied Ballistics Elite looms and, based on posts I have read, few users of the first generation Kilo 10k units appear to have used the wind meter essentially finding it limited in range, time consuming to interface with, and generally more trouble than it was worth to integrate into their shooting process. Incidentally, the WeatherFlow functionality has not been removed from the Gen II Sig 10k binoculars or the BDX app. I have tested the previous WeatherFlow meter with the new Gen II binos and it works fine. I believe these included meters were normal WINDmeters and not a special edition, so, it is possible a $60 WINDmeter would work for those who really want that functionality.
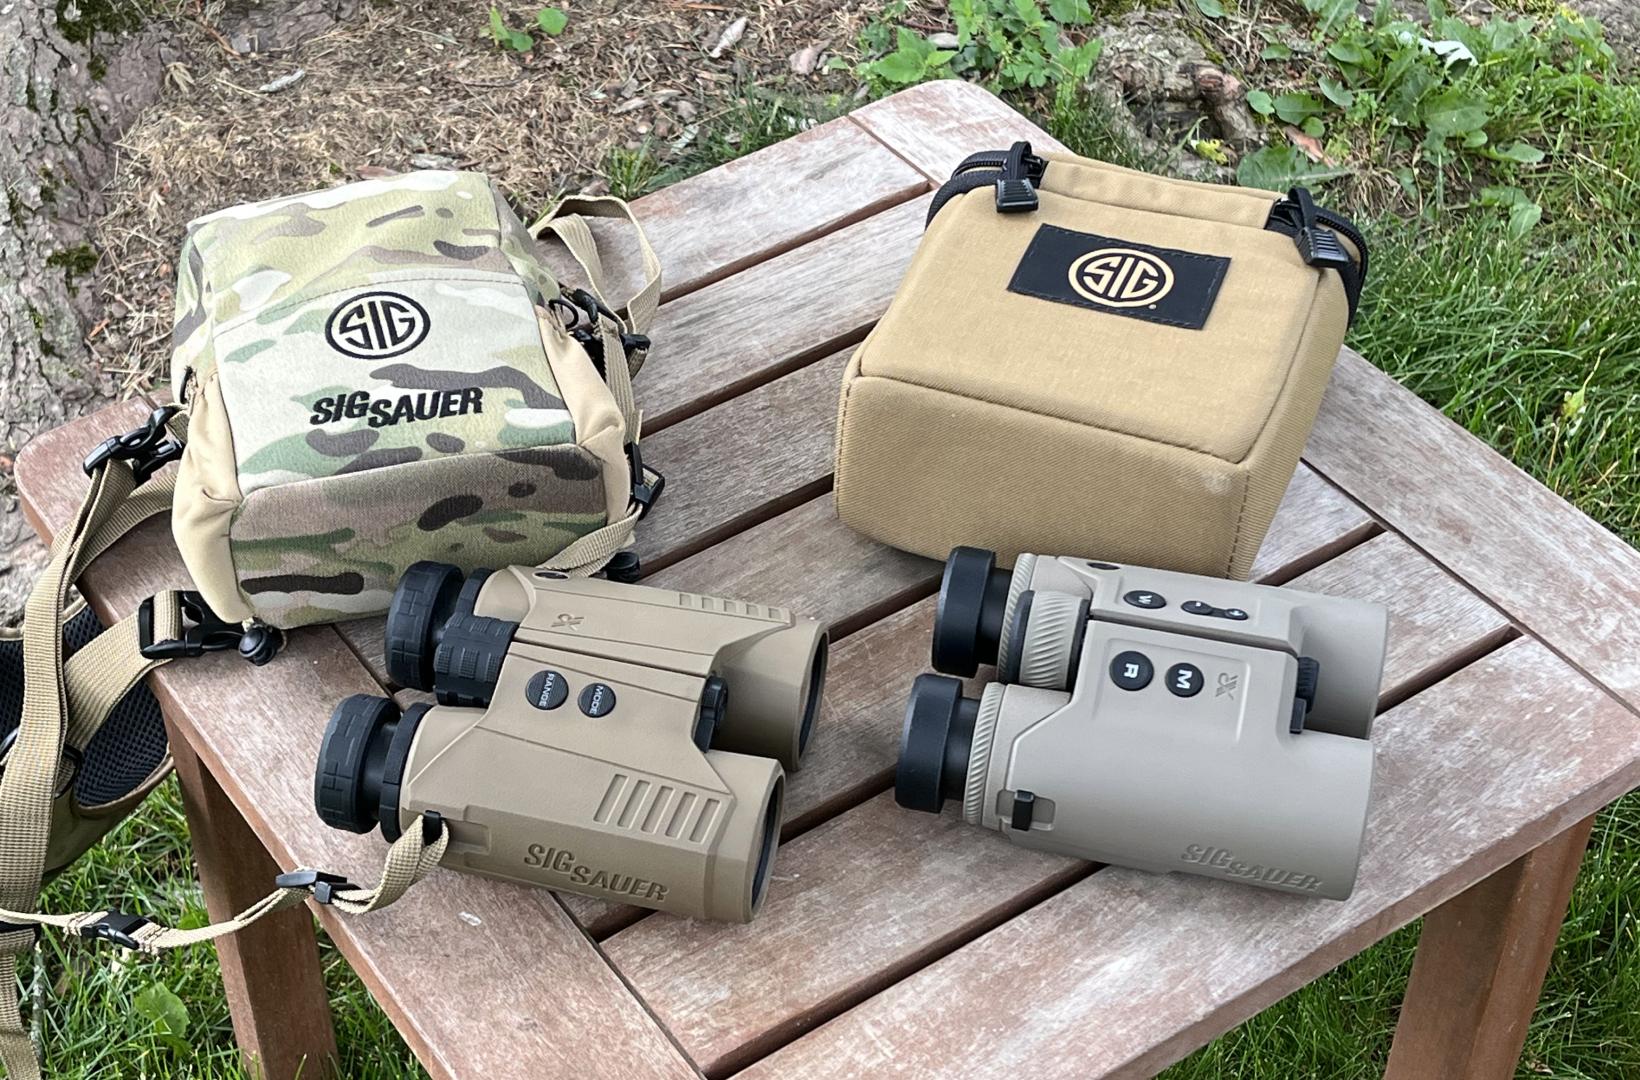
Also gone from the first generation 10k’s equipment is the binocular harness. This has been replaced with a case and a coupon for 50% of a Sig branded Marsupial Gear gen2 no-mag enclosed binocular pack (SOZBH202) through the Sig website while supplies last. While I do not like the Gen 2 marsupial gear bino pack near as much as I did the Gen 1, this is still a very nice coupon and a good compromise for those who would have preferred a binocular harness such as the first generation Sig 10k came with to the case the second generation comes with. Choosing what type of case to include with a set of rangefinding binoculars is quite the dilemma for manufacturers as different product use cases argue for very different case solutions. For range use and storage, a simple padded case is best whereas, for hunting use, a harness is likely preferred. Sig has chosen a nicely padded simple case with very good quality construction. This is not surprising as Marsupial Gear manufactures it for them. The case has a small mesh zipper pocket in the inside of the lid and has MOLLE loops on the back. I certainly don’t mid the choice of a well manufactured simple case that is excellent for storage, transport, and range use in place of the binocular harness. However, the zipper closure top with no latch does not allow you to carry the pack with the strap protruding out for use. I find this unfortunate, as this is how I often carry optics too and from the range and even how I tend to store them. Also, the pocket would better on the outside of the padding and accessed from outside the case as the fragile lenses are better protected in this way. You don’t really want the battery you are likely to be carrying in the pocket to be directly on the eyepiece if you drop the case. This is especially true since the 10k’s do not come with the typical thick rubber eyepiece cover that often comes with binoculars. Of course, a carry strap is also included to carry the binoculars with. It’s a pretty perfunctory example, with no padding and an unusual attachment system utilizing small plastic HK-style snap hooks that attach to the binoculars with little sewn loops.
Stylistically, the Gen II 10K binoculars are a pretty significant departure from the originals. Gone is the cammo on the harness, replaced with a tan carry bag. The FDE on the original binoculars has been replaced with tan on the Gen II units. Most of the aggressively styled knurling everywhere present in the original binoculars is now toned down. Knurling on the Gen II unit is much more subdued. In most places this is purely aesthetic. However, when it comes to the focus wheel, it’s a substantial function improvement as well as the new knurling is much easier to turn with just one finger as the large flats on the first generation units were not great for this.
Despite the change in styling, the Gen II 10k units are very close to exactly the same dimensions as the first generation. They have the sort of blocky feel common in rangefinding binoculars and users with small to medium hands will find the controls a stretch for single-handed use. The updated knurling on the focus knob is a substantial aid in this over the first generation units but it is still a bit of a reach and a little on the stiff side. The 10K’s are simply a better fit for two handed use with my medium sized hands.
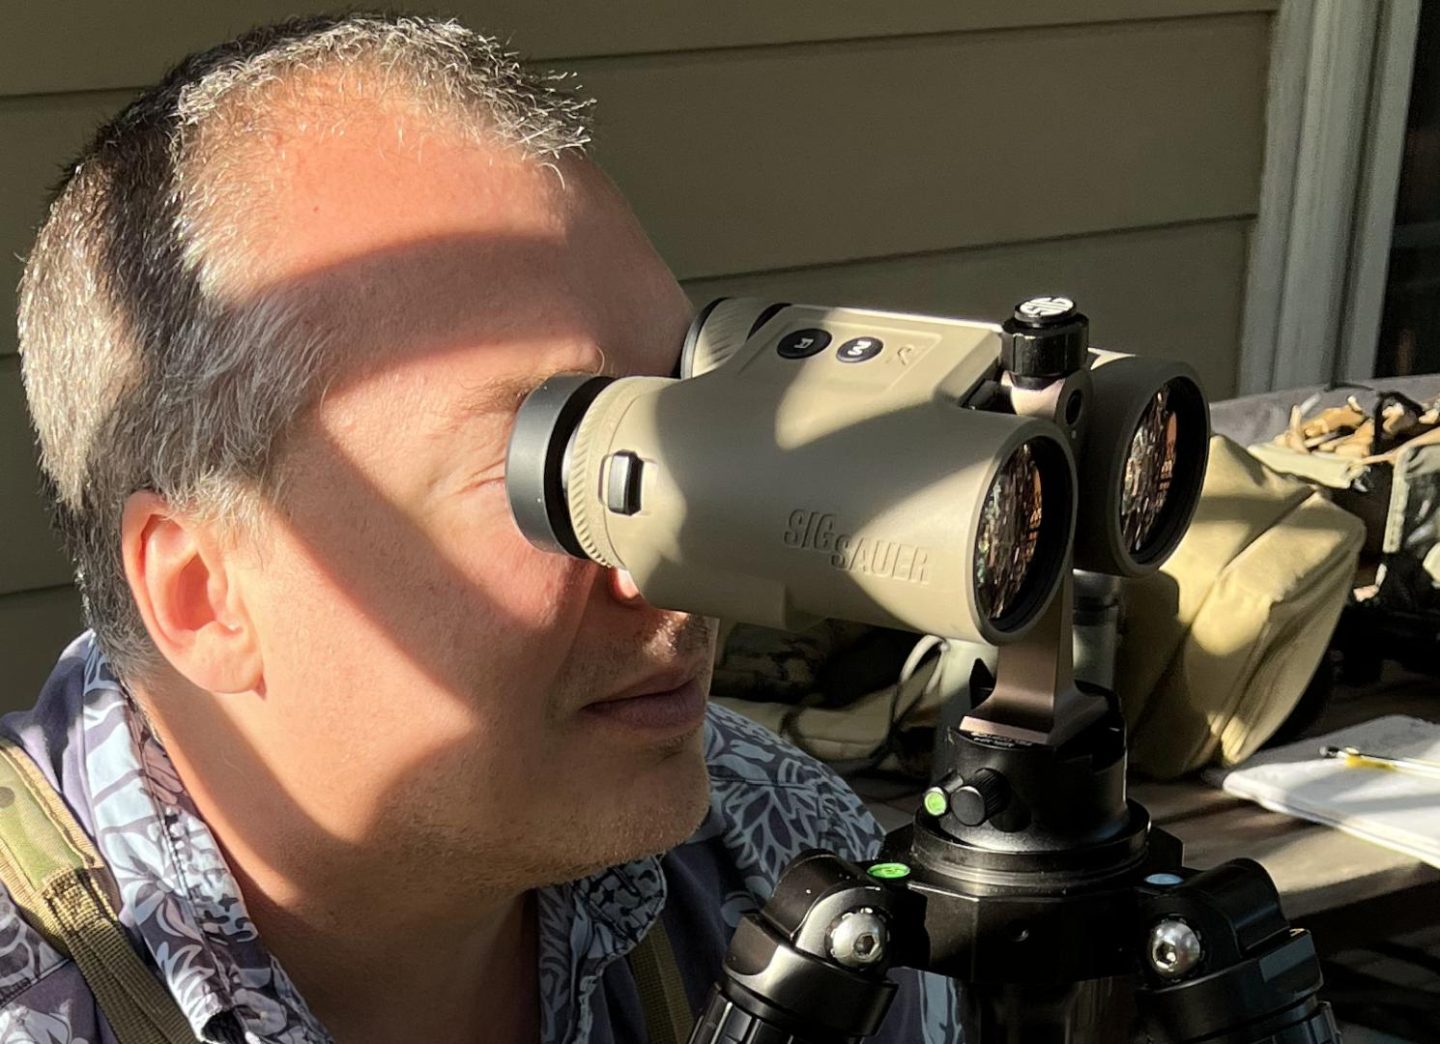
The change in styling for the Gen II’s has made mounting of a cinch tripod adapter easier in this generation as the rubber armor on the objective area has had the facets and angles removed and is now completely round. Sig still includes a tripod mounting stud behind the decorative Applied Ballistics logo in the front of the hinge point for their tripod mount as well. I picked up one Sig’s Zulu bino adapters to try out with this during this review. I ended up preferring both the cinch strap type solution and just holding the binos on top of a bag on the tripod when ranging. There was a good deal of play with the Zulu adapter that made it hard to get it to stay where you wanted it on target when ranging. It’s cant adjustment also did not get very tight, and it was a PITA to have to remove the base of the adapter and stash it somewhere to fit the binos back in the case. The adapter probably isn’t a bad fit for bird watching but wasn’t great for trying to precisely aim a rangefinder off of a tripod.
As with the first generation 10Ks, the Gen II units have three position twist up eyecups and a little less eye relief than most binos of similar size I have used. The Eyecups are 1.858” in diameter. This is a little smaller than the knurled styled ones on the Gen I units and I found they felt a little more comfortable despite the difference being miniscule. As with other rangefinding binoculars, both right and left lenses have a diopter on them. Both of these are non-locking on the 10Ks but are stiff enough they are not going to move inadvertently. Another improvement since the first generation 10K binoculars is the tooless battery cover with integrated T-handle. Not only does this keep you from having to dig for a coin or Leatherman, but it also makes it much easier to get the cover straight and not cross-threaded when you put it back on.
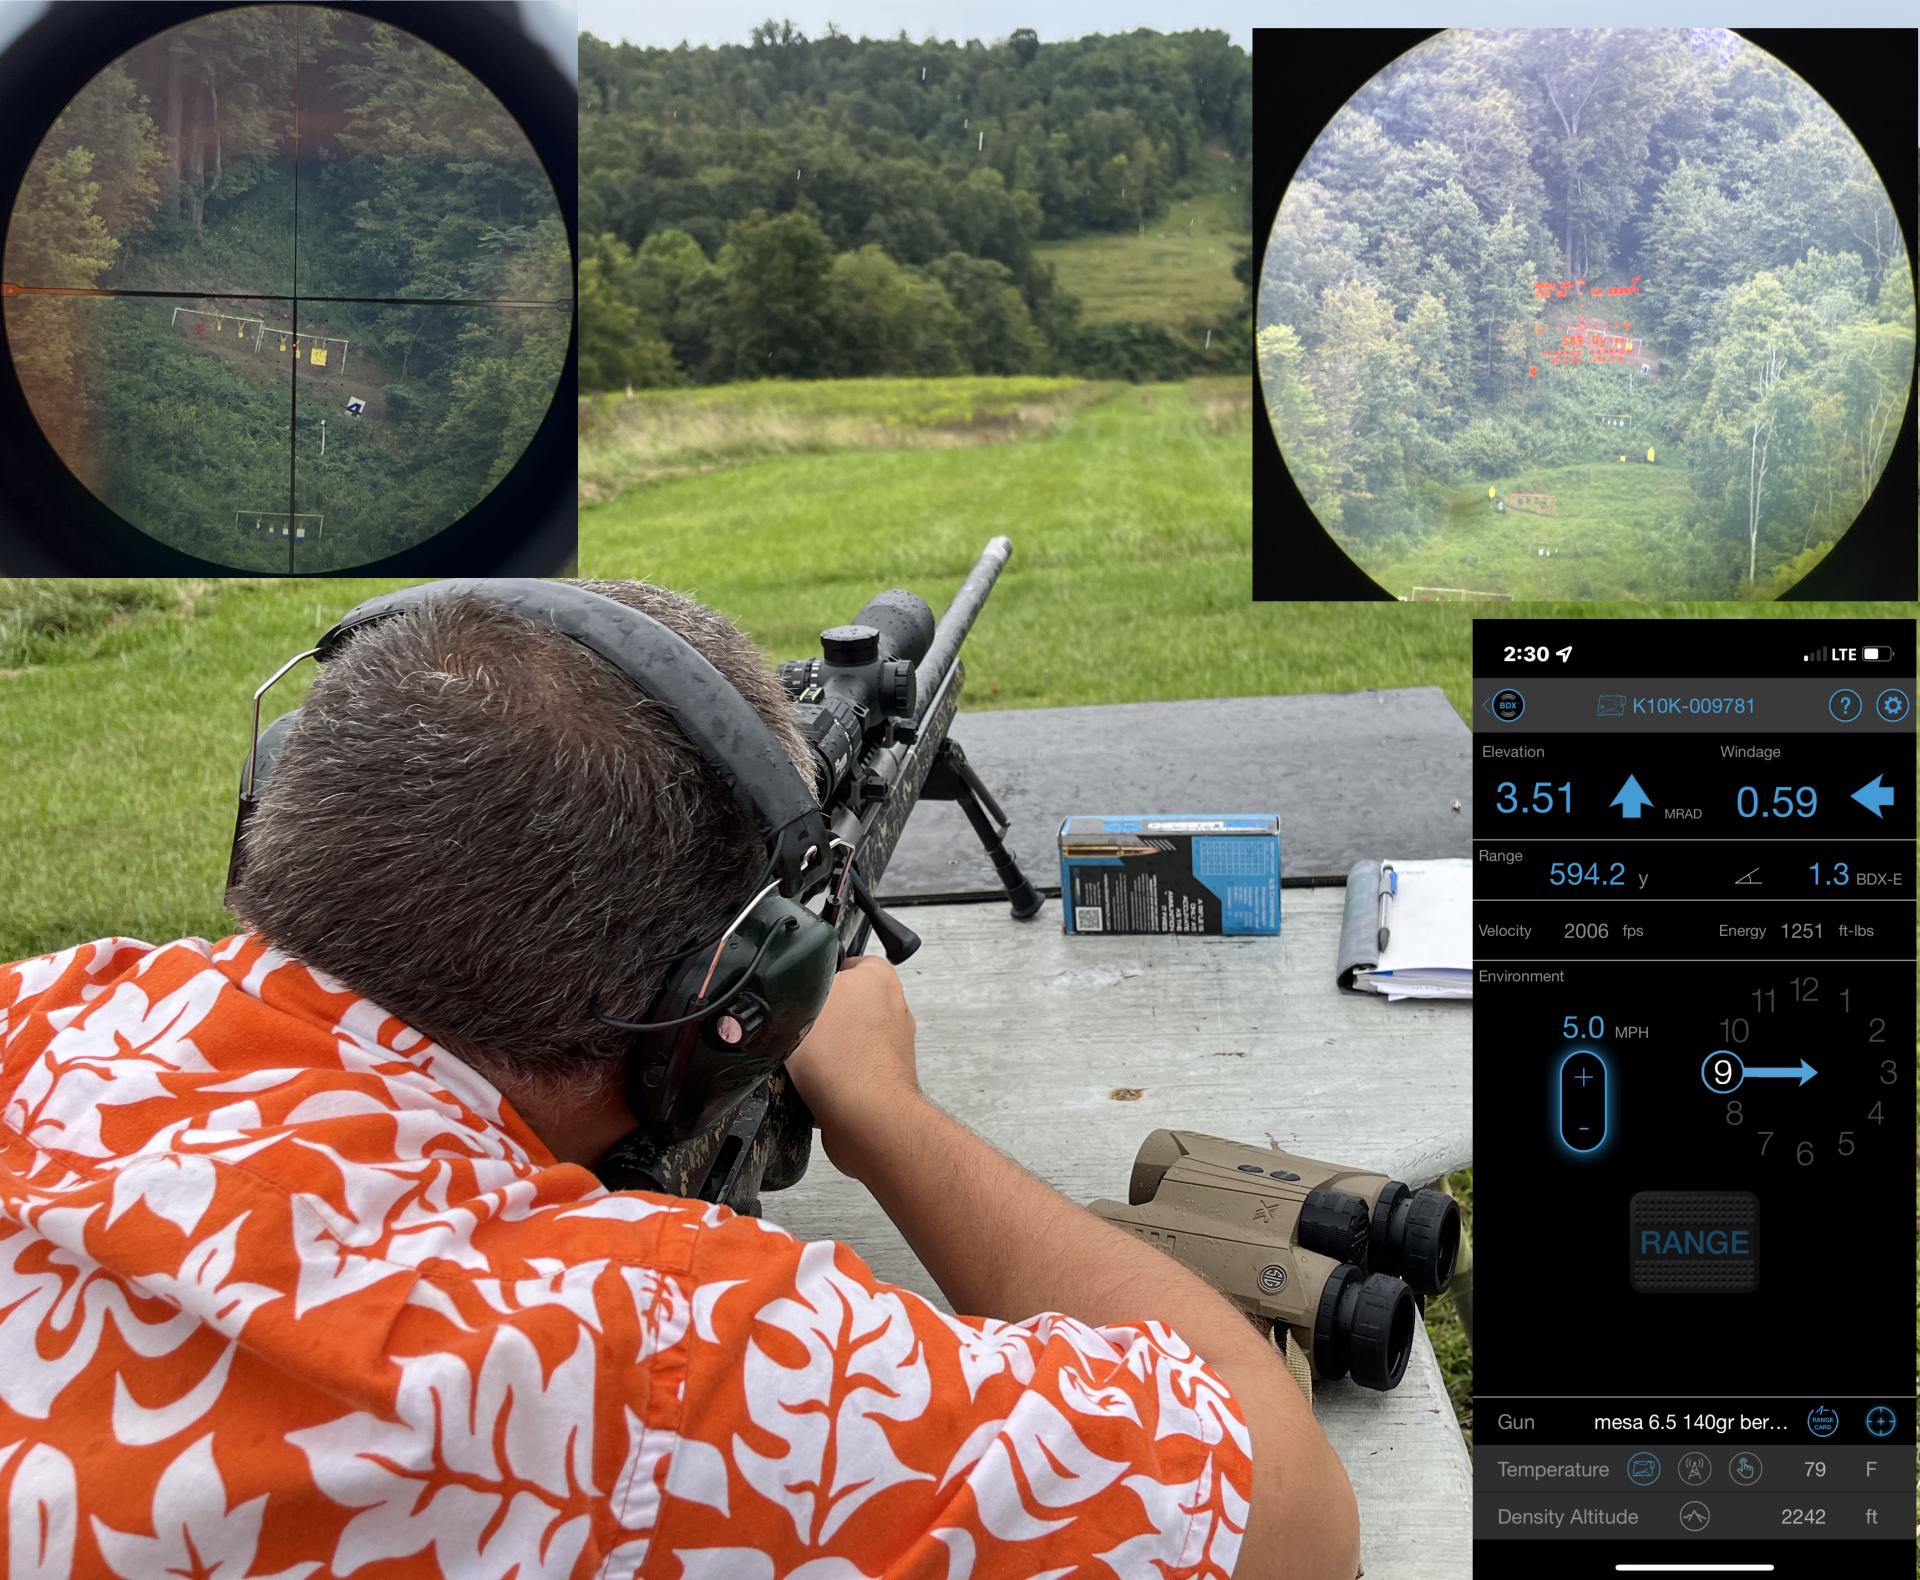
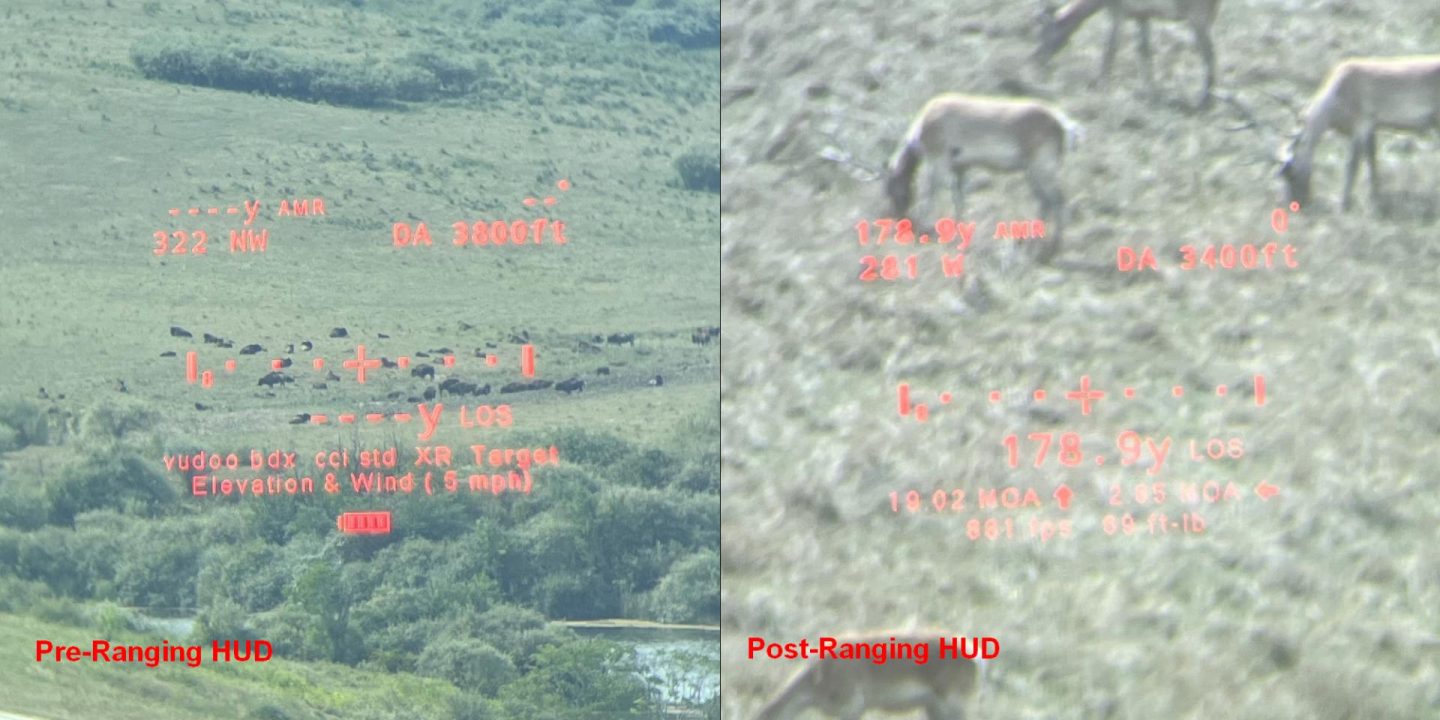
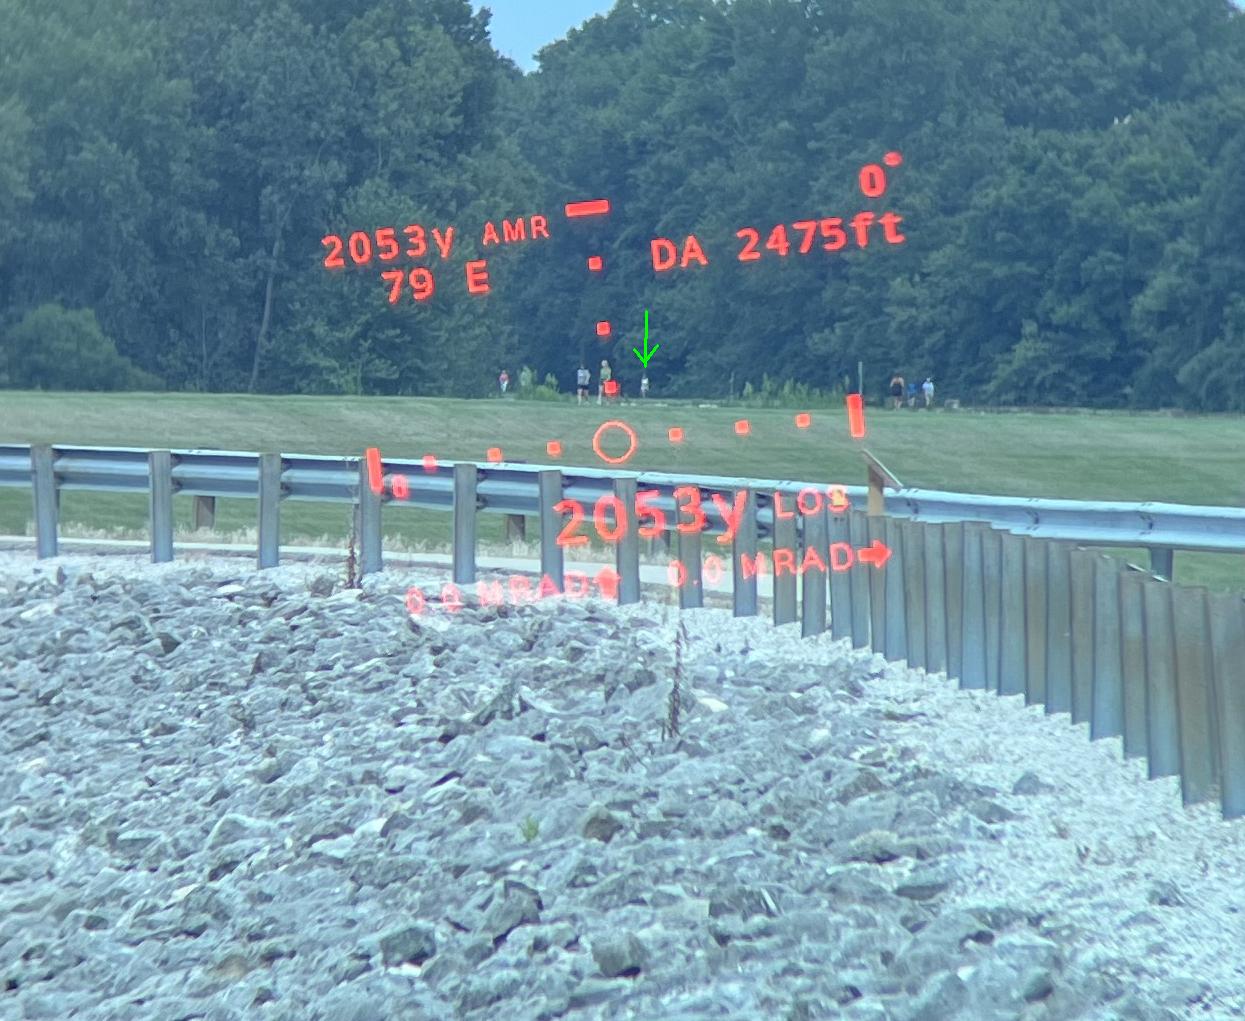
As with every other range finding bino I have encountered, the rangefinding display in the 10ks is in the right barrel only. This display is quite complete. As pictured below, you can see that the pre-range main display includes the bearing, density altitude, reticle, ballistic profile loaded, target mode, wind setting, and battery remaining. The screen brought up after ranging is equally complete and includes angle modified range, inclination, bearing, density altitude, reticle, yards to target, drop, windage hold, velocity of the round at target, and energy of the round at target. This incredibly complete HUD is made possible by Sig’s unique 304 x 256 pixel AMOLED screen. I should note that originally I thought the display in my test binoculars was canted a couple degrees counterclockwise. You will note that it appears so in most of my images. This is because I have a giant head. The display is leveled for the average, 66mm inter-pupillary distance. Mine is 75mm and adjusting for this tilts the display. This is more noticeable in the Sig than in other binos because it features long lines of straight text and also a reticle with a crosshair. There are no functional impairments resulting from this melon head induced display cant. Sig’s pixel-based display makes possible the excellent onboard menu system which does not need to use obscure three letter acronyms you will inevitably forget for everything. The menu makes it easy to utilize the binoculars without being connected to the BDX application in the field. This is even so when needing to use multiple ballistic profiles, as the binoculars have the memory to store thirty profiles. The displays and menu system are simply excellent. As a result, in the two years since I reviewed the first generation 10k unit I have almost exclusively used it as the rangefinder and ballistic calculator on trips to the range and almost never had it connected to the application while doing so. The display also makes it possible to have a function allowing the user to zero the reticle within limits. This is quite nice as rangefinder beams are seldom perfectly aligned with the reticle and users often have to memorize their alignment or keep a little cheat sheet in their binoculars case in order to remember the optimal aim point. You will find the zeroing function for the 10ks under the settings gear in the upper right of the rangefinder page in the BDX phone app. It is near the bottom and will bring up an alignment mode operated through the phone. You can adjust plus or minus five increments in both the vertical and horizontal. On the first generation 10k’s this allowed me to zero the reticle. Unfortunately, this gen2 set is a little further off and I need around 4 more increments in the vertical. The resulting best zero setting places the true aim point near the top of the central plus sign on the reticle I chose.
The last thing I will talk about in this section is the three new buttons added to the left tube that were not present in the first generation 10K units. These were a big request of competitive shooters and allow for rapid input of wind data without having to be linked to the phone application. Previously, this function was buried under two different functions in the main menu system. There was one menu option for wind speed and a second for direction. On the Gen II, when in quick mode, you can just hit the plus or minus keys on the left barrel to change the wind speed and tap the W key to bring up a direction menu where the direction changes with the plus and minus keys. There is also a hunt option for the wind keys found under the feature settings. This mode requires holding the W key to start a mini wind setting wizard. Either setting is quite intuitive and tremendously quicker than was previously possible. The new wind keys can also be used to navigate around in the main menu with the plus and minus keys moving your selection up or down and the wind key acting to select options. This is an improvement over the previous system as you can move up and down in the menu now whereas previously you could only move one way and had to go all the way around if you clicked past the option you wanted.
Optical Performance:
The feature in bold on Sig’s 10K Gen II page is the reduction of blue tint. Without question this is the biggest change from the Gen I units. So, we may as well start talking about optical performance by talking about tint. After all, the first Gen 10K’s review did. Of course, it’s different this time. The Gen II binos don’t really have any perceptible tint to their image under natural conditions. If you want to perceive any tint at all you really have to create synthetic conditions such as looking at a white wall under indoor lighting and then switching back and forth between the right side that has the notch filter and the left side that is without one on the Gen II units. Under those conditions, you can verify that there is a notch filter. You already knew that though. All rangefinding binoculars have a notch filter. This time though, you won’t see any tell tale tint in real world use. It is that big of an improvement.
As with my review of the Gen I 10K binos, I took quite a few different comparison photos of different scenes in order to put together a comparison photo that I believe well illustrates the blue tint in the Gen I binos. In this case though, the comparison is with the Gen II units. These photos have not been post processed in any way beyond resizing, gluing together and labeling. Fun fact about the suspicious looking bushy central dark green tree in the images, just as in the famous Monty Python “How not to be seen” skit, there are in fact two people in these photos not being seen. They are behind the dark central bushy tree, not being seen. They did not suffer the fate of any of the people not being seen in that Python skit, a skit you will probably now be googling, for which you are welcome.
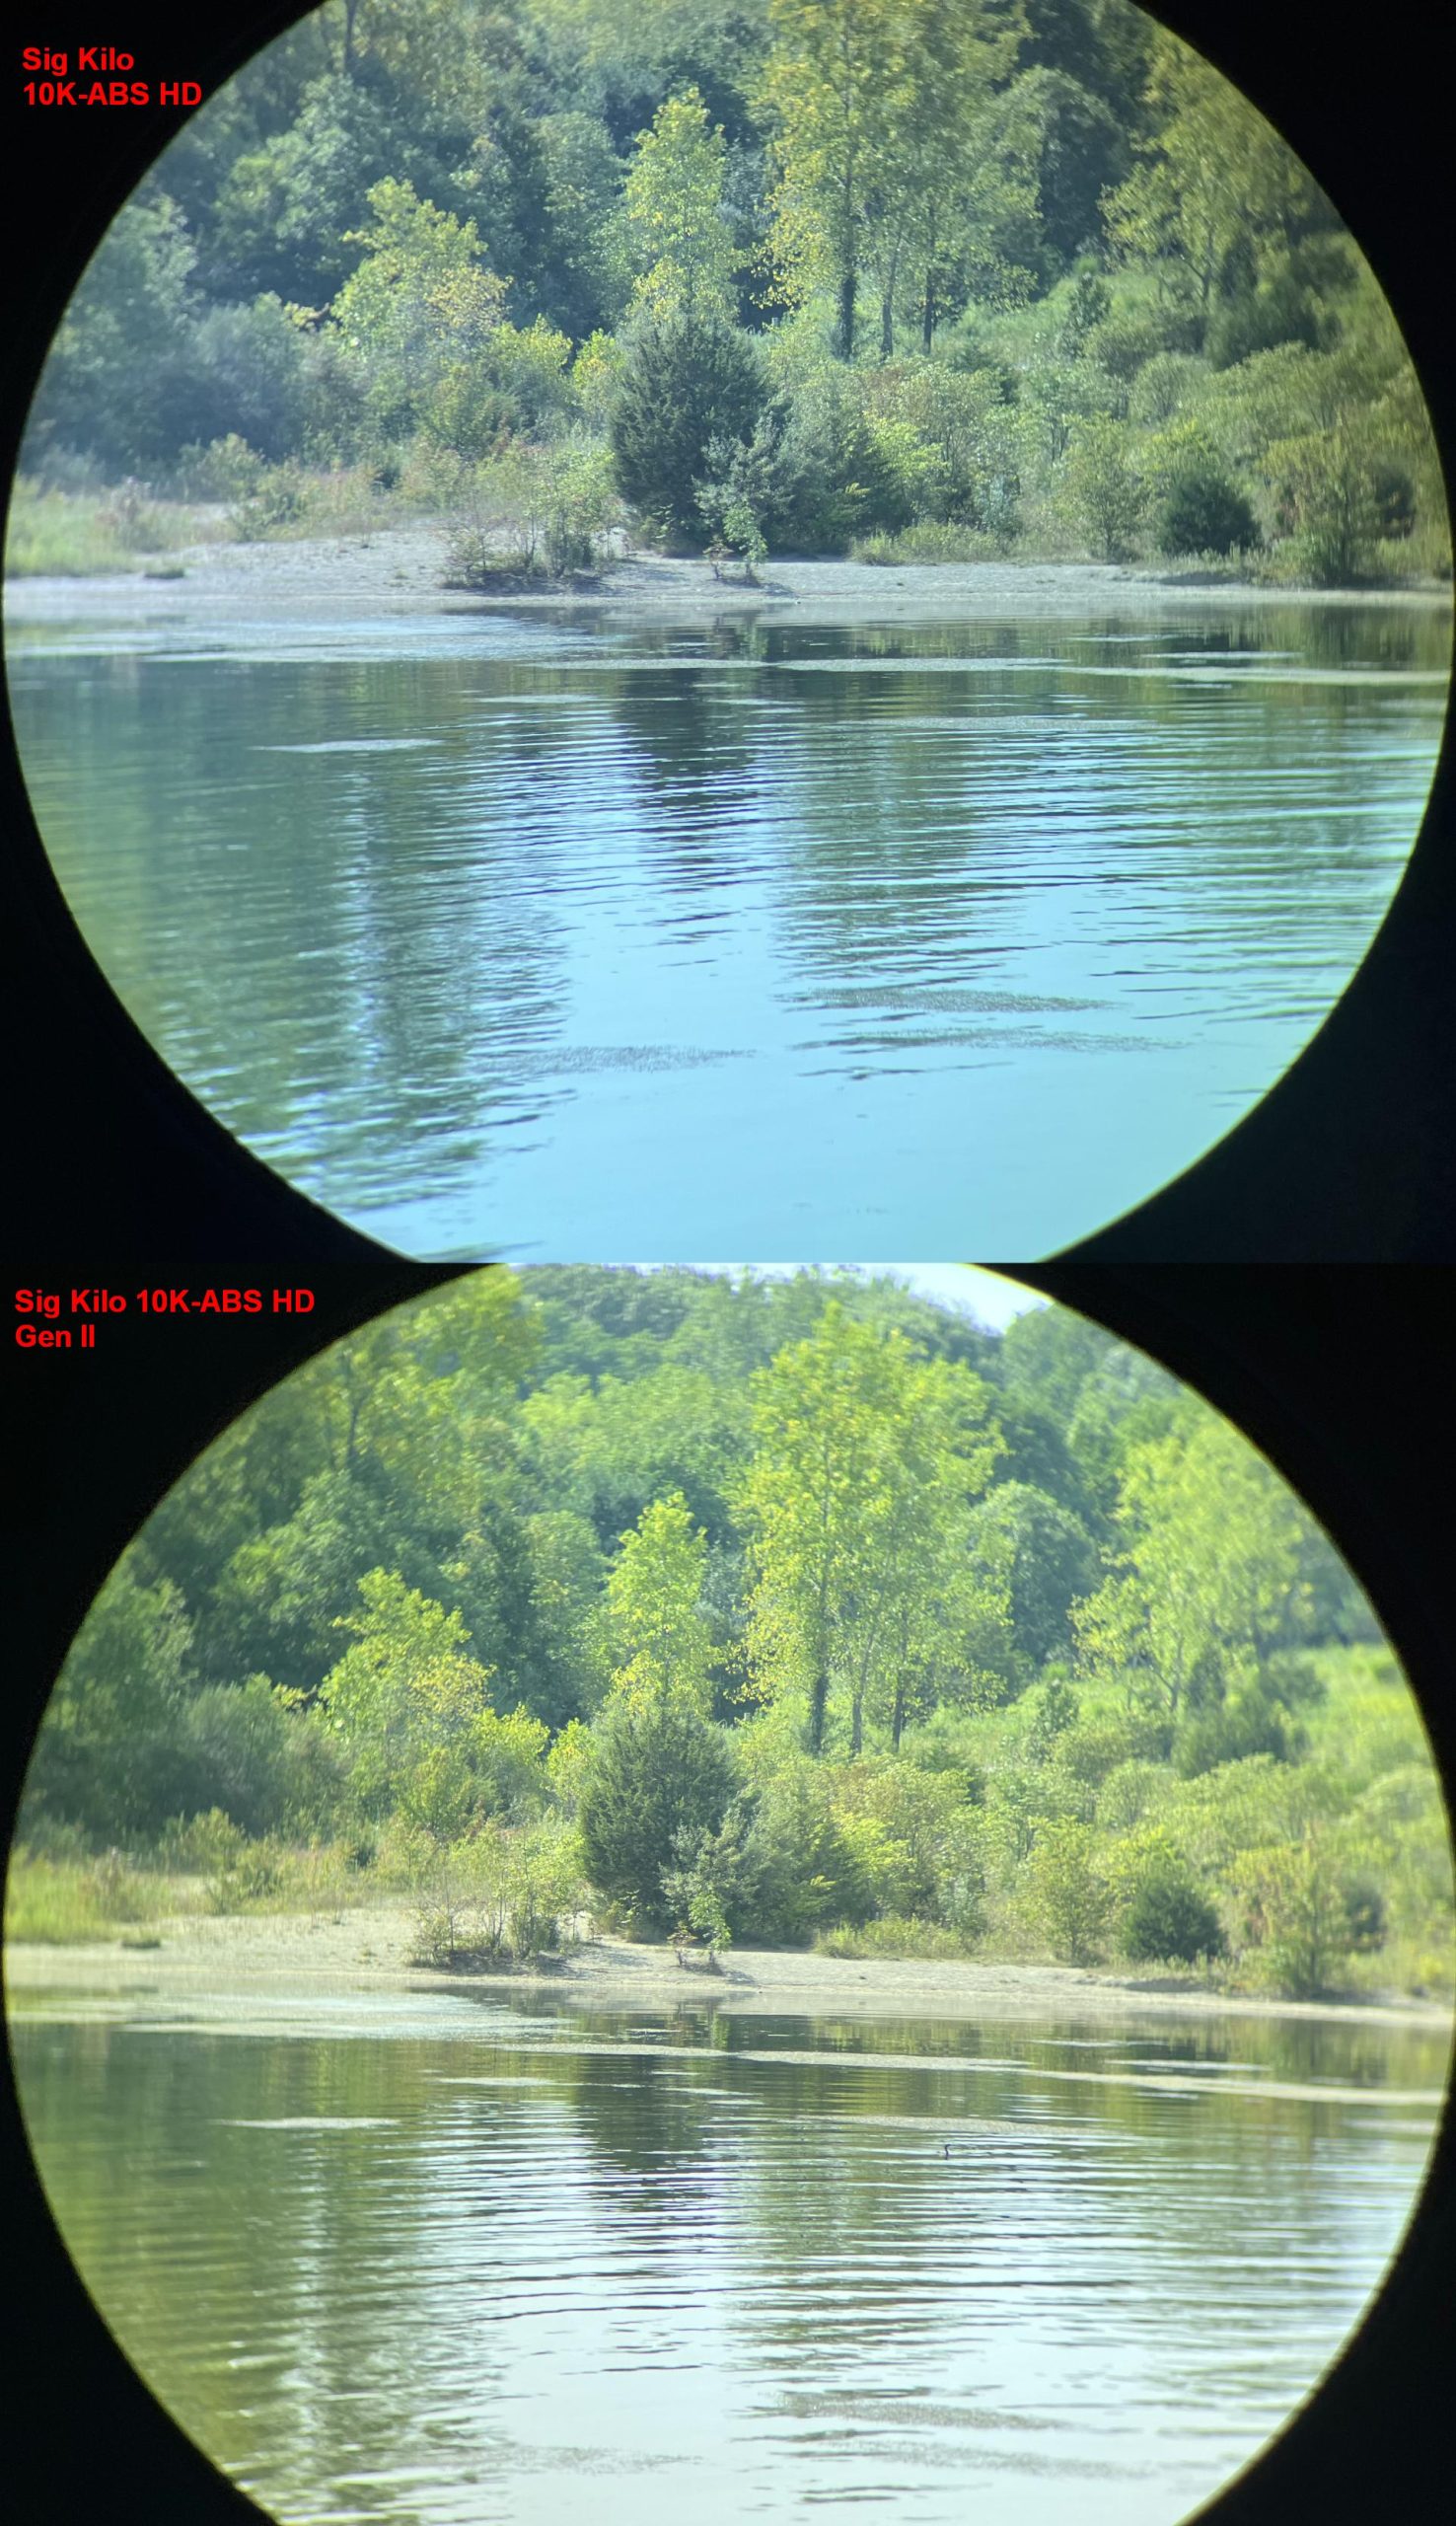
The thing that struck me most in using the Gen II units as compared with the Gen I units was not specifically the absence of the blue tint, but rather how much more vibrant the image appears. I hope that I have captured that in the comparison because it changed how I feel about the optical performance quite a bit. The first Gen 10K units performed pretty well on most of my specific optical testing. These are tests to determine resolution, chromatic aberration, contrast, Depth of Field, and edge-to-edge clarity. I placed them as a little behind Zeiss Conquests and about equal to Vortex Fury 5000’s in overall optical performance. My conclusion was therefore that the tint really wasn’t a big deal. It didn’t seem to block much light as the low light performance was fine relative to other 10×42’s and it didn’t seem to be impacting any of the other performance metrics much either. Testing with the new Gen II units indeed supports that original line of reasoning. Both the Gen II and Gen I units are essentially identical on resolution, chromatic aberration, edge to edge clarity, etc. They basically look like the same optical system without the noticeable blue notch filter.
My conclusion about the blue not being a big deal based on that reasoning was nevertheless incorrect. Just look at how much more vibrant the Gen II image appears and how the blue tint makes the Gen I image appear gray and flat. It may not show up on the metrics, but in terms of user experience, it was a big deal. I came away from the first generation units finding them optically mediocre. They were adequate as a rangefinder and it was worth it as a tradeoff with the excellent 304 x 256 pixel AMOLED display but they were not something I enjoyed as binoculars per say. Had I been rating them as binoculars alone, not knowing they had a rangefinder function that was downright spectacular, they would not have done well. The view though the Gen II binoculars on the other hand looks much more vibrant. I actually like using them as binoculars. On optical testing they are still behind the Leica Geovid Pro’s and the Vectronix Vector X’s by exactly the same amount the Gen I units were but by producing a bright and vibrant image they feel closer to those units when your using them in they field than they do to the Gen I unit. The blue being banished is a big deal. I’m glad they were able to accomplish it and I’m sure it is worth whatever higher battery consumption it costs to boost the display brightness. I might add that the battery consumption of the AMOLED display is actually tremendously less than that of the traditional segmented LEDs anyway. The AMOLED takes something like 1/20th the power and this shows in the very long battery life Sig 10k units have.
Laser Performance:
The statistics Sig lists on its website for the Kilo 10K-ABS HD Gen II laser rangefinding binoculars are exactly the same as for the first generation units. These are: ranging performance of up to 3k yds on deer, 4k for trees, and 10k for reflective targets. The laser is listed with a beam divergence of 1.5 x .06 MRAD and is 905nm. The only difference on the spec sheet is the Gen I units were class 1M and the Gen II are class 1. I inquired and this change was to comply with new European regulations. In concert with the change to laser output some changes were made to the FPGA that processes the returns. Combined, the net effect is expected to be a little better rangefinding performance. In side-by-side testing with the Gen I unit, I saw no performance difference between the two units. So, whatever changes were made in the laser emissions and return signal processing schemes are not major.
At the time the first generation 10K units were released, their rangefinding performance was downright shocking. Essentially, they ranged similar targets in similar conditions between 1.5x and 3x as far as the best competing rangefinders, as exemplified by the Leica Geovid Pro 32’s, depending on the specific target and conditions. They did this with a laser that itself was pretty similar to the competing units but by using more laser pulses spread out further from each other over a longer time and using an improved algorithm to process those pulses. Sig calls this the Gen II Lightwave DSP Ranging Engine. Despite the sophistication of this engine, Sig further incorporates five target modes allowing the user to utilize some processing facility of his or her own in choosing a mode best suited for the conditions. These modes are first, last, best (the basic default), XR (extended range), and fog (should be called fog / rain / snow). These modes can change both the laser pulsing scheme and the signal processing to enable better performance in some niche scenarios. The XR and fog modes are particularly useful in their niches.
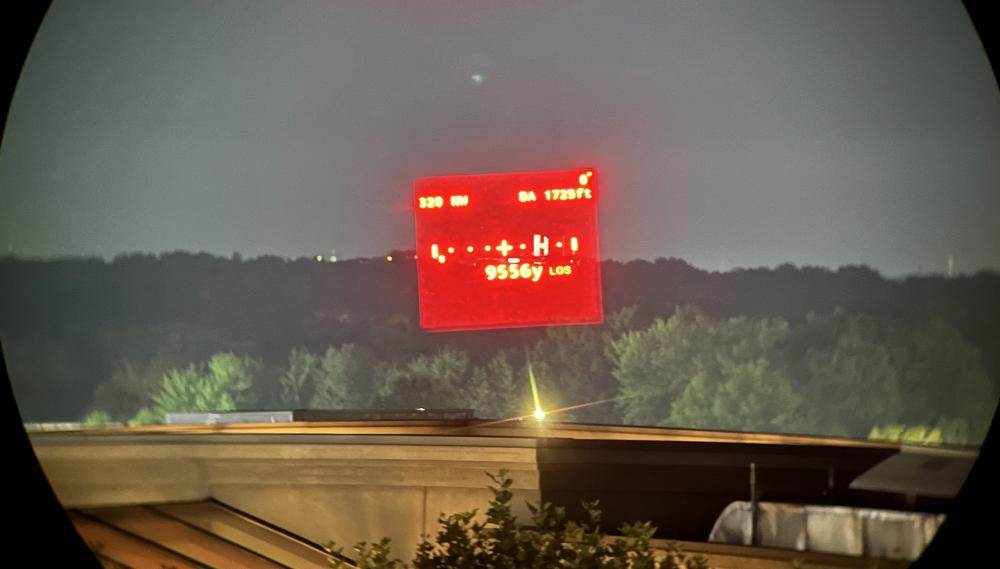
I may as well start out the rangefinding testing examples with the nighttime Budweiser tower range. I was able to back up a few yards further on the parking garage this time and so the range was 9556 yards. That is 5.43 miles in case you curious, as I was. This is not at all a difficult range to get on the 10k’s under night conditions. They will return a value every time. The interstate goes right by that tower and I drove by it on the way to the parking garage to take that range. It’s a ten minute drive from the tower to the garage despite almost the entire rout being freeway. That really puts things in perspective. Of course, ranging a massive factory at night, when you have essentially no background radiation, is an impressive feat, but not the most important data for prospective users.
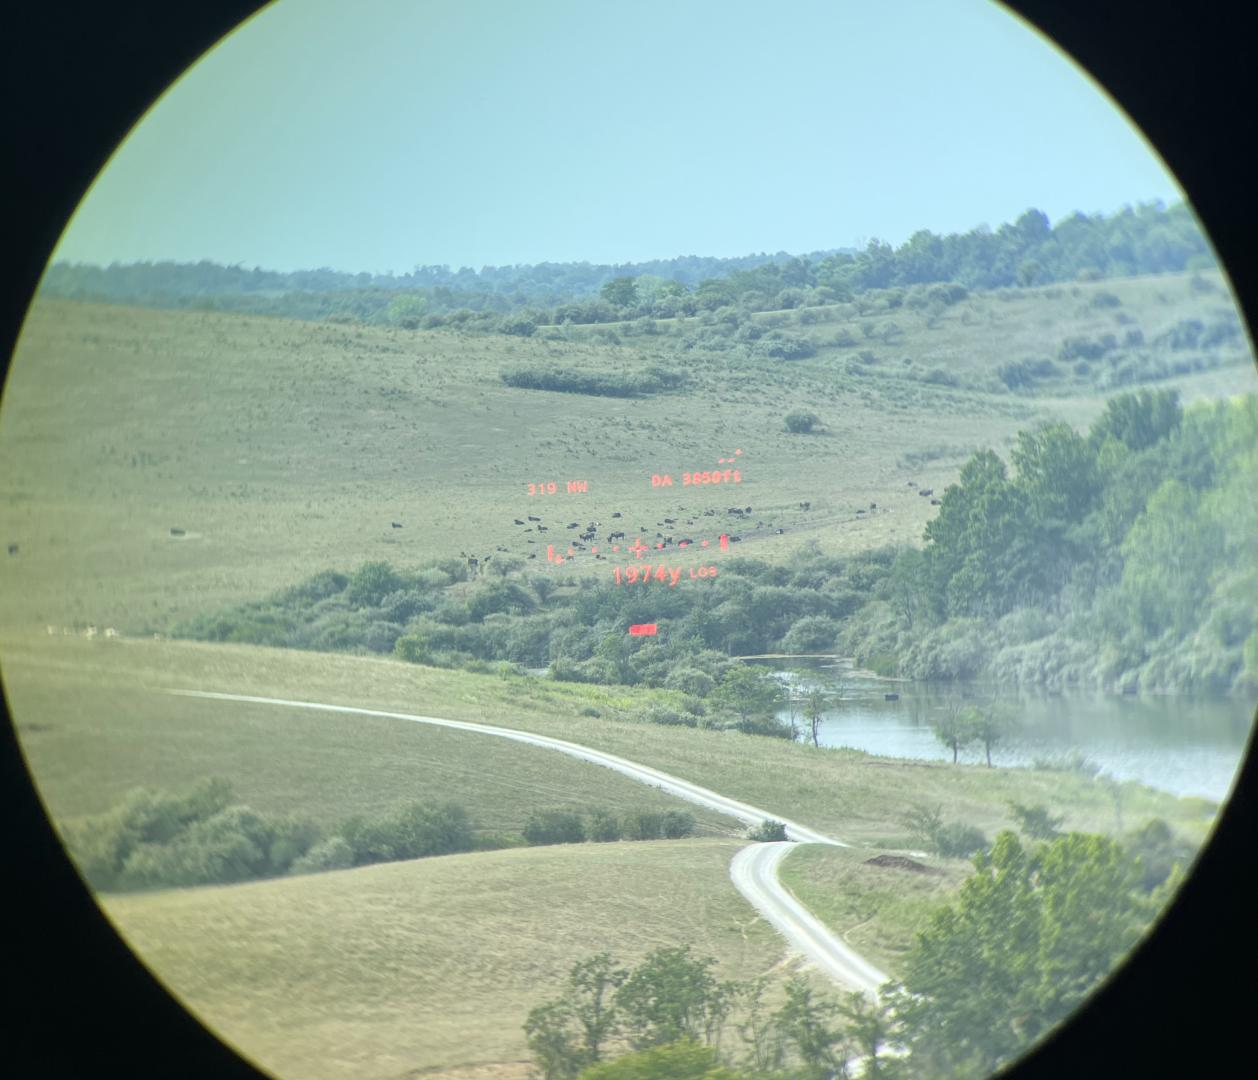
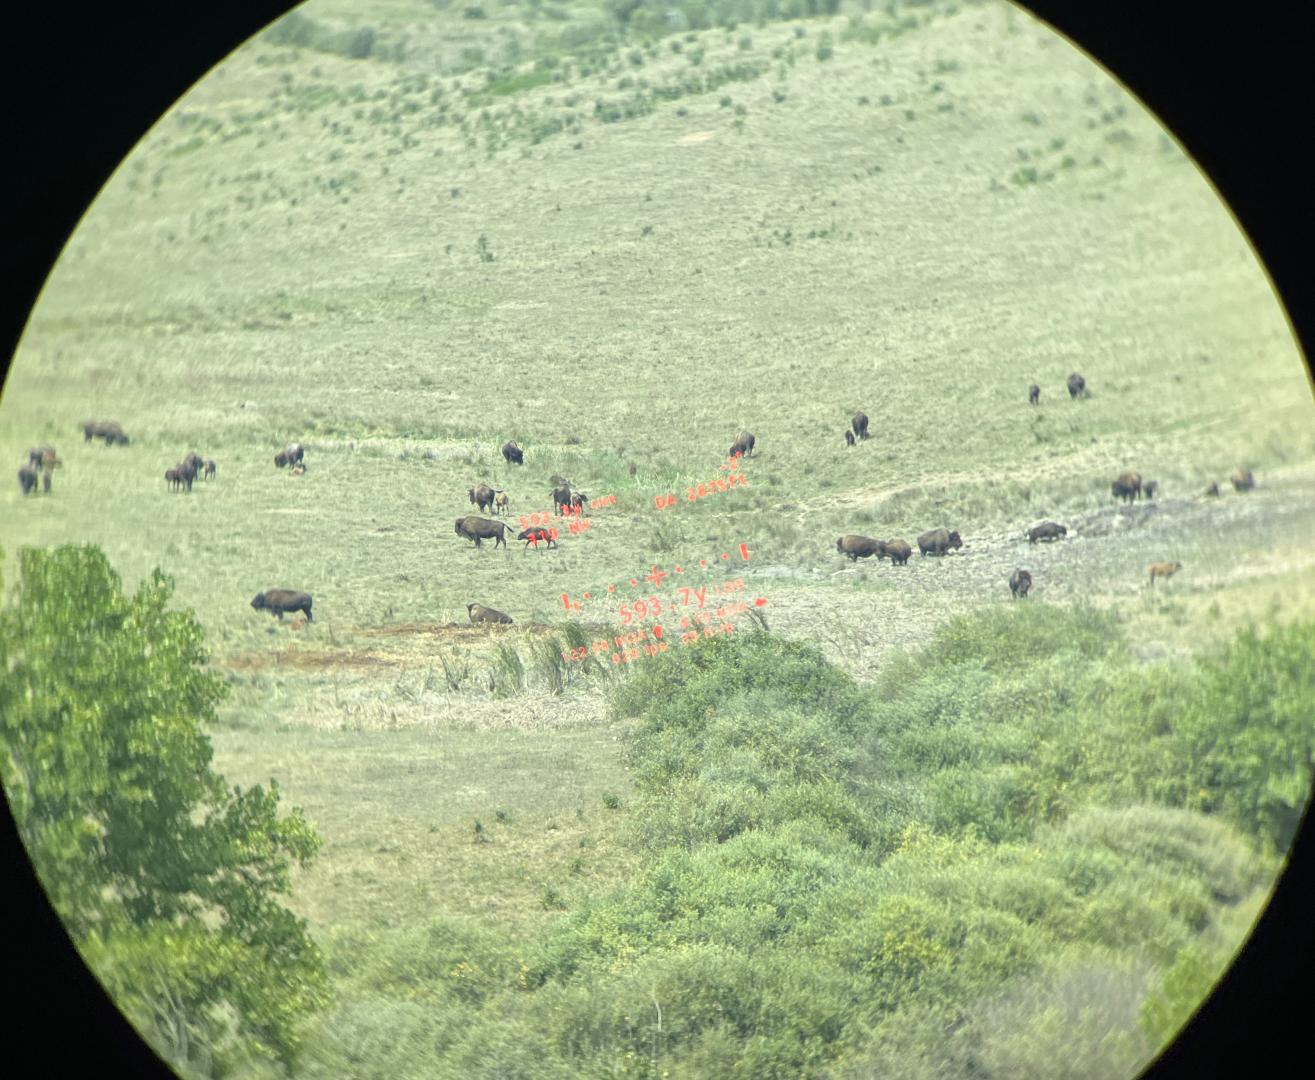
In the specifications Sig lists performance of up to 4k yards for ranging trees. In addition to being able to do this on overcast days as I was with the first generation 10k’s, I was actually able to get pretty close on a sunny day as well. To be clear, the first generation 10k’s also ranged near 4k on this particular sunny day. For some reason it was just not a difficult as other sunny days have been in the past. This was probably because the temperature was lower than on most other testing days leading to less stray infrared radiation. Conditions matter a tremendous amount and how difficult they are is not immediately obvious to the user. For instance, on a different, very difficult day, I struggled to range a heard of bison on a well-defined hillside at 2,000 yards. Bison, hillside, getting anything was something like a one in twenty attempt proposition. On that same day, ranging trees on the hillside behind them at somewhere around 2,300 was not happening at all. Conditions are very important for any laser rangefinder. For the common 905nm lasers most rangefinders use, the hotter and brighter it is the more difficulty you will have. I’ve spent some time experimenting with this and it appears that you can improve your results aiming at something that is shadowed near the target if possible. This can even matter more than how hard and reflective the target is at times. Of course, if you can get something shadowed and hard like a big rock or tree trunk that is best. Pick your target well. Also, I have noticed multiple rapid ranges yield diminishing chances of a return. I expect this either has to do with either heating up components or with temporarily drawing down battery voltage. If you’re trying for a really tough range, your better off allowing a little cool down between attempts. This also has proven true across multiple rangefinding devices tested.
Other things I have managed to range are squishy humans at 2,100yards in overcast conditions, treelines at 5,000yards under night conditions, and hillsides at 2,400yards. Somewhat surprisingly, hillsides seem more difficult than trees to range so I recommend trees when you have the choice. Hopefully this is helpful in giving you a general idea of what to expect in terms of performance under particular scenarios. Because of the giant effect conditions and specific targets have on rangefinder performance it is difficult to convey to the reader exactly what targets can be excepted to yield a return in what conditions over a broad scope of possible scenarios. I find Sig’s afore mentioned claims of best-case performance on different targets to be reasonable however.
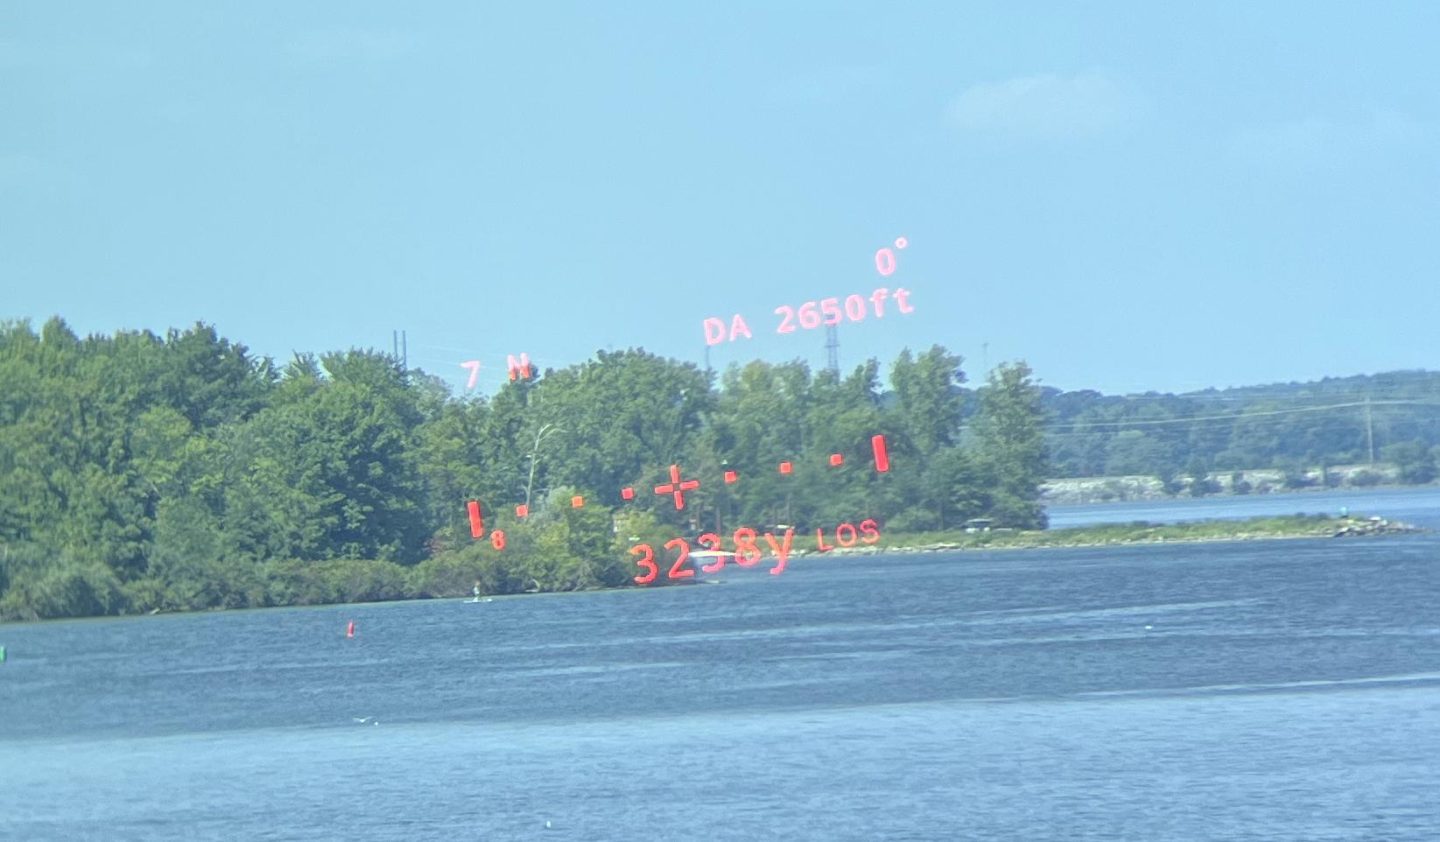
Going into this review, one of the comparisons I was most interested in seeing was the laser performance of these category changing Sig 10k’s vs. the Vectronix Vector X rangefinding binoculars that promised to be the first similar challenger. One important note on that: The Vector X unit I have is a late stage engineering sample with FPGA firmware that differs slightly from the production versions now shipping. The rest of it’s firmware has also had a number of updates throughout the testing process and will doubtless have more. The FPGA firmware in the Vector X unit I have processes noise heavy data more aggressively delivering more long range readings in noise heavy inclement conditions but also more false readings in those same conditions. This will need to be kept in mind when making comparisons. My expectation when starting to compare the Vector X and Gen II 10ks side by side was to have either a clear winner or, possibly, a performance that was indistinguishable as I was not certain if they would be running the same rangefinding hardware and engine. They are not, but despite that, the performance of the competing binoculars is similar but without what I would call a clear winner. I’ll give you some side-by-side examples of performance differences as well as some generalities. First off, the Vector X would not range the Budweisser tower at night at 9556 yds. I checked and it is not memory limited on this. It just doesn’t seem to do as well as the Sig on hard targets at long ranges in ideal conditions. The Sig will range that tower on every try. On the other hand, the Vector X binos were able, with many attempts, to correctly range the bridge at 6405yards across the lake that I have been trying to range for years with both generations of Sig 10k binoculars. Furthermore, they were able to do so on a day that was not overcast when the 10k’s neither managed it on that same day nor on days with more overcast conditions in the past. Generally, the Vector X binoculars can deliver longer ranges than the Sig 10k’s on targets that are less great in conditions that are more inclement. There is an important caveat to this though. On the Vector X’s I have, with their beta FPGA firmware, you will get ranges at longer distances in noisier conditions but you can also occasionally get incorrect ranges under those conditions. This didn’t happen with the bridge, but has happened in other scenarios. For instance, when ranging the above Bison heard mentioned before, in rough conditions, the Vector X had a much easier time ranging the Bison and even managed to range the hill further back all the way to the hills top at 2,700yds. However, they did not always return the correct yardage when they returned a yardage. Every once in a while they read noise as signal and would return an erroneous and improbably long range such as 8,189 yards when they should, and most readings did, return ~1,937. On the production version of the Vector X, these false ranges will be much less common. The trade off to this change is that the Vector X’s ability to deliver long range readings in noisy conditions will also be diminished. My expectation is that the Vector X will still have some advantage at noisy longer ranges but that the advantage will be significantly less than on my beta unit. I also expect the production binos won’t deliver the erroneous long range readings any significant amount of the time. For the record, I have never encountered the Sig 10ks delivering a similar erroneous long range reading despite a great deal more ranging experience across two generations of units and including side by side in all the conditions where the Vectronix did have such readings.
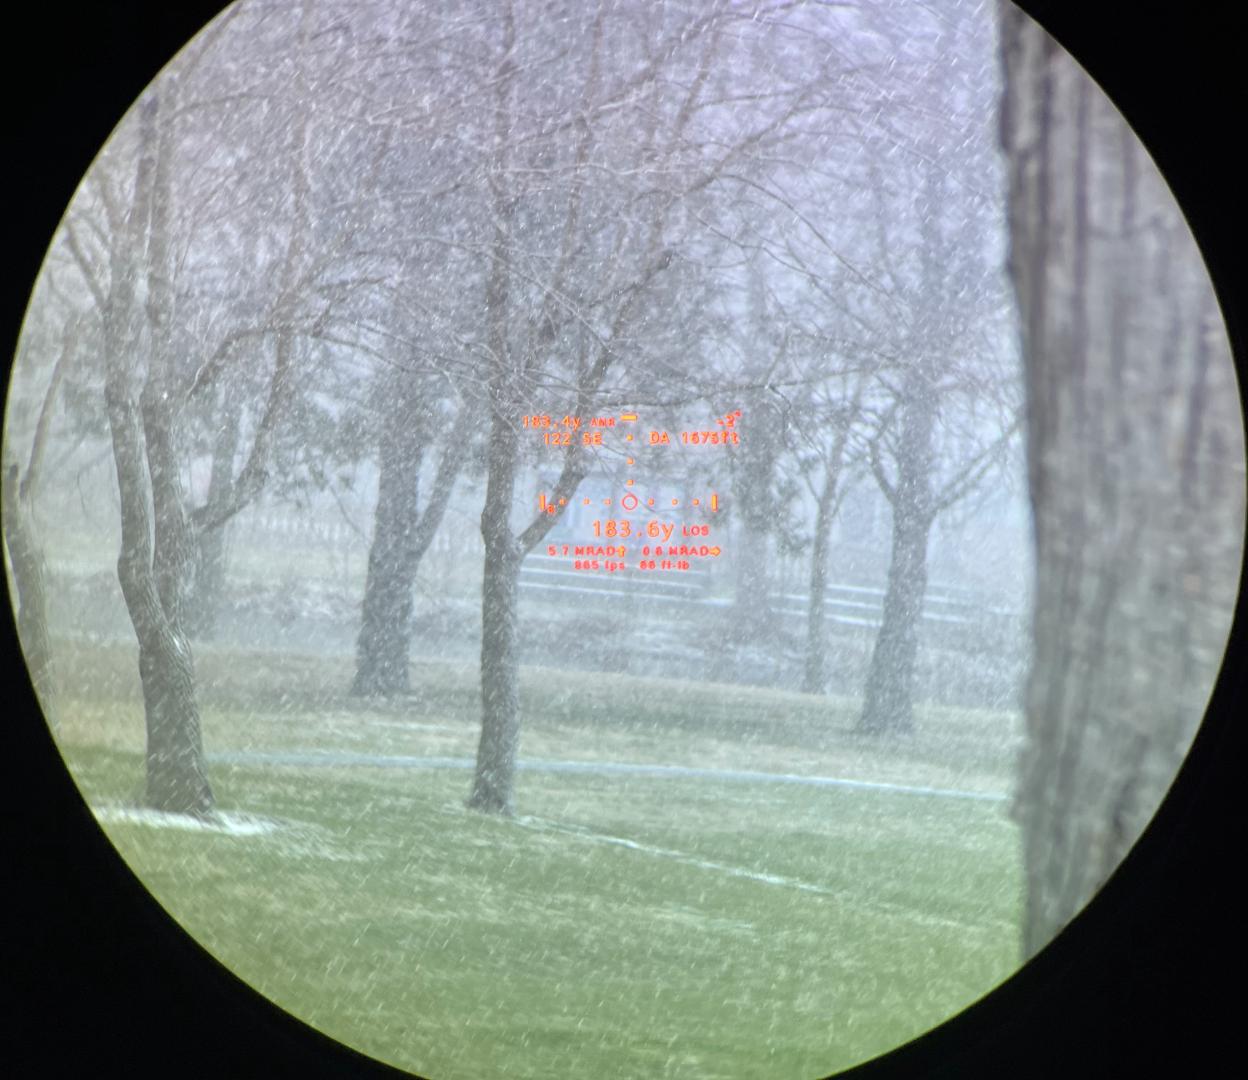
I’ll conclude the rangefinding section with the Fog mode that exists as a target option for the 10k binoculars but not in most competitors. I believe this mode actually works best falling snow. It may also have some advantages in heavy rain or dust but I have not had issues with the basic ranging modes in these conditions or in fog for that matter. However, in heavy snow, outside of the fog mode, rangefinding binoculars have always just delivered an erroneous very short reading such as 30 meters to me. The fog mode allows the Sig 10k’s to deliver the correct range on targets in those conditions. This mode is so good it can deliver ranges on targets I can no longer even make out myself though the snow. This has proven an excellent, though niche, function for the Sig.
Other Onboard Sensors:
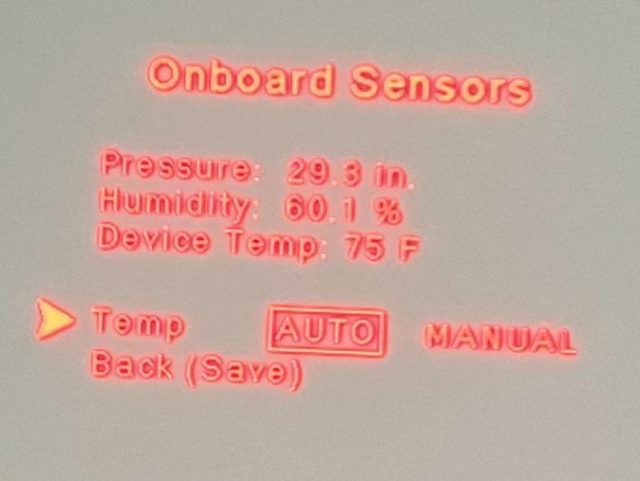
Just as on the Gen I Sig 10ks, the Gen II units come with a suite of other sensors in addition to the rangefinding laser. There is an atmospheric pressure sensor, temperature sensor, humidity sensor, angle of inclination sensor, and compass. In the future, you will also have the option of adding the wireless Calypso AB edition ultrasonic wind meter. Some of the appeal of an all-in-one rangefinder and ballistic solver is that all these sensors can be automatically integrated into the calculations for greater accuracy, speed, and translatability from wherever you zeroed the rifle and practiced to wherever you are hunting. To do this though, the sensors have to be reasonably accurate. So, I tested them. With its remarkably thorough display, some of this data (bearing, DA, and inclination from vertical) shows up to the user while ranging. What does not show up in the ranging screen is visible in the onboard sensors section of the excellent menu system in the binoculars.
Over several different sessions I have found the temperature sensor to stay within about five degrees of the local weather data from the airport quite near my home indicating it is sufficient for it’s purpose. As many have noted, the temperature sensor is very slow to adjust, taking 20 min or so to acclimate to its location. The temperature sensor is also easily thrown by direct sunlight heating up the binoculars themselves. This has been true of all laser rangefinding binoculars I have encountered and Sig has included an option to manually set and lock the temperature within the binoculars or, if you are using the app and in cell range, you can set the temperature based on the closest weather station. I would suggest either of these options if you are using the binos for extended time in direct sunlight. As with the temperature sensor, I found the atmospheric pressure sensor plenty accurate for its purpose. It combines with the temperature and humidity settings to produce a density altitude number used in the ballistic calculator. This number has typically agreed with that of the airport within 500ft or better provided the temperature was correct either by setting it or letting it acclimate but not in direct sunlight. The Sig 10ks also have an angle of inclination sensor. This tested within a degree and a half or so of correct, which seems more than sufficient to the purpose.
While all of these sensors in the Gen II 10K units tested more or less like the Gen I’s sensors, my testing indicated the compass in the Gen II unit was significantly improved from the Gen I unit. I later verified that the Gen II units do actually have a different, better, compass chip. These little chip sized compasses are very finicky both in terms of their precision and their accuracy. They have little effect on the ballistic calculations (Coriolis is really not a big effect) but they are one of the primary components to placing a remote GPS point where you have ranged on a map for game recovery. This feature is discussed in the background on GPS mapping and Basemap section near the end of the review for those interested. Sig has also incorporated an export map point feature directly into it’s own software so you can choose to export the ranged point to Google maps, Apple maps, or onX. On the Gen I 10K’s I often saw ten degree swings in the compass reading for ranging the same target. With the Gen II units I am seeing more like a five-degree range of reading. That is a substantial improvement for those using remote GPS points.
Ballistic Software:
In writing this review, I fell like I am returning to the BDX software after two years. It is not that I have stopped using the Gen I Sig 10K binos I reviewed at that time. Indeed, up until the time this years rangefinder review devices landed on my doorstep for review my go-to rangefinding device and ballistic calculator was the Gen I Sig 10K binoculars and I took them with me every time shoot long distance. The reason for the lack of application use was that the binoculars store 30 ballistic profiles and their menu system is so robust that I just didn’t need to use the application. Indeed, the binoculars even communicate directly with the BDX 2.0 equipped Sierra6 BDX scope. I guess if I had been trying a bunch of different ammo in that time I would have needed to break the app back out to make new profiles but I wasn’t doing a whole lot of ammo or load experimentation in that time so it just didn’t happen. Honestly, I found myself a little excited to see if anything had changed in the software.
I’ll start the BDX software discussion with those changes. Probably the largest one is the option to cloud sync your ballistic profiles. This is not forced on you as some software makers are always trying to do but does allow you to back up your ballistic profiles remotely if you wish. Login for this is automatic using your Apple or Google ID. For those curious, this does not create a single universal AB profile storage that allows you to move your ballistic profiles from say your Leica Geovid Pro to your Sig 10k Gen II. For now, at least, profiles are limited to specific companies apps. Sig has included an interesting transfer feature between it’s own devices however. This feature is the ability to share a particular ballistic profile with a friend via QR code. So, if you and and a buddy both use Sig rangefinders, you can instantly transfer your profile to his app so you can easily have all profiles on one rangefinder for a match. Setting up a profile to transfer by QR code is done by hitting the odd looking symbol beside “profile editor” near the top right of the profile editing screen for the profile you want to transfer. This brings up a QR code. On the device you plan to copy the profile to, you start creating a new profile and choose the bottom “scan code” option for profile type. Then you scan the code and it’s done.
Other changes to the BDX app include moving the ballistic correction units from the general menu to the specific ballistic profile menu to account for people who have both mil and MOA scopes on different rifles. Lastly, Sig has increased the number of options for dropping a remote point on a map. At the time of the initial release of the 10k, you could only drop a remote map point from within BaseMap. You now have the additional options of exporting a ranged point to Google Maps, Apple Maps, or onX. These options are found on the active ranging screen within the settings tab. Selecting one of these export options activates a pop up on the ranging screen that prompts you to initiate the export of the last target ranged.
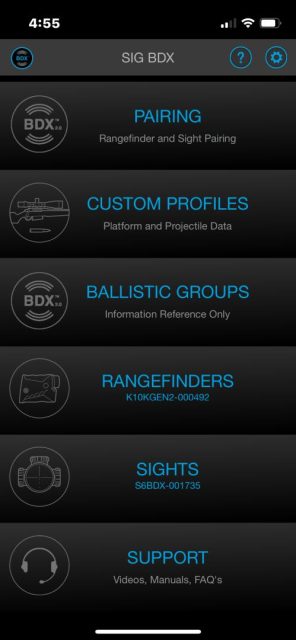
Now we will talk about the features of Sig’s app that haven’t changed since I last visited it. All of Sig’s BDX rangefinders and scopes use the same BDX master app whether they are based on AB elite or AB Ultralight. This app differs from other Applied Ballistics applications in that it has the massive added function of including the Sig BDX 2.0 system. The App’s startup screen is indicative of the breadth of stuff the app is intended to do, having sections for the different devices you have paired with the app, as well as your ballistic profile creation section, the pairing menu, and a couple informational sections. Note that the video and manual section is actually just a hyperlink for your web browser. This is a bummer as it doesn’t work offline, and I suspect more than one person has really, really, needed it to do so while on a hunt. Note to Sig, our phones have enough memory to integrate the manual into the app so it works offline. It is an excellent manual by the way. I can’t say that the arrangement of the BDX app is my favorite of the AB apps. It’s ranging screen is the 4th tab down under “rangefinders” and sits below the tab “ballistic groups” that is an informational reference section only germane to those using Sierra BDX riflescopes and only if they are using the “SmartBDC” groups of similar cartridges function instead of programming a profile specific to the exact ammo and rifle being used. I have gotten used to the layout over the time that I have used the app, but I think the above is a good example of how sometimes the ordering of items and labeling of categories seems a little counter intuitive.
As the Sig Kilo 10k-ABS HD comes with Applied Ballistics Elite, the bulk of this review will be focused on navigating that. I should note though that the binos do have other ranging modes including LoS, AMR, external ballistics (for Kestrel or external device calculations), and even an archery mode (for high angle long distance archery shots).
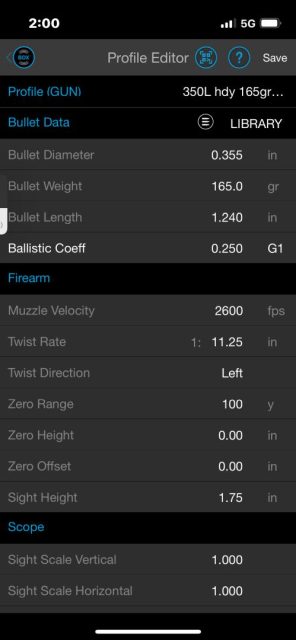
The Applied Ballistics Elite built into the Sig 10k binoculars and enabled in the BDX application when it is connected to those binoculars, navigates the same as the AB Ultralight. Having elite just unlocks a few more options in the Custom Profiles section than those using this application with a rangefinder only equipped with AB Ultralight would see. These options include access to custom and personal ballistic coefficients within the AB library, adjustment for twist rate, sight height, sight scale (an adjustment for when your scopes adjustments are a little off in adjustment magnitude), some velocity scaling for temp, and a few other offsets you will probably never use. Of course, it also gives you ballistic solutions for >800M shots. You will note that there is no section in the ballistic profile screen for truing muzzle velocity to field data or adding a drop scale factor for supersonic to subsonic transition. These functions are only accessible from the live rangefinding screen and only work with ranges you have just taken, live. You cannot input previously recorded data. This is not my favorite choice. I would like to be able to more easily mess with these things when not at the range and be able to both mess with them and the range card to see how the data is lining up with my field-recorded data. While I can certainly still mess with the muzzle velocity in the old-fashioned, non-automated way, there is no other way to access the drop scale factor. If I, a person who really doesn’t shoot past supersonic much, want to do that, I am sure the ELR guys do as well, and lots of them are going to be looking at this product. Make it so we can manually enter this stuff and futz with it. This inability to use the truing function unconnected from rangefinding also makes it too cumbersome to be feasible to true both BC and MV in a partially automated way. This is something that you can usually do without too much difficulty only if you have an automatic truing function for one of the two. Lastly, I should note here that the same system exists in the BDX software for truing MV (though not DSF) for those with only the Ultralight version of AB. AB Ultralight does not usually include any automated truing function. That, coupled with some integration with atmospherics, is probably why truing is a roundabout system on the Kilo 10k, even though is comes with AB Elite. I still want to be able to easily manually mess with this stuff, though, and therefore disagree with Sig’s choices in this regard. This truing function also refuses to do the automated truing for all cartridges except .22LR when the range used is inside of 300yds. This is a strange and annoying prohibition as there are other slow calibers you might want to true at less than 300yds such as straight walled Midwestern deer rounds and 300 really isn’t sufficient for truing the big fast stuff anyway. The app is also not the best at identifying a .22lr profile and so blocks close truing with some of the .22lr profiles as well.
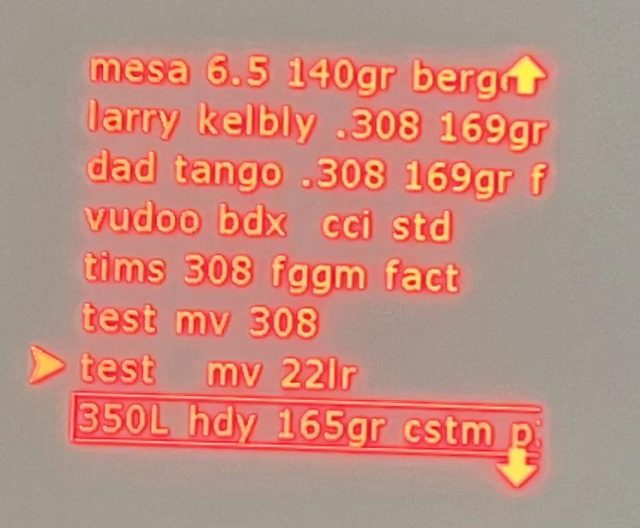
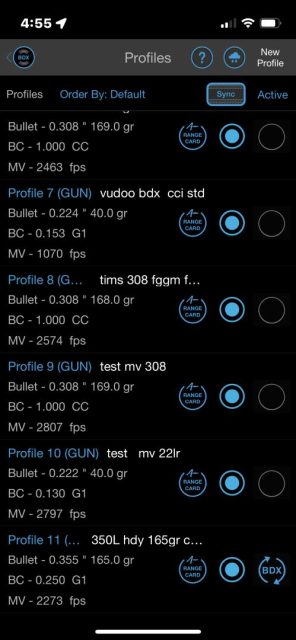
The Sig BDX application gives you a good deal of control as to what and when you sync information with the binoculars. This gives you the ability to hold more profiles within the app than the 30 that can be simultaneously in the binos. Because of the Kilo 10k’s large display capacity, a large amount of text can be displayed for each profile name, making it quite easy to keep track of which one is which. You never have to remember just which data is stored under some generic ‘Profile 1’ designation. I’m telling you, the menu system in the binos is so good you will rarely feel the need to connect them to the app.
Summary and Conclusion:
Following up the category changing success of the first generation of Sig Kilo10k-ABS HD rangefinding binoculars is a job I wouldn’t wish on anybody. Those binoculars ranged two to three times further than their closest competitors and featured a 304x 256 pixel AMOLED display that used 1/20th the energy of competitors offerings while allowing for a robust and easy to navigate menu system that all but obviated the need to pull your phone out in the field. They also featured Applied Ballistics elite baked in. The 10ks were not the first to integrate this software, but it was still a fairly new and uncommon feature and Applied Ballistics had just started their mobile test lab resulting in a rapidly expanding custom ballistic model library making that feature far more valuable. Without question, the Kilo10ks were a game changer.
What this second generation of the Sig 10k’s represents is a refinement of it’s revolutionary progenitor, not it’s own revolution. It eliminates the blue tint, yielding a dramatically improved user experience, adds three more buttons for quicker wind input and better menu navigation, improves ergonomics for more comfortable use and better cinch strap compatibility, and improves the internal compass. These things make the second generation unquestionably a better product with a far more refined user experience. It’s not going to give you the same rush as before though because you have seen it’s best features already. These best features are the Sig Kilo10k-ABS HD’s class leading rangefinding ability, it’s 304 x 256 pixel AMOLED display and it’s integration of Applied Ballistics elite.
The biggest of the changes in the second generation of 10k binoculars is unquestionably the removal of the dreaded blue tint. While the optical performance otherwise appears unchanged, this results in a huge improvement in user experience. The resulting image appears much brighter and more vibrant making the binoculars a pleasure to use as binoculars and not just as a housing device for a rangefinder and ballistic calculator. They are not optically competitive with Leica Geovids, Vectronix Vector X’s, or Swarovski EL ranges, but they are competitive with mid level non-rangefinding binoculars such as Zeiss Conquests. I find them to be good optically and that is a long way from the mediocre I found their predecessors.
In my experience, the Sig Kilo10k-ABS HD Gen II Binoculars, despite the change from class 1M to class 1 have no noticeable change in range finding performance from their progenitors. They again deliver on their lofty best-case scenario ranging advertising promises. The 10ks will range hard targets at 10k yds (at night), tree lines at 4,000 yards (even on some bright sunny days), and deer at 3,000 yards (this is going to need to be a big deer and an overcast day.) The tight 1.5 x .06 mil beam dispersion even allows for some quite improbably far results on small targets such as being able to range a person at 2,100 yards. Full disclosure, that result was with a gen I unit as I was not able to get as good of conditions or as fat of a subject this year any time during my testing of the Gen II unit. As with all rangefinders, conditions greatly effect the potential performance but you will be hard pressed to have difficulties inside of 2,000 yards with the 10ks. The 10ks ranging is also fast. Though only by spit second margins, I believe they are the fastest range finding binos I have tested.
Since the launch of the first 10k binos and going into this second generation, Sig has added a number of features to their flavor of Applied Ballistics Application. These included more map software options for dropping a remote ranged point, cloud syncing of ballistic profiles, and the ability to easily utilize a mixed mil / MOA stable of equipment. I still find their flavor of Applied Ballistics a bit clunky though. While I can see it’s utility in the excellent BDX 2.0 system, it does not shine for AB elite outside of that context. It’s locking the truing functions behind a tedious wizard in the active ranging menu and artificial constraints truing distance are frustrating and I find much of the menu layout to be less intuitive than other implementations. It could also use a live ranging automatic target card construction feature.
Since the time of the original 10k launch Sig has massively boosted it’s warranty coverage. Sig Kilo electro-optics now all carry an industry leading unlimited, transferable, lifetime warranty. This is a tremendously better warranty than most competing optics offer and a lot of peace of mind when investing the sort of money it takes to buy a top tier all in one optical, rangefinding, and ballistic calculating solution.
Background on Ballistics Calculation, Modeling, and Applied Ballistics Elite:
For a long time, ballistics calculators have virtually all used the same underlying math, which is essentially based on the measured trajectories of two basic tested projectiles, these being the G1 and G7.

Each software would iterate from these underlying measured trajectories using a comparison factor known as the Ballistic Coefficient. This coefficient established a comparative degree of aerodynamics between the shooter’s specific bullet and the G1 or G7 standard, according to which the formula would stretch and deform the original G1 or G7 measured trajectory to be more like what would be expected from the user’s bullet. This is where the G1 and G7 BC numbers on your bullet box come from and what they mean.

In practice, the typical process using G1 or G7 based software was to measure the velocity of your rifle when establishing your 100 yd zero or when developing a new handload for your rifle, then plug that value along with the BC on the box and your atmospherics into your software to get an initial set of ballistic solutions for different distances. These would of course be wrong by a few tenths of a mil or so as you got further out. You would write down the real field-recorded values and then fudge with the BC and / or velocity until the model being spit out was as close to correct as you could get it. This new model would be helpful in spitting out good numbers for different untested distances or on days with different atmospheric conditions. It wouldn’t be perfect and, with all the guessing and checking, it would take a while to get to, but it would be helpful.
Of course, the model faced some limitations because your bullet is not actually shaped like either the G1 or G7 standard. Its trajectory is fundamentally not just a G1 or G7 trajectory stretched a bit. Furthermore, you are firing it from a gun a bit different from whatever the test gun was in those original trajectory studies, at a different initial velocity. All this matters. The bottom line is that there is a limit to how accurately you can stretch the G1 or G7 trajectories based on just a BC number and initial velocity number, and that limit is not as good as many of us would like it.
Because of this, a couple of companies have begun measuring the trajectories of more projectiles from more rifles fired at more velocities. This is the origin of Applied Ballistics’ Custom Drag Models (CDM) and Hornaday’s Bullet-Specific Drag Models. Software based on these libraries, such as Applied Ballistics Elite, can output better distance compensation values than that which is based on G1 and G7 values because the underlying trajectory curves are those of the actual bullet in question. For more detail on these changes in ballistic calculation, Cal Zant did an excellent article on Bullet-Specific Drag Models and Frank did a couple interviews with Brian Litz and Emil Praslick for the Everyday Sniper podcast.
Additionally, the rangefinding software within commercial rangefinders has also shifted over time: first only offering a few stock options for preset ballistic curves; then allowing you to input your own G1 or G7 based ballistic profile that you had to, by guess and check, true to your actual field results; and now starting with a custom drag model and having a truing function within the software that eliminates the tedious guess and check truing. When using software with a truing function, you simply enter a few of your field results for recorded drop at a known distance and the software fine tunes the custom drag model, typically its initial velocity, to fit your data.
Having spend a good deal of time with Applied Ballistics Custom Drag Models over the last two years I am very impressed with the improvement this engine offers over traditional G1 and G7 models as well as how many bullets have been added to the CDM library and how regularly it is updated. You will now find basically anything used in long range competitions as well as quite a number of hunting bullets. Were talking a lot of bullets, 447 at the time of writing for 6.5mm alone for instance. My experience is that these custom models are significantly better out of the gate than traditional models to the point that (assuming you know your muzzle velocity) they frequently require no truing to be correct all the way out to transonic distance. In the event that you do need to true the velocity, this is much more easily accomplished though the truing function in the software than by traditional guessing and then re-testing as was done in previous calculators. The end result trued up model is also often better than was produced using older G1 and G7 software as I often previously produced models that would be off by a tenth mil or so at some distance and I was unable to remedy this with MV or BC changes to the formula without messing up some other part of the curve. This software has greatly improved my confidence in my data when interpolating or extrapolating to distances I have not specifically gathered dope on or in conditions different from which I gathered the dope in (the LRF binos in question gather data on and compensate for temperature and pressure). I am missing a lot fewer targets, spending a lot less time crunching numbers, and chasing my tail a lot less in miss analysis as well.
Background on How Laser Rangefinders Work
As with most tools in life, a better understanding of the principles behind, and idiosyncrasies of, the tool’s function often results in more skillful use and better outcomes. The purpose of this section is to help familiarize the reader with just what a laser rangefinder actually sees and how it analyzes and conveys this information to the user.
Though a variety of methods can be used to assess distances using lasers, the majority of laser rangefinders, including this one, employ a time-based calculation for distance. What this means is that the pulse is sent out and bounces back, and then the time between these two events is used to calculate the distance. This is easy enough in principle. In practice, however, we’re not talking about one laser pulse but many, and a variety of other factors also complicate this, so the resulting data requires some interpretation. The most important of these factors are beam dispersion, refraction, and background radiation.
Beam dispersion refers to the fact that the shape of a beam being emitted from the range finder is a cone, with the wide base oriented to the target, and not a rod. That is, the beam spreads out and covers more area the further the object being ranged is from the rangefinder. In addition, most rangefinders, this one included, emit a beam that is not round in cross section, but rather closer to rectangular.
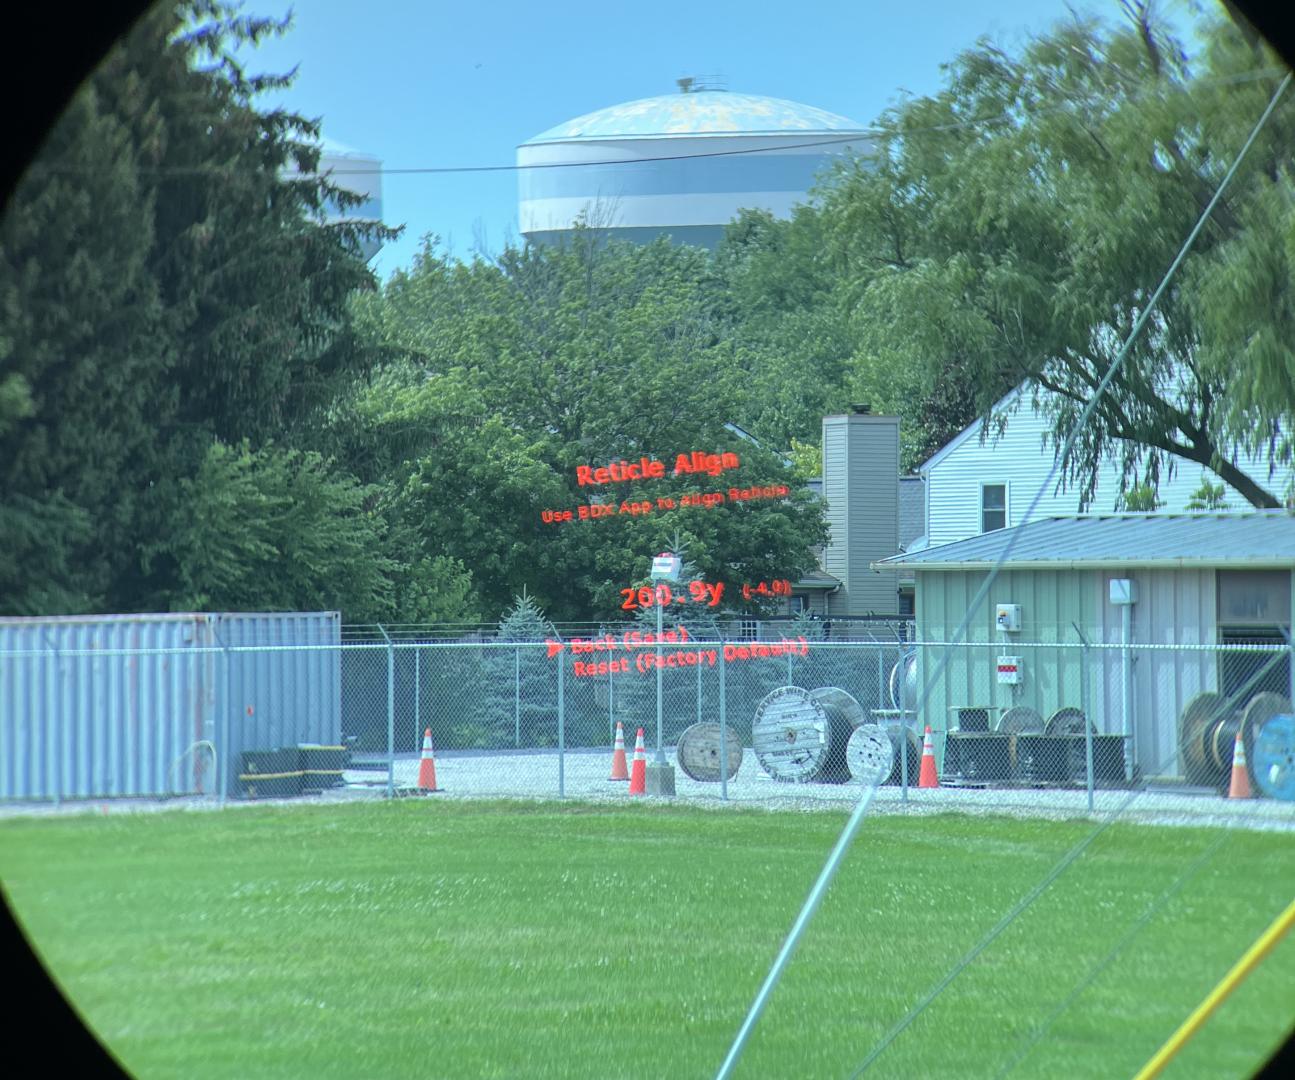
In the case of this particular rangefinder, the divergence is .06 mils in the vertical by 1.5 mils in the horizontal. The Sig Kilo 10ks are unique in providing the user the ability to align this beam to the reticle manually within the BDX smartphone app. It is important that you do this as it is unlikely it will be ideally aligned out of the box, just as it is unlikely most other rangefinders will have a perfectly aligned beam. The difference is that you can align the 10k yourself whereas most others you just have to make a mental note on the alignment and live with it. For most makers, a pass for beam alignment on QC means only that some portion of the beam touches some portion of the reticle, not that it is properly centered. Indeed when tested, the beam on this 10k was just barely touching the edge of this reticle. To center it using the alignment function within the BDX software, an adjustment of -4 in the horizontal and +1 in the vertical was necessary. Being able to do this is much appreciated, as a small misalignment can matter a great deal when ranging small objects far away. In determining your alignment, you can quite easily see the beam with a nightvision system, as the rangefinder’s 905nm beam is in the spectrum the nightvision sees. However, if you don’t have nightvision, as I don’t, there are a couple of ways to figure out the alignment. The easiest is probably to find a nice, flat, small sign roughly the size of your reticle when its a couple hundred yards away and see how far right, left, above, and below, you can aim and still get the range of the sign. I did this with the below pictured rectangular industrial light and adjusted the beam increment by increment within the BDX software to center it. Remember, you can flip the binos upside-down or sideways during testing to be sure not to get returns from the post when you’re trying to find the bottom edge of your beam. Also of note when adjusting the reticle alignment on the 10ks, is that you handle the ranging within the program during the process and not from the binoculars range button.
In addition to alignment, it is also important to understand just how large a laser rangefinder beam will get at longer ranges. At this time, average beam dispersion for a laser rangefinder is something like 2 x 1 mils. This is 7.2″ wide at 100 yards, or 72″ at 1000 yards. With this pattern, if you are trying to range a target at 1000 yards, unless it is an elephant, much of that beam will be reflecting back from what is around and behind the quarry and not the animal or, more likely at that range, steel itself. Most of the time, a rangefinder may receive a signal comprised mostly of light not reflected off of the target. Data analysis will therefore be necessary to pick the target out from what is not target. Similar in effect to this, many targets are not perfectly flat and perpendicular to the rangefinder. Because the beam is broad at the target end, this means that what is reflected back will not be a single sharp signal but a number of different reflections at a number of different distances. If you aim at a hillside, for instance, some will be reflected off the closer bottom of the hillside, some off the further top, and some off everything in-between. A tree will also give a broad reading as it is a three-dimensional object with reflective parts and pieces throughout. What the rangefinder actually sees, therefore, is not to be represented as a single blip at a single distance, but rather a plot of many returns at many distances with a variety of peaks and valleys corresponding to distances at which a few (valleys) or many (peaks) of the laser pulses were reflected back. The rangefinder may carry out all the interpretation of this plot itself or it may allow the user some degree of control. In theory, a rangefinder could also present the entire plot to the user for interpretation, though I am not aware of any models that do this. This Sig 10k, with its pixel-based display, is one of the few that theoretically could, though it does not. It does, however, give you a large amount of choice in data analysis. The rangefinder’s menu includes modes for last (prefer far target), first (prefer near target), best (target with biggest returns), XR (prefer furthest target and more ranging pulses will be sent out over a longer time), and fog (different processing algorithm to minimize erroneous returns.) That is a good deal of choice, and given the excellent menu system of the 10ks, it is easy to access and utilize this function.
Refraction refers to the bending of light through mediums of differing density such as air or water. The pulse sent out by a rangefinder must travel though a great deal of medium before returning. This air will have a variety of different temperatures and moisture contents. It may also contain microscopic or macroscopic water droplets. All of this, as well as dust in the air, will serve to scatter or absorb the laser such that much of the beam will either not hit the target or not return. The effect of this will become more pronounced with distance at the same time that beam dispersion dictates that the beam is more spread out with distance. This works together such that the further an object is, the less signal could possibly be reflected off of it. At some range, therefore, the signal will not be strong enough to be distinguished from the last of your important factors. Additionally, if your rangefinder is of the higher power 1500nm variety instead of the more common 900nm variety (these Sig 10k binos use a 905nm laser), absorption and scattering become a much bigger deal. 1500nm lasers interact heavily with water and so become far less effective the more water is in the air.
Background radiation is omnipresent but varies greatly with atmospheric conditions. At night, if you could see the target to range it, you would not have much of a problem. On a bright day, however, the sun is introducing a tremendous amount of electromagnetic radiation that is reflecting, refracting, transferring energy to objects, and being radiated once again at different wavelengths. Some of this cacophony of radiation will be close enough to the wavelength used by the rangefinder to be picked up. This radiation will form a floor to the possible signal strength returned from the object ranged that could be read.
I have made the following crude diagram of what the user, and the rangefinder, might see in a particular contrived scenario in order to help the reader to understand the type of data a rangefinder might be interpreting. This is not strictly accurate as the rangefinder does not send one beam out and record a bunch of different returns but rather sends out a whole bunch of tiny pulses and records a return for each. In other words, the theoretical return plot I show is much smoother than actual data would look, though the shape is the same. I think this way of depiction is most useful in helping the user to understand what a rangefinder sees, though. It may also help the user, where possible, to present the rangefinder with scenarios where it might have an easier call to make. In other words, to aim to get better returns,sometimes, by ranging easier-to-read items near in proximity and distance to a small desired target instead of that target itself.
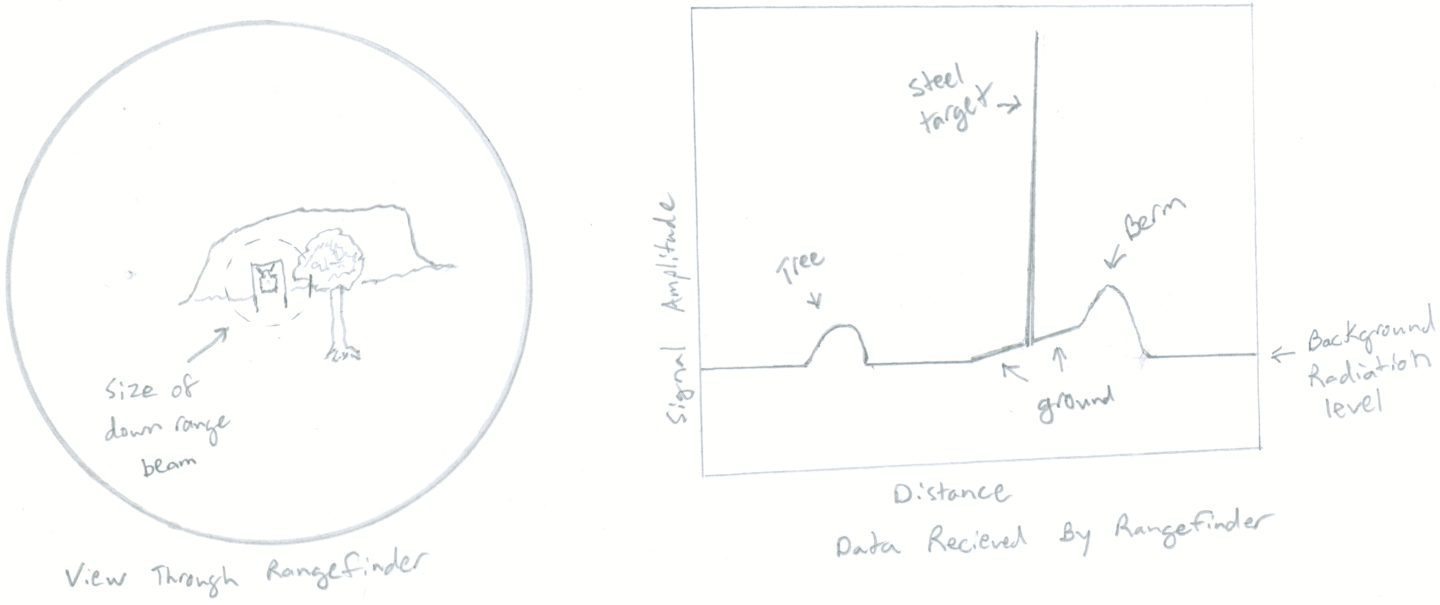
As you study the above diagram and plot, keep in mind the following possible ways in which the data might be interpreted by the rangefinder and how those interpretations would effect the user not only in this example situation, where the steel target is the desired object to be ranged, but in other scenarios as well: perhaps when ranging softer targets against hard or absent backgrounds.
1) A rangefinder might be programmed to display the closest peak in amplitude to the user. This would be the tree.
2) A rangefinder might be programmed to display the furthest peak in amplitude. This would be the berm.
3) A rangefinder might be programmed to pick the peak with the greatest area underneath. This normally corresponds to the object filling the greatest area of the diverged laser beam down range. In this example, this would be the berm. 4) A rangefinder might be programmed to pick the peak with greatest maximum amplitude. This usually corresponds to any object that is sufficiently large, reflective, and mostly perpendicular to the shooter. In this case, that is the steel target.
Most rangefinders are programmed to pick one of these criteria to determine the range from. A few have several modes you can switch between. These typically allow you to set preference for near / first target (tree), far / last target (berm), or highest number of signal returns / best target (berm or steel depending on specific criteria). The Sig 10ks have modes for each of these and these modes are easily found in the binoculars menu system under “Target Mode”
Background on the Challenges of Getting Optical Performance from a LRF Bino:
Producing laser rangefinding binoculars of high optical quality is a difficult proposition. Nevertheless, this is a very important area of performance because the idea of LRF binos is not just to replace a small rangefinding monocular, but also to replace the binos you use to find and observe your quarry. For such purpose, LRF binos need a lot better optics than the small, dark, heavily-tinted view you get through a little handheld LRF monocular unit.
Amongst the difficulties faced in designing optically high performing LRF binos, foremost are the effect of the display on optical performance and how to integrate the laser optic components with those for visible light. You have some tough decisions to make when it comes to coatings as the laser transmitter and receiver are part of the optical system, in the right barrel. The laser wavelength used, 905nm, is just outside of the visible light spectrum. This laser light must both pass through and utilize much of the optical system used for the visible light traveling to the user’s eyes and be diverted from the rest of the incoming light at a point to be redirected to a receiver positioned in the barrel. Obviously, this is a coatings challenge.
The other main optical challenge of laser rangefinding binos is the effect of the display on optical performance. There is simply no way to put a display bright enough to see in the optical path without some diminution of transmittance. Furthermore, to a great extent, there is a direct tradeoff between how bright you can make the display and what percent of incoming light the binoculars can transmit to your eye. If you’re willing to have an image through the binoculars that is dimmer, or, say, blue-tinted, your display can be quite bright. If you want the image bright and untinted, however, you may have to go with less display brightness and probably simpler, larger, illuminated digits. The reason for this is that your display basically works by bouncing the display image off a lens in the main optical path. This requires some semi-reflective coating, as on a holosight or red dot. These coatings absorb light and the more you want them to reflect the light in front of them (for a brighter display) the more they absorb the light behind them (what you’re looking at through the binoculars). The challenge of light absorption of this nature is strong enough that two of the makers of optically superior laser rangefinding binoculars have opted for unusual choices in prism design, partially to counter the light loss. Leica, on its Geovid series, has gone with a Perger-Porro prism design, while Zeiss went with an Abbe-Koenig prism system. Both of these choices offer more light transmission and are far less common than the Schmidt-Pechan prisms most often simply called roof prisms that are found in most binoculars, including the Sig 10ks, Vectronix Vector X, and Swarovski EL ranges.
Background GPS Mapping with BaseMap:
Sig and a few other makers have introduced the ability to mark the location of a ranged point using BaseMap or other GPS software. With BaseMap, his feature requires the paid subscription Pro version of the software though, a few other options, such as Google maps, are generally free.
The biggest goal of remote marking is to help the hunter to find the start of a blood trail. Often, after an animal is shot, it often goes some distance before it dies. Because animals do not understand what being shot represents, they do not usually go far if they are not actively chased because they neither understand they are dying nor that they are being hunted. They just feel hurt, then weak and tired. As such, after delivering a shot, hunters typically lay low and wait a while to start tracking the animal so that it will not likely go far before bedding down and dying. It is therefore quite helpful to have an accurate point to start your search for a trail but this is not so easy when the game starts 500yds from you and you have to wait a while before starting to track it. Things can look a lot different standing in a field than looking at that field from 500yds. It can be hard to find your starting point, and that is the main idea behind dropping a remote GPS point on it.
Prior to doing 2022’s rangefinder reviews, I had not noodled with the BaseMap software at all. I had heard of it from people using its satellite map to estimate ranges to targets by bringing up a map of the range and dropping points on the map where it thought the targets were, but I hadn’t actually tried it. I found it a slick software package and have used it a number of times not in conjunction with testing rangefinders. It has lots of functionality around creating routes, measuring distances, and marking campsites, gear drops, and other important points. BaseMaps is also designed to be used without access to a cell phone signal. This is an important consideration, given that the locations having the best hunting and hiking rarely offer cell service. This also gives the Sig Kilo 10k, and other makers’ products that interface with BaseMaps, the advantage of working without cell service, whereas Swarovski’s similar feature uses its own proprietary software which requires a cell signal. Most importantly from the standpoint of my use, BaseMaps interfaced quite easily with the Sig binos.
Within BaseMap, mapping points while ranging them is found within the BaseMap software under tools and is called “Remote Marker”. Once you have paired your binos to the software, hitting this function will prompt you to range what you want to mark. When you range, the point will show up on your map with a line from where you are standing to the ranged point. You can then choose to place a marker at that point, manually adjust the marked point’s location, or just dump the point. The software uses three data inputs to decide where the point should go. These are the user’s location as determined by your phone’s GPS, the distance and angle of the point from the user determined by the binos, and the Azimuth of the binoculars, determined by the compass in the binos. The accuracy of first couple of inputs are generally quite good. Typically, outside the GPS is good to within about 3yds, the range within 2yds, and the inclination within a degree and a half or so. In my testing, however, the Azimuth was only good within 20 degrees or so. This translates into quite a lot of error as the distances increase and boy can these Sig Kilo 10ks range a long way.
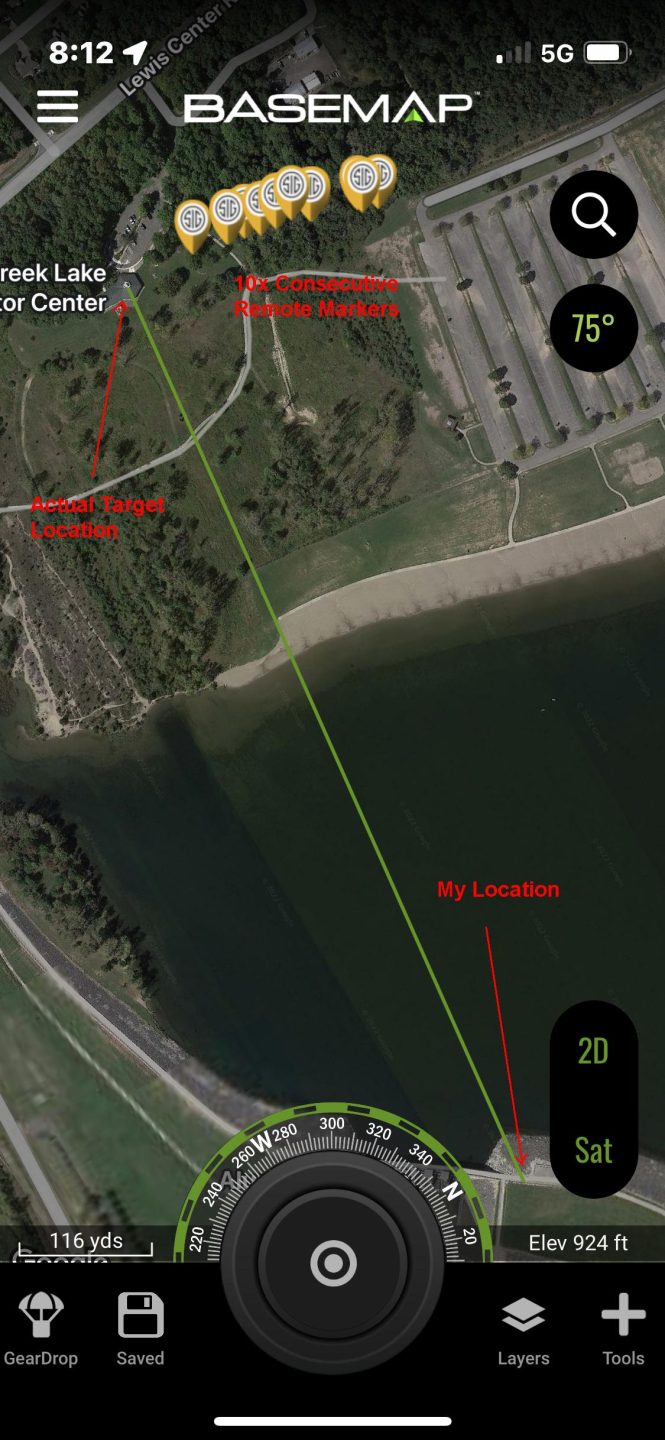
Fortunately, this is not a random error and we are not talking about an area of uncertainty as much as a path of uncertainty. There is very little uncertainty in either the user’s starting location or the distance of the target from the user. Therefore, you can pretty easily mark out an arc-shaped path of possibility and just walk it from one end to the other. You can do this by ranging and marking the same point 5-10 times. All those points will line up on a gently arcing path. Its no nice, clean, single pinpoint, but it is still a tremendous aid in helping you find the animal’s trail. Keep in mind that when I did my testing of this feature, more than half the time the correct target location did not actually lie within the bounds of the 10 points I dropped so when you are following the arc made by the points you dropped, you will likely need to extend past the furthest point in each direction in order to reach the target location you ranged. Frankly, the software should probably just mark an arc for you on the map instead of a single point. This would save you from having to mark the same point 5-10 times, and, I believe, this is what Swarovski actually did. The little chip-sized digital compasses in these and other competing binoculars just aren’t very accurate.
