Table of Contents:
– Introduction
– A bit on Ballistics Calculation and Modeling
– A bit on How Laser Rangefinders Work
– Unboxing,Look and Feel
– The Challenges of Getting Optical Performance from a LRF Bino
– Optical Performance
– Laser and Sensor Performance
– GPS Mapping (Leica ProTrack)
– Ballistic Software
– Considerations for Timed Competition Use
– Summary and Conclusion
– Addendum: Marsupial Gear No-Mag Enclosed Harness
Introduction:
This year, when I saw the product announcement for the Leica Geovid pro 32s, it reminded me that it has been a while since I visited the topic of laser rangefinders. In fact, almost 10 years. At that time, in 2013, I did an article about the coming of age of laser rangefinding that included the then new Leica Geovid HD-B 42s as well as a review of the then new Bushnell Fusion 1 Mile ARC LRF binos. This was a time of rapid increases in the ranging distance that rangefinders were capable of and the start of integration of custom ballistics information within the rangefinders themselves. It was also a time in which some of what I consider to be the first optically excellent LRF binos, Leica Geovid HD-B in 2013 and Swarovski EL Range in 2011, were being introduced. These were laser rangefinding binos that looked, and felt, like nice sets of birdwatching binoculars instead of a blocky piece of military hardware.
Since this time, laser rangefinders have continued to improve, though at a much more gradual pace. Ranges continue to increase, sometimes, as in the case of 1500nm systems, to quite incredibly far distances. In most cases now, the reliable range of mid to upper price offerings now easily exceeds the maximum range that most long range shooters actually shoot at, with the highest range products actually proving serviceable for ELR shooters.
In addition to ranging performance upgrades, software and interface has changed a good deal as well. Older rangefinding binos, such as the early Leica Geovids, did not have ballistic computers or onboard suites of atmospheric sensors. This was added with the HD-Bs in 2013. At that time, the system utilized a Micro SD card slot in with the battery compartment to download the user’s custom parameters within Leica’s proprietary ABC ballistic software. Physical media systems such as this were gradually replaced with systems wherein information is transmitted to the binos via bluetooth from a smartphone, or sometimes a Kestrel, as with 2020’s Leica Geovid.com series and this new Pro 32 series. Lately, units from a variety of different companies have begun to integrate better ballistics software by way of partnerships with Applied Ballistics and geomapping functionality such as Leica’s Pro Track feature.
A Bit on Ballistics Calculation and Modeling
This brings us to changes in ballistics calculations and Applied Ballistics Elite. For a long time, ballistics calculators have virtually all used the same underlying math, which is essentially based on the measured trajectories of two basic tested projectiles, these being the G1 and G7.

Each software would iterate from these underlying measured trajectories using a comparison factor known as the Ballistic Coefficient. This coefficient established a comparative degree of aerodynamics between the shooter’s specific bullet and the G1 or G7 standard, according to which the formula would stretch and deform the original G1 or G7 measured trajectory to be more like what would be expected from the user’s bullet. This is where the G1 and G7 BC numbers on your bullet box come from and what they mean.

In practice, the typical process using G1 or G7 based software was to measure the velocity of your rifle when establishing your 100 yd zero or when developing a new handload for your rifle, then plug that value along with the BC on the box and your atmospherics into your software to get an initial set of ballistic solutions for different distances. These would of course be wrong by a few tenths of a mil or so as you got further out. You would write down the real field-recorded values and then fudge with the BC and / or velocity until the model being spit out was as close to correct as you could get it. This new model would be helpful in spitting out good numbers for different untested distances or on days with different atmospheric conditions. It wouldn’t be perfect, and with all the guessing and checking, it would take a while to get to, but it would be helpful.
Of course, the model faced some limitations because your bullet is not actually shaped like either the G1 or G7 standard. Its trajectory is fundamentally not just a G1 or G7 trajectory stretched a bit. Furthermore, you are firing it from a gun a bit different from whatever the test gun was in those original trajectory studies, at a different initial velocity. All this matters. The bottom line is that there is a limit to how accurately you can stretch the G1 or G7 trajectories based on just a BC number and initial velocity number, and that limit is not as good as many of us would like it to be.
Because of this, a couple of companies have begun measuring the trajectories of more projectiles from more rifles fired at more velocities. This is the origin of Applied Ballistics’ Custom Drag Models (CDM) and Hornaday’s bullet Specific Drag Models. Software based on these libraries, such as Applied Ballistics Elite, can output better distance compensation values than that which is based on G1 and G7 values because the underlying trajectory curves are those of the actual bullet in question. For more detail on these changes in ballistic calculation, Cal Zant did an excellent article on Bullet Specific Drag Models and Frank did a couple interviews with Brian Litz and Emil Praslick for the every day sniper podcast.
Additionally, the rangefinding software within commercial rangefinders has also shifted over time: first only offering a few stock options for preset ballistic curves; then allowing you to input your own G1 or G7 based ballistic profile that you had to, by guess and check, true to your actual field results; and now starting with a custom drag model and having a truing function within the software that eliminates the tedious guess and check truing. When using software with a truing function, you simply enter a few of your field results for recorded drop at a known distance and the software fine tunes the custom drag model, typically it’s initial velocity, to fit your data.
A bit on How Laser Rangefinders Work
As with most tools in life, a better understanding of the principles behind, and idiosyncrasies of, the tool’s function often results in more skillful use and better outcomes. The purpose of this section is to help familiarize the reader with just what a laser rangefinder actually sees and how it analyzes and conveys this information to the user.
Though a variety of methods can be used to assess distances using lasers, the majority of laser rangefinders, including this one, employ a time-based calculation for distance. What this means is that the pulse is sent out and bounces back, and then the time between these two events is used to calculate the distance. This is easy enough in principle. In practice, however, we’re not talking about one laser pulse but many, and a variety of other factors also complicate this, so the resulting data requires some interpretation. The most important of these factors are beam dispersion, refraction, and background radiation.
Beam dispersion refers to the fact that the shape of a beam being emitted from the range finder is a cone, with the wide base oriented to the target, and not a rod. That is, the beam spreads out and covers more area the further the object being ranged is from the rangefinder. In addition, most rangefinders, this one included, emit a beam that is not round in cross section but rather, closer to rectangular.
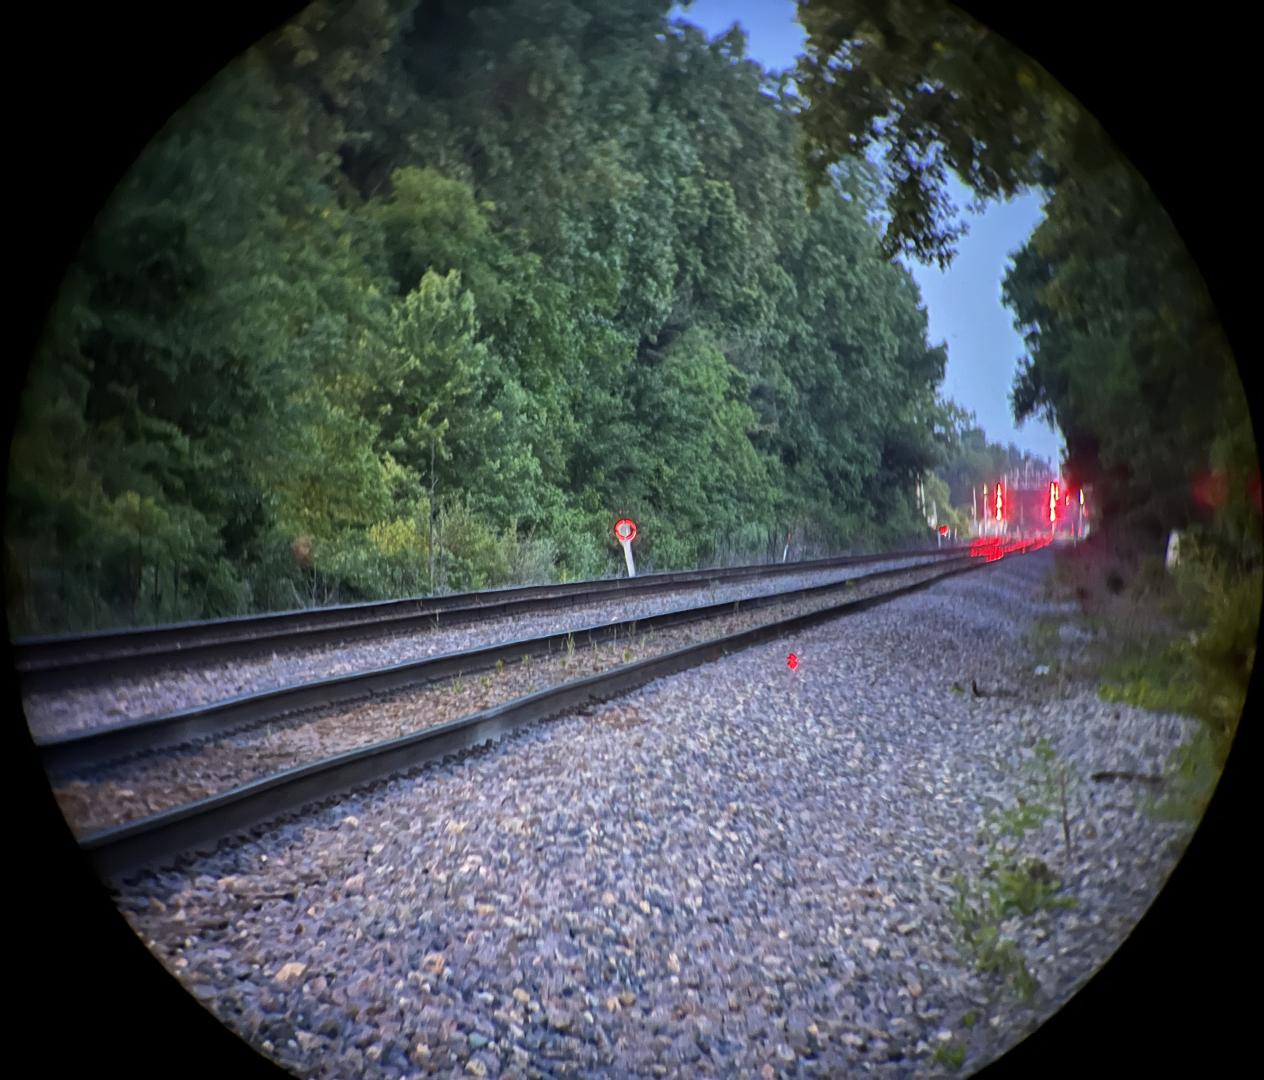
In the case of this particular rangefinder, the divergence is .5mils in the vertical by 1.2mils in the horizontal. Leica’s standard on beam alignment QC specifies that more than 50% of this beam must align inside the circular projected reticle. This is important to note not just with this, but also with other rangefinders. You may think that your beam centers nicely on the reticle you see, but this is more than likely not the case. Leica’s standard for alignment is higher than most, but the center of your beam is more than likely still not the center of the reticle, and this can matter when ranging small objects far away. Knowing where the center is can be helpful. If you have a nightvision system, it is quite easy to determine this, as the rangefinder’s 905nm beam is in the spectrum the nightvision sees. If you don’t have nightvision, there are a couple of ways to figure out the alignment. The easiest is probably to find a nice, flat, small sign roughly the size of your reticle when it’s a couple hundred yards away and see how far right, left, above, and below, you can aim and still get the range of the sign. I did this with the below pictured railroad sign and determined the reticle and beam in my test binos are pretty much dead nuts aligned. Remember, you can flip the binos upside-down during testing to be sure not to get returns from the post when you’re trying to find the bottom edge of your beam.
It is also important to understand just how large a laser rangefinder beam will get at longer ranges. At this time, average beam dispersion for a laser rangefinder is something like 1 x 2 mils. This is 7.2″ wide at 100 yards, or 72″ at 1000 yards. With this pattern, if you are trying to range a target at 1000 yards, unless it is an elephant, much of that beam will be reflecting back from what is around and behind the quarry and not the animal or, more likely at that range, steel itself. Most of the time, a rangefinder may receive a signal comprised mostly of light not reflected off of the target. Data analysis will therefore be necessary to pick the target out from what is not target. Similar in effect to this, many targets are not perfectly flat and perpendicular to the rangefinder. Because the beam is broad at the target end, this means that what is reflected back will not be a single sharp signal but a number of different reflections at a number of different distances. If you aim at a hillside, for instance, some will be reflected off the closer bottom of the hillside, some off the top, and some off everything in-between. A tree will also give a broad reading as it is a three-dimensional object with reflective parts and pieces throughout. What the rangefinder actually sees, therefore, is not to be represented as a single blip at a single distance, but rather a plot of many returns at many distances with a variety of peaks and valleys corresponding to distances at which a few (valleys) or many (peaks) of the laser pulses were reflected back. The rangefinder may carry out all the interpretation of this plot itself, as with these Leica Geovid Pro 32’s, or it may allow the user some degree of control. In theory, a rangefinder could also present the entire plot to the user for interpretation, though I am not aware of any models that do this.
Refraction refers to the bending of light through mediums of differing density such as air or water. The pulse sent out by a rangefinder must travel though a great deal of medium before returning. This air will have a variety of different temperatures and moisture contents. It may also contain microscopic or macroscopic water droplets. All of this, as well as dust in the air, will serve to scatter or absorb the laser such that much of the beam will either not hit the target or not return. The effect of this will become more pronounced with distance at the same time that beam dispersion dictates that the beam is more spread out with distance. This works together such that the further an object is, the less signal could possibly be reflected off of it. At some range, therefore, the signal will not be strong enough to be distinguished from the last of your important factors. Additionally, if your rangefinder is of the higher power 1500nm variety instead of the more common 900nm variety (these Geovid binos use a 905nm laser) absorption and scattering becomes a much bigger deal. 1500nm lasers interact heavily with water and so become far less effective the more water is in the air.
Background radiation is omnipresent but varies greatly with atmospheric conditions. At night, if you could see the target to range it, you would not have much of a problem. On a bright day, however, the sun is introducing a tremendous amount of electromagnetic radiation that is reflecting, refracting, transferring energy to objects, and being radiated once again at different wavelengths. Some of this cacophony of radiation will be close enough to the wavelength used by the rangefinder to be picked up. This radiation will form a floor to the possible signal strength returned from the object ranged that could be read.
I have made the following crude diagram of what the user, and the rangefinder, might see in a particular contrived scenario in order to help the reader to understand the type of data a rangefinder might be interpreting. This is not strictly accurate as the rangefinder does not send one beam out and record a bunch of different returns but rather sends out a whole bunch of tiny pulses and records a return for each. In other words, the theoretical return plot I show is much smoother than actual data would look, though the shape is the same. I think this way of depiction is most useful in helping the user to understand what a rangefinder sees, though. It may also help the user, where possible, to present the rangefinder with scenarios where it might have an easier call to make. In other words, to aim to get better returns. Sometimes, by ranging easier to read items near in proximity and distance to a small desired target instead of that target.
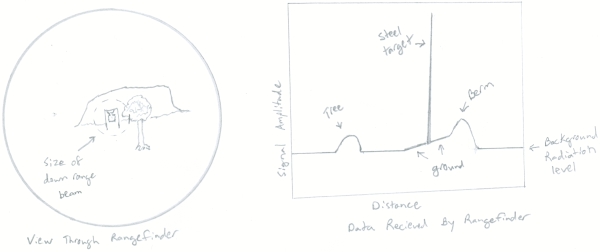
As you study the above diagram and plot, keep in mind the following possible ways in which the data might be interpreted by the rangefinder and how those interpretations would effect the user not only in this example situation, where the steel target is the desired object to be ranged, but in other scenarios as well: perhaps when ranging softer targets against hard or absent backgrounds.
1) A rangefinder might be programmed to display the closest peak in amplitude to the user. This would be the tree.
2) A rangefinder might be programmed to display the furthest peak in amplitude. This would be the berm.
3) A rangefinder might be programmed to pick the peak with the greatest area underneath. This normally corresponds to the object filling the greatest area of the diverged laser beam down range. In this example, this would be the berm. 4) A rangefinder might be programmed to pick the peak with greatest maximum amplitude. This usually corresponds to any object that is sufficiently large, reflective, and mostly perpendicular to the shooter. In this case, that is the steel target.
Most rangefinders are programmed to pick one of these criteria to determine the range from. A few have several modes you can switch between. These typically allow you to set preference for near / first target (tree), far / last target (berm), or highest number of signal returns / best target (berm or steel depending on specific criteria). The Leica Geovid Pros do not have different modes at this time. They are programmed for best target in the sense of most returns from a particular peak and would most probably return the berm.
Unboxing, Look, and Feel:
The Leica Geovid Pro 32s come amply padded both within their carrying case and further hidden within a custom-cut foam sarcophagus. The carrying case really isn’t anything to write home about: it’s really only suitable for storage. The fit of the binos within this case is snug enough you won’t want to be taking them out and replacing them during use, and no pockets exist for accessories nor anchor points for straps. For carry options, there are just two rather perfunctory belt loops on the back, which I suspect will never be used by anyone. The strap for the binos themselves is a bit better. It’s nicely padded and gives you the option carrying with a rubberized grip down or a softer neoprene. Two objective covers are also included which nicely snap into a ridge in front of the objective lens. Unfortunately, when open, the caps are not as well secured. No ridge is present in the rubber cladding to retain the caps, so they are held by stretchiness and friction alone. On just the first hike alone, I picked them off the ground a few times before just giving up and removing them altogether so as not to lose one. You basically have to re-cap after each use or use the caps only for storage and transport. You can’t let them bounce around hanging off the binos while walking. Lastly, a lens cloth, some sort of little plastic strap stabilizer, a quality German battery, a manual containing little information, and an inspection card are included. While the manual says Geovid Pro on the front, it appears not to have been totally updated from previous Geovid iterations and therefore includes some technical specifications and menu options that are not actually correct.
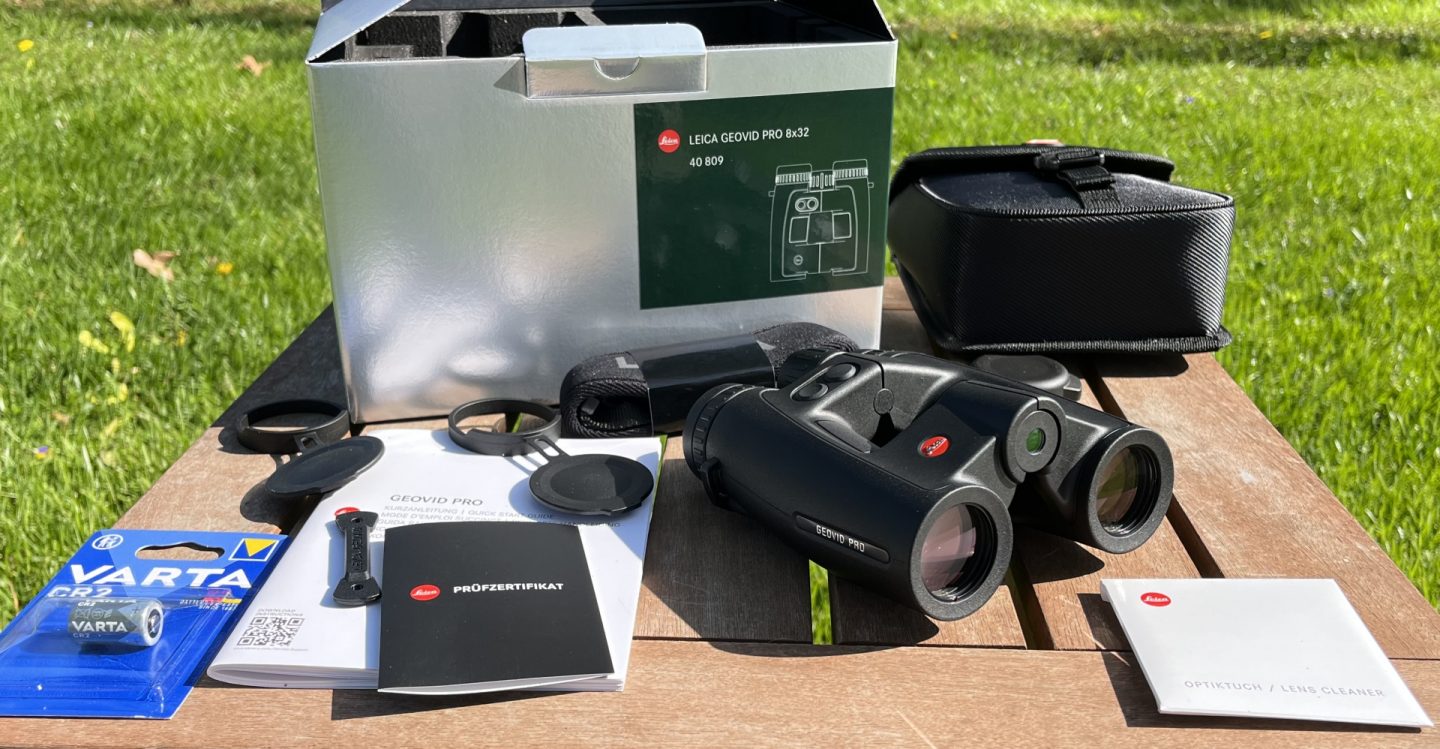
The Leica Geovid Pro 32 binos have an appearance that, excepting previous Geovid siblings, is quite unique. The Geovids utilize a Perger-Porro prism system used only in the Geovid series, which results in slightly banana-shaped housing instead of the more common straight tubes of the almost omnipresent Schmidt-Pechan roof prisms. This gives the Geovid series a unique look.
Outside of the unique housing shape, the appearance of all the the post-2013 Geovid models combines the birdwatching look that an open frame gives with a thick, robust, black rubber armor I associate more with hunting binoculars. Unlike many other rangefinding binoculars, Leica has opted to place the laser emitter outside of the lens system for the binoculars themselves. It is housed in the front hinge assembly and adjacent frame. The battery housing is also in this small section of frame and holds the CR2 battery most common in rangefinders today. The battery compartment is easy to get to and does not interfere with the ergonomics of the unit.
These ergonomics are quite excellent. The slightly bent shape to the optical housing is very comfortable and the open frame allows the user to get a good wrap around for a firm grip. The range and menu buttons are located adjacent to the focus wheel on the frame hinge closest to the user. They are quite well positioned for comfortable and secure one hand operation. The focus wheel is smooth and moves with a well calibrated resistance. Eye cups are of the turn-up variety and feature numerous different detents for different eye relief. They fit perfectly in my eye sockets and are probably the most comfortable I have ever used. As with most rangefinding binos, the Leica Geovid Pro 32s have a separate diopter for each eye. The reason for this is that the right one is used to focus the right eye to the display and the left one is next used to focus the left eye to the right eye. The display is only present in the right eye (not a problem for most people, but as my wife pointed out, might be a dealbreaker for anyone who doesn’t want to look like they don’t know how to use binoculars because they only have one good eye and it’s the left one, so they have to just use the right barrel and leave the other one sticking useless out to the side – I would roll my two good eyes at her, but she speaks from experience and I must agree she does look pretty funny helping me with binocular reviews). These diopters are not of the locking variety and on the first (10×32) pair of Geovids I tried, they moved too easily and would probably occasionally be accidentally moved by the user. On the second pair (8×32) they are a little stiffer, though not quite as stiff as I would like, but will nevertheless probably not be accidentally moved out of adjustment.
Overall, the comfort level and ergonomics of the Geovid Pro 32s are on par with what you would expect from top tier birdwatching binoculars, if a little larger and heavier than comparable current generation 32mm birdwatching binos with no rangefinder. They are, of course, smaller and lighter, and tremendously more comfortable than most competing rangefinding binoculars. This is unsurprising as these Geovids are the first alpha class 32mm rangefinding bino.
The Challenges of Getting Optical Performance from a LRF Bino:
Producing laser rangefinding binoculars of high optical quality is a difficult proposition. Nevertheless, this is a very important area of performance because the idea of LRF binos is not just to replace a small rangefinding monocular but also to replace the binos you use to find and observe your quarry. For such purpose, LRF binos need a lot better optics than the small, dark, heavily-tinted view you get through a little handheld LRF monocular unit.
Amongst the difficulties faced in designing optically high performing LRF binos, foremost are the effect of the display on optical performance and how to integrate the laser optic components with those for visible light. Leica has, I think wisely, partially mitigated the second issue by separating the laser’s emitter from the rest of the optical system. This helps with the lens coating issue of what wavelengths to optimize for and probably also makes it easier for Leica to align the laser with the reticle. Of course, you still do have some tough decisions to make when it comes to coatings as the laser receiver is part of the optical system in the right barrel, the laser is outside of the visible light spectrum, and the laser light must be diverted from the rest of the incoming light to a receiver positioned in the barrel. This is the primary of the two reasons that Leica went with the unusual Perger-Porro prism system instead of the more common Schmidt-Pechan roof prism system. Porro prisms are much less complicated from a coating standpoint and could be better optimized to unusual system needed in a laser rangefinder. This is probably why these Leica’s don’t show any noticeable chromatic aberration whereas the roof prism Swarovski EL ranges do.
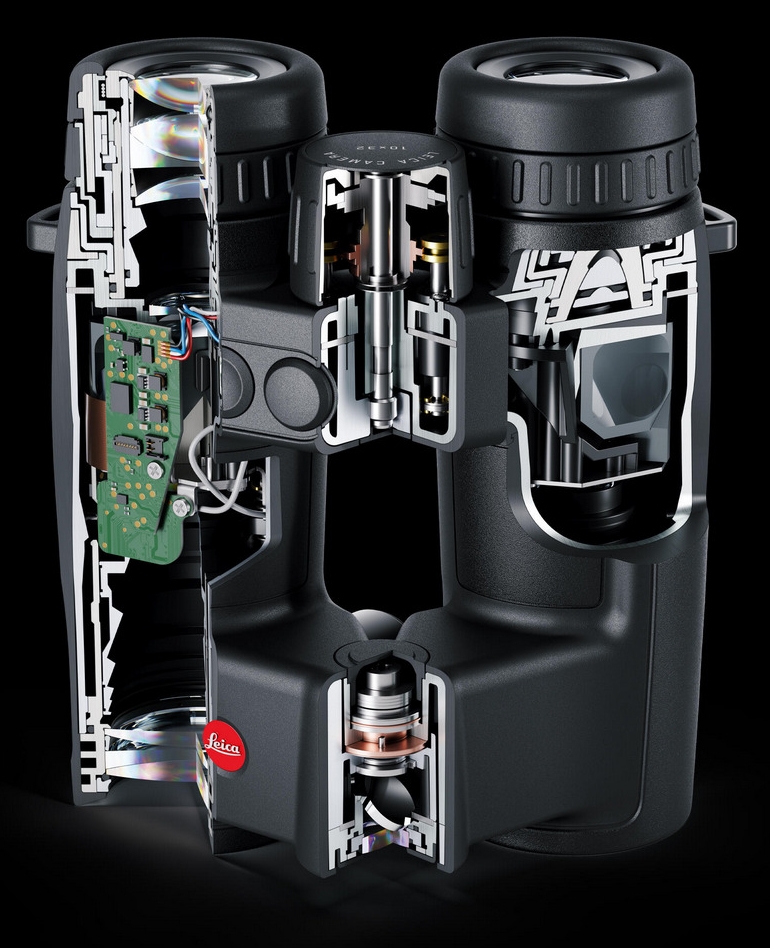
The other main optical challenge of laser rangefinding binos is the effect of the display on optical performance. There is simply no way to put a display bright enough to see in the optical path without some diminution of transmittance. Furthermore, to a great extent, there is a direct trade-off between how bright you can make the display and what percent of incoming light the binoculars can transmit to your eye. If you’re willing to have an image through the binoculars that is dimmer, and, say, blue-tinted, your display can be quite bright. If you want the image bright and untinted, however, you may have to go with less display brightness. The reason for this is that your display basically works by bouncing the display image off a lens in the main optical path. This requires some semi-reflective coating, as on a holosight or red dot. These coatings absorb light and the more you want them to reflect the light in front of them (for a brighter display) the more they absorb the light behind them (what you’re looking at through the binoculars). The challenge of light absorption of this nature is strong enough that two of the makers of optically superior laser rangefinding binoculars have opted for unusual choices in prism design, partially to counter the light loss. On these Geovids, Leica has gone with the aforementioned Perger-Porro prism design, while Zeiss went with an Abbe-Koenig prism system. Both of these choices are far less common than the Schmidt-Pechan prisms found in most binoculars and both offer higher light transmission.
Optical Performance:
Without question Leica has done an impressive job when it comes to the optical performance of the Geovid Pro 32 binos. There is no noticeable color tint at all in the image, yet the display is readable in most conditions without the user covering the objective with one hand or re-aiming the binocular at something darker. Furthermore, even in the challenging super bright conditions with a light tan or gray background where you might need to cover the objective or look at something else to read the display, you can still make out the aiming reticle well enough for ranging the target. Leica clearly preferred the optical performance end of the trade-off over the display performance end, but they did not go so far in this direction as to give you real issues in any conditions. I think they did quite well calibrating this.
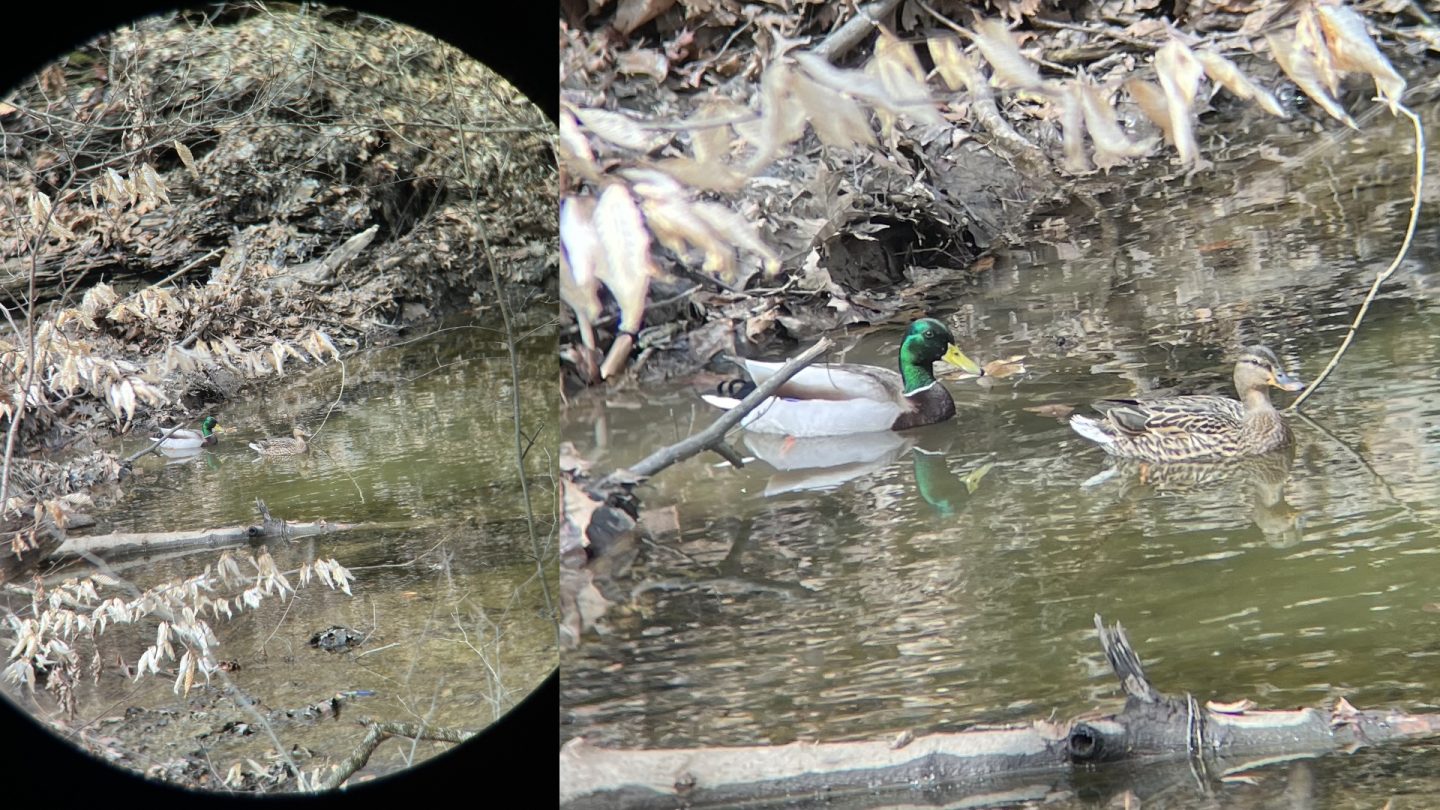
As for the unavoidable light absorption you get with LRF binos, you will not notice it in daytime even if it is rainy and overcast, but as the light fades in the evening, these Geovid 32s become noticeably darker than comparable quality non-LRF 32’s and this is especially so in 10x configuration. I should note here that Leica unsurprisingly has 42mm Pros slated for production sometime next year. Going with 42s over 32s is the obvious choice if low light performance is more important to you than size and weight, jJust as the 32s are the obvious choice for size and weight. For my part, the 8x32mm form factor was my preference for binos before these and the percent light lost due to these being laser rangefinding has not changed that.
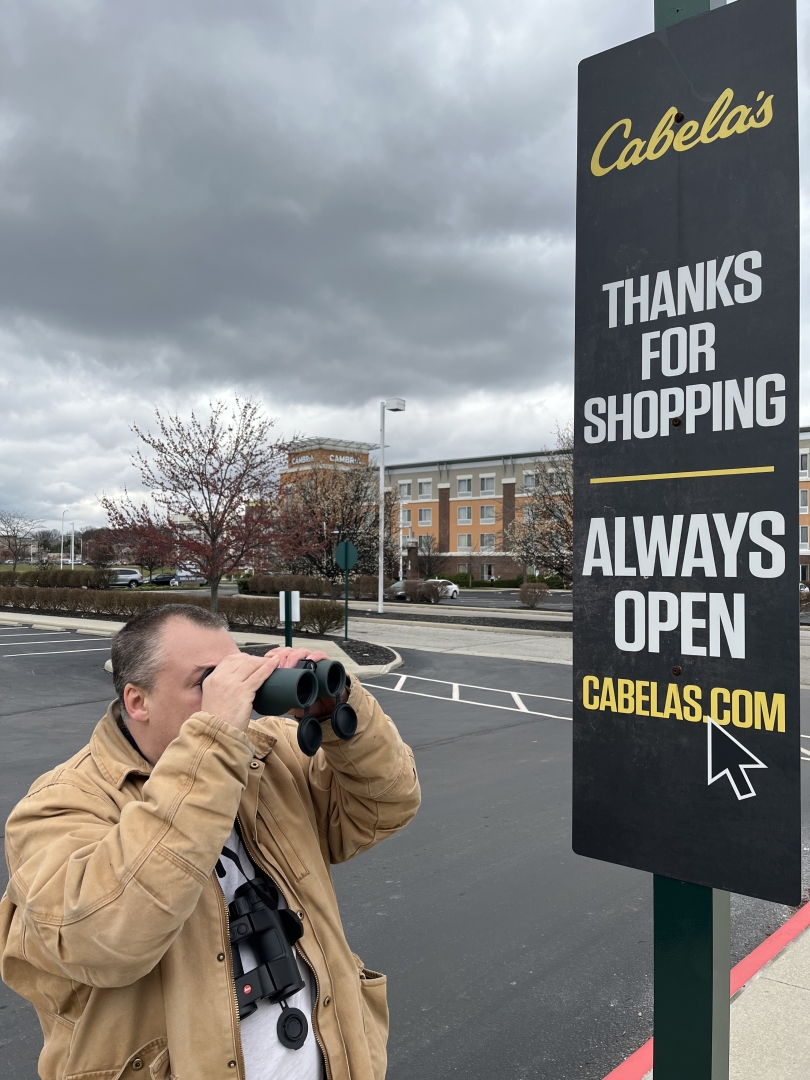
Over the course of this review, I have had the opportunity to compare the Geovid Pro 32s side-by-side with Swarovski EL Ranges, NL Pures, and ELs as well as to Zeiss Conquests, Vortex Razor HDs, and the Nikon Premiers I have used for years. Outside of the NL Pures, which are plainly optically better than the others, and the Conquests, which are inferior, there is mostly subjectivity in how you would line up the optical performance of the ELs, EL Ranges, Geovid Pro 32s, Vortex Razor HDs, and late model Nikon Premiers. They are all quite good, but they don’t render the image exactly the same or in ways that are directly comparable.
The first thing to talk about when it comes to how the above binoculars render images is Swarovison, or so-called ‘field flatters’. I say “so-called” because they do not correct curvature of field, which appears to the user as fuzzy out-of-focus edges when the center is in focus, but rather, pincushion or barrel distortion. This type of distortion appears to the user in the form of straight objects looking bent in the binoculars. You might think this is an obvious correction of an optical distortion and therefore all to the good, but in reality it’s a little more complicated than that. Lenses that remove these distortions are aptly named ‘field flatteners’ because in removing the distortion they also compress the user’s perception of depth. This goes double if the binoculars also use an Abbe-Koenig roof prism system. The result is an image where everything appears to be the same distance from the user. It is therefore hard to tell if one thing is nearer to the user than another unless it is literally in front of it, and even then you don’t get a sense of how far in front. As a result, there is a lot of debate in optics circles as to how desirable or undesirable an aggressively flattened field is. There is also a lot of difference in how much a particular maker or model flattens the field, if at all. Swarovski, who debuted this technology, goes in heavily for it on its EL and NL lines, whereas these Leica Geovid Pros appear to have no field flattening at all, but rather show quite a bit of pincushion distortion. It is therefore easier to tell how relatively far away things are in the Geovids, but, technically, these things are being significantly distorted, as is easy to notice when you encounter straight lines like a fence row. For my part I think that, in rangefinding binoculars at least, it is probably advantageous to have a better sense of how far things are from you and from each other even if it costs you some distortion.
Color rendition is another area in which the aforementioned optics differ. The Geovids and Nikons in particular are quite pop-py. Reds and greens really jump out and look more vibrant in the rendering than they do in reality. Swarovski, on the other hand, appears to render colors more true to life.
When specifically comparing the Leica Pros to the EL Ranges, I felt that the EL Ranges had a bit of an edge when it came to contrast, as well as the obvious (being 42mm instead of 32mm) edge in low light. The Leica Pros had a clear edge in chromatic aberration, showing essentially none, whereas there was a small amount of aberration in the EL Ranges. The binos were quite close when it came to resolution. Close enough that I would need more time and optical charts than I had access to at the time to parse the difference given the borrowed nature of the EL Ranges. In other words, they were too close for the winner to really matter anyway.
My takeaway from my optical testing of the Leica Pros is that they were quite competitive with non-laser rangefinding high-end binoculars when it came to optical performance. They were also quite competitive with their green team rivals. In fact, I preferred them to both the Swarovski rangefinding ELs and also the non-range finding ELs. The Leica Pros are quite excellent optically: so good, comfortable, light, and compact, you will certainly use them for any birdwatching, nature observation, sporting events, or whatever else you also do with binoculars that has nothing to do with shooting. Users particularly needful of low light performance for hunting in the early morning or evening may want to jump up a lens size, though, as all rangefinding binos have a bit less transmittance than their non-rangefinding brethren. Fear not if you’re in that camp. The 42 Pros will be next year.
Laser and Sensor Performance:
Over the years, Leica has vacillated somewhat on whether or not to include a range number in the product name of their rangefinders in the way most companies do. With its previous generation 3200.com Geovids, Leica had included a number. I believe this generation was also originally slated to include the number 2700 along with the pro designation. I recall some of the early marketing stuff had that number appended to it. At some point, they decided to drop the number. Perhaps this is because they plan a 42mm Pro model as well which would need a different, 3200, number even with the same laser. This is because the laser receiver is in the objective and a larger objective captures more, and thus ranges longer. Or perhaps Leica finally bowed to the fact these numbers are ultimately meaningless anyway. The bottom line is that no recognized standards exist as to what target has to be ranged in what conditions and, given the fickle nature of atmospheric conditions and the tremendous distances involved, such standards would be hard to achieve anyway. So the numbers companies plaster on their products typically are only meaningful as indicators of which model in their product line ranges farther than which other model. The numbers have little or no correlation with a competitor’s numbers and also don’t tell you much about what to expect in terms of real world performance. Leica, in choosing a number but being more conservative than most other companies in picking that number, had never really been doing itself any favors.
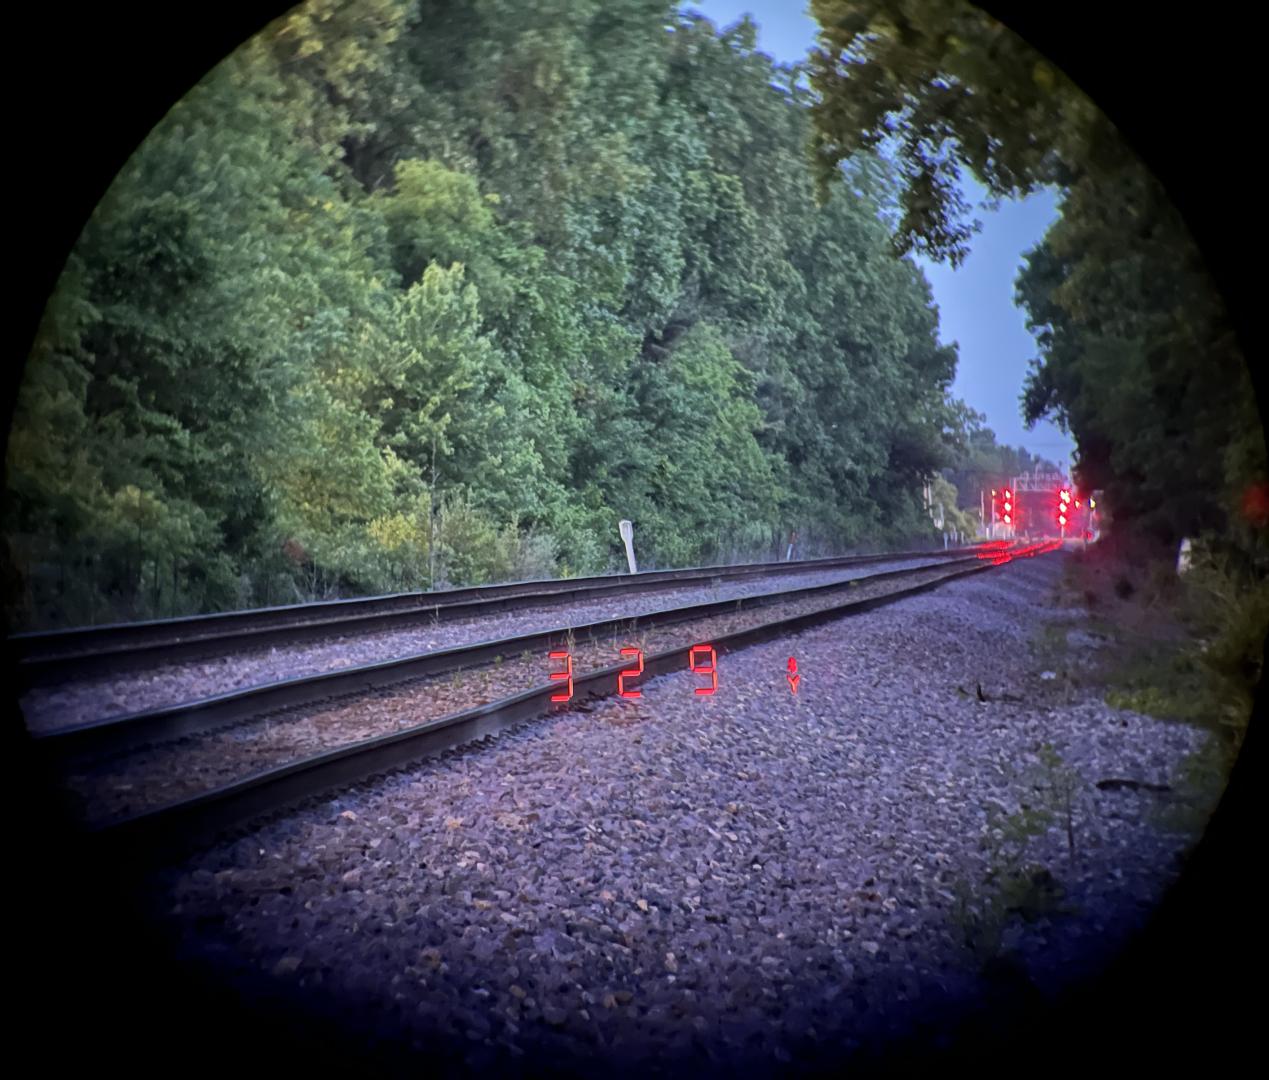
Of course, you want to know what to expect the Geovids to be able to do and I did a good bit of testing in a variety of conditions to be able to give you some scenarios. These all assume you have a steady rest for the binos, as otherwise all you would be getting is a measurement of how steady my hands are, and that is neither objectively good, or of much use to you.
Under totally optimal conditions, being late evening with just enough indirect light to make out the target and a huge metal municipal water tower as that target, the furthest the Geovids will range is 3,044 yds. They will range this every shot, but will not range 50 yds further on any number of tries. On a bright sunny day, worst case situation, they will range squishy humans at about 900yds and will get to 1050 or so if the sun dips behind a cloud. Returns near the maximum range for a given target and conditions are generally intermittent on every rangefinder I have ever tested. Tree lines, the Geovids can range in sunlight out to around 1850 yds and a somewhat overgrown gravel berm they can get to 2,400 yds, though only when the sun dips behind a cloud. They will range a pickup truck sized boat in the bright sun zipping along on the water at 2,140 yds. I’m not sure how useful it is to know that specific piece of information, but it was fun to do.
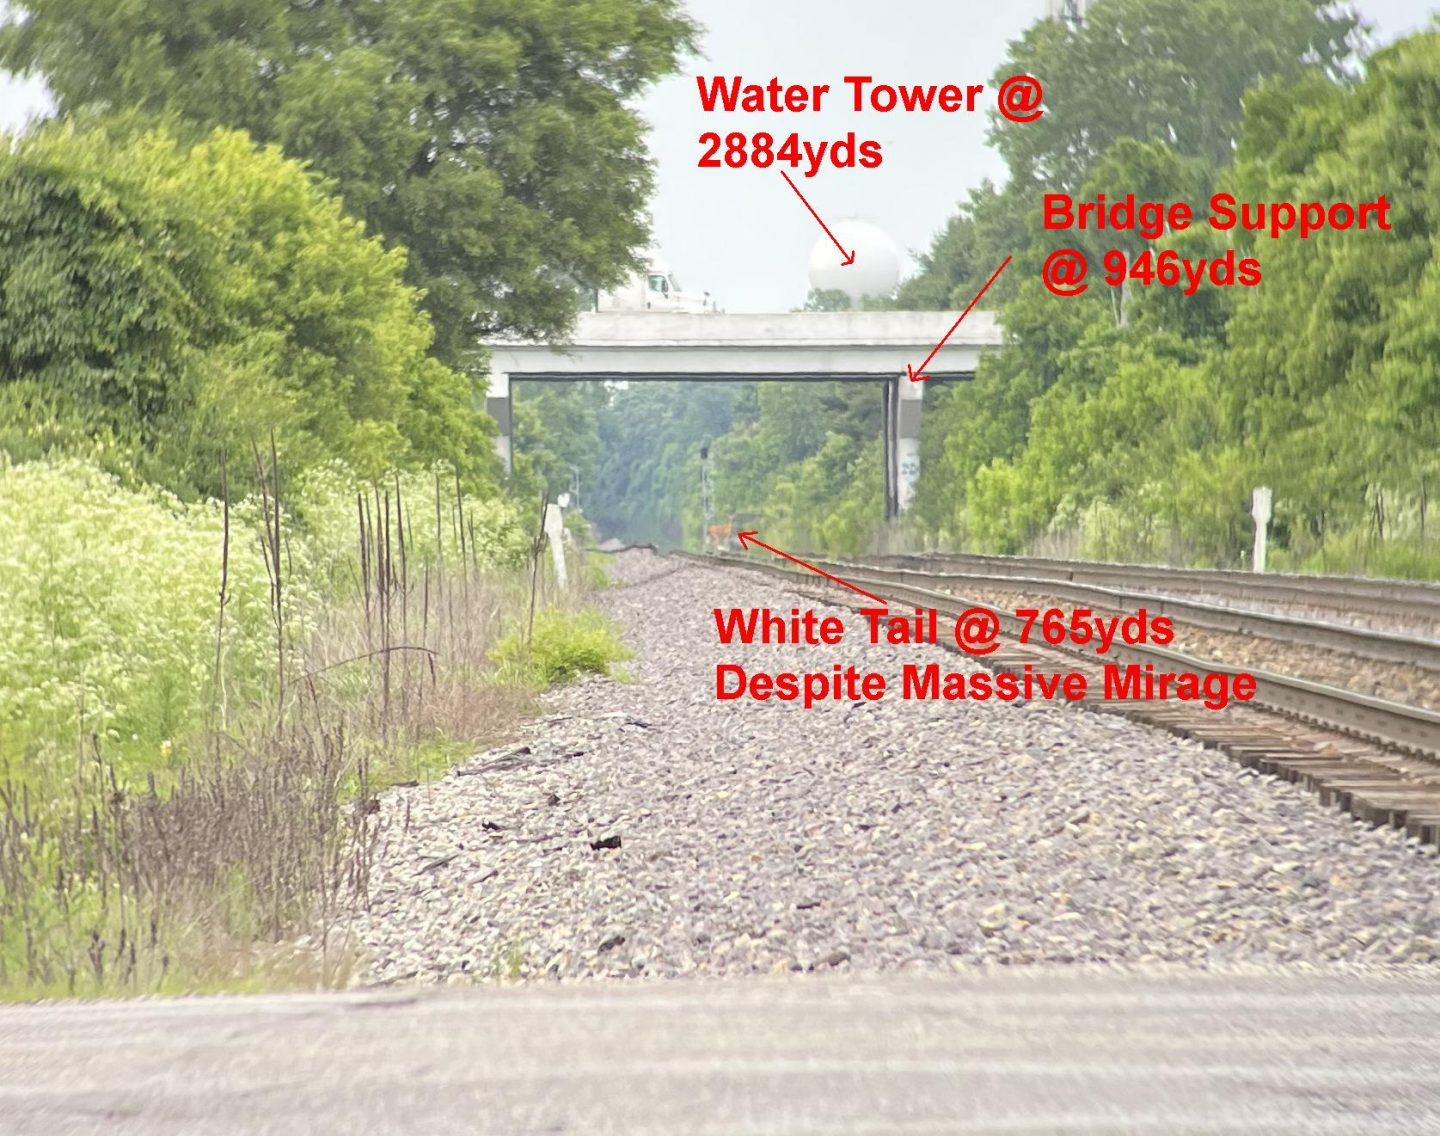
Throughout the course of the Geovid Pro rangefinding testing, it was being compared side-by-side with the original Vectronix Terrapin, long considered the standard in handheld rangefinding units. I was surprised, and greatly impressed, to find the Geovids returned results on more targets than the Vectronix did. This appears to be some function of either the Geovid’s tighter beam divergence (.5 x 1.2 mil vs. .4 x 2.4 mil on the Terrapin) or a better data processing algorithm. The Geovids are also much faster than the Terrapins when returning ranges. They are near instant, whereas a noticeable lag exists with the Terrapins. I say that this better performance of the Geovids on most targets than the Terrapins is probably due to processing or beam divergence because the Geovids are not actually the more powerful unit. You can get a further max range on the Terrapins than on the Geovids, provided that target is large and simple. I was still getting water tower ranges beyond 3,110yds on the Terrapin after the Geovids maxed out. I was just sick of walking and had a bad feeling I might have another 1-2k yds to go to tap it out. I have heard people talk of pulling 5k ranges with a Terrapin on cliff faces. As for the ranges returned on targets ranged with both units, they never differed more than two yards from each other except on the water tower. Given that the tower is round, massive, and 3k yds away, it is implausible to expect them to be ranging exactly the same place on the curved surface. This exceptional degree of agreement is impressive, but not really surprising as most rangefinders seem to be accurate within a few yards these days. Accuracy just doesn’t seem to be an issue with the technology,or at least not within an order of magnitude of anything a shooter would have any concern about.
Overall, I was quite impressed with the rangefinder performance of the Geovids. Being generally better than the Terrapin was not something I expected and being able to range squishy flesh bags at 1k on a sunny day is pretty good. Deer are easier to range than humans, so I expect that hunters will be able to easily range any fuzzy animal they are hunting well beyond the maximum range they would actually intend to shoot at it from. Even in the worst conditions I would expect easy returns on a deer in excess of 1k yds. I also expect that most long range competition shooters will be quite satisfied with the laser performance, ELR guys excluded.
Of course, a laser rangefinder is not the only sensor in the Geovids. There is also an atmospheric pressure sensor, temperature sensor, angle of inclination sensor, and compass. Some of the appeal of an all-in-one rangefinder and ballistic solver is that all these sensors can be automatically integrated into the calculations for great accuracy and speed. Unfortunately, from what I have read, many of the products thathave this sort of sensor suite seem to have low-balled on most of them, and they aren’t very accurate calling into question what the point of having them at all is. The Leica rep made a point of telling me they spend a good deal on these sensors and that they are the best that can be reasonably purchased. I, of course, tested them. Though the user does not have this data viewable via the in binocular display, most of it shows up on the smartphone when the binoculars are being used in connected configuration. I found over several different sessions that the temperature sensor was always within the range of different thermometers I had, as well as the local weather data, as was the atmospheric pressure sensor. I found the angle of inclination sensor within a degree and a half or so of correct. The compass, though its data is not directly accessible, can be indirectly tested by using oremote GPS mapping points in BaseMap. By taking multiple measurements of the same point, I was able to determine that the compass will read as much as 9 degrees in difference from one measurement to another of the same point. Furthermore, the distribution of measurements typically does not center on the actual, correct, value. This is more than accurate enough to get good coriolis numbers but as we will see in the ProTrack section, it’s not ideal for placing remote map pins. From what I have read, this degree of accuracy in compass readings is about what you can expect from a chip size magnetic compass and is in line with the magnetic compass sensors found in cell phones when those sensors are being used by an app that does not supplement them with the phones GPS.
All in all the sensor suite aboard the Geovid Pros looks quite good. Relative to what I would consider necessary to produce data for the purposes of ballistic calculation, it’s probably even a good deal better than it needs to be.
GPS Mapping (Leica ProTrack)
With this generation of laser rangefinders, Leica and a few other makers have introduced the ability to mark the location of a ranged point in GPS software. At the time of this writing, BaseMap is the only choice for doing this and doing so requires the paid subscription version of the BaseMap software. Google Maps and Garmin are also mentioned in the Leica advertising literature in conjunction with “ProTrack” but at this time there is no integration of this function within those software packages and the Leica ballistics app does not itself have mapping functions.
The idea of Leica ProTrack is to help the hunter to find the start of a blood trail. Often, after an animal is shot, it goes some distance before it dies. Because animals do not understand what being shot represents, they do not usually go far if they are not actively chased because they neither understand they are dying, nor that they are being hunted. They just feel hurt, then weak, and tired. As such, after delivering a shot, hunters typically lay low and wait a while to start tracking the animal so that it will not likely go far before bedding down and dying, so they won’t lose it. It is therefore quite helpful to have an accurate point to start your search for a trail and this is not so easy when the game starts 500yds from you and you have to wait a while before starting to track it. Things can look a lot different standing in a field than looking at that field from 500yds. It can be hard to find your starting point and that is what the idea is behind ProTrack and similar remote point mapping functions.
Prior to doing this review, I had not noodled with the BaseMap software at all. I had heard of if from people using its satellite map to estimate ranges to targets by bringing up a map of the range and dropping points on the map where it thought the targets were, but I hadn’t actually tried it. I found it a slick software package. It has lots of functionality around creating routes, measuring distances, and marking campsites, gear drops, and other important points. BaseMaps also is designed to be used without access to a cell phone signal. This is an important consideration, given that the locations having the best hunting and hiking rarely offer cell service. This also gives the Leica Geovids, and other makers’ products that interface with Basemaps, the advantage of working without cell service, whereas Swarovski’s similar feature uses its own proprietary software and requires a cell signal. Most importantly from the standpoint of my use, BaseMaps interfaced quite easily with the Geovid binos.
Within BaseMap, mapping points while ranging them is found within the BaseMap software under tools and is called “Remote Marker”. Once you have paired your binos to the software, hitting this function will prompt you to range what you want to mark. When you range, the point will show up on your map with a line from where you are standing to the ranged point. You can then choose to place a marker at that point, manually adjust the marked point’s location, or just dump the point. The software uses three data inputs to decide where the point should go. These are the user’s location determined by your phone’s GPS, the distance and angle of the point from the user determined by the binos, and the Azimuth of the binoculars, determined by the compass in the binos. The first couple of inputs are quite good. Typically, outside the GPS is good to within about 3yds, the range within 2yds, and the inclination within a degree and a half or so. In my testing, however, the Azimuth was only good within 9 degrees or so. This can easily mean 50-100yds of error on a longer shot.
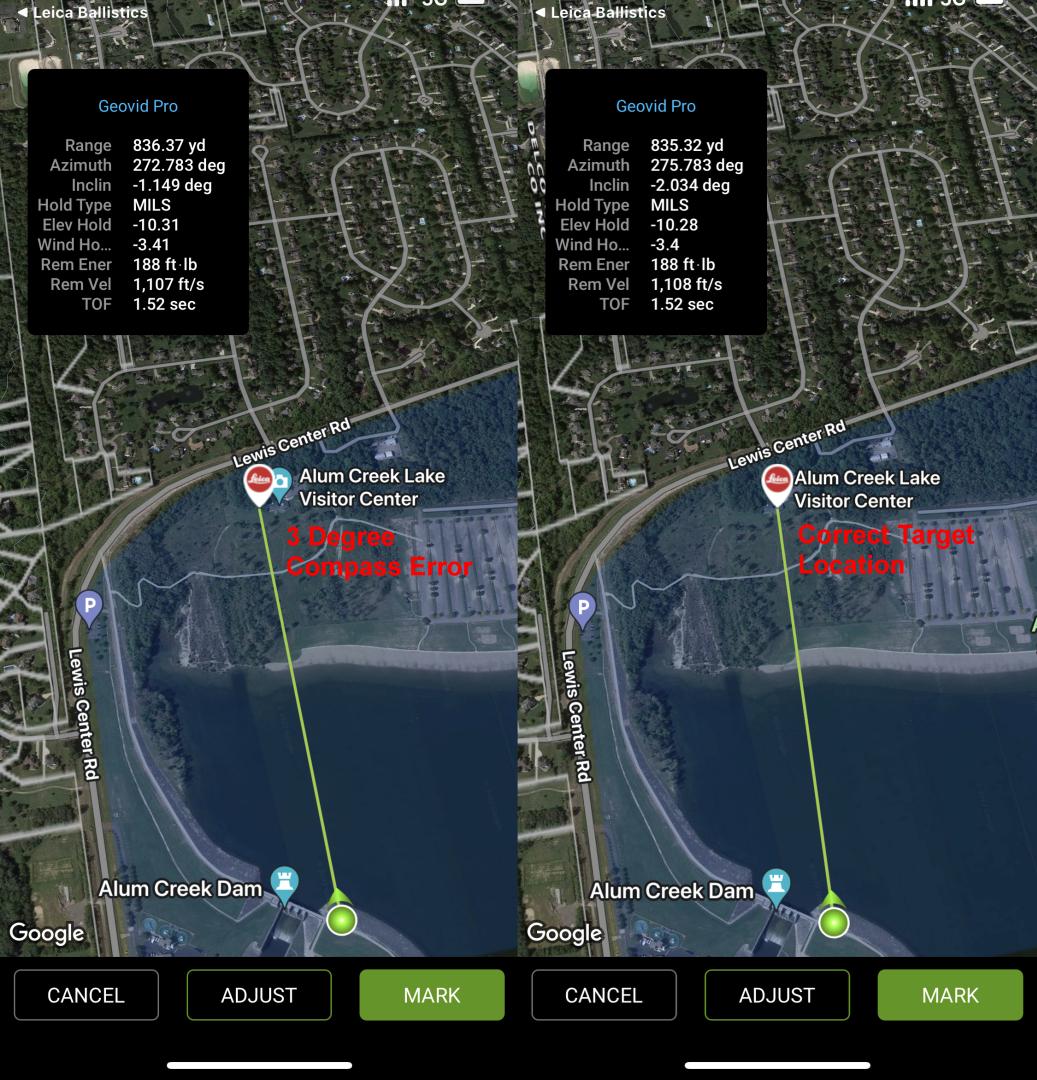
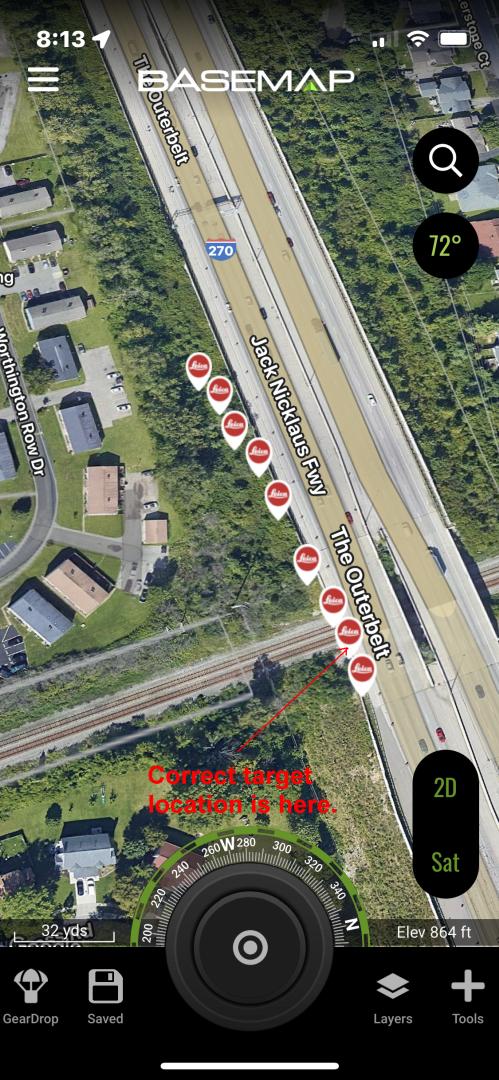
Potentially being off by 50-100yds on a target’s location sounds bad, but, fortunately, this is not a random error and we are not talking about an area of uncertainty as much as a path of uncertainty. There is very little uncertainty in either the user’s starting location or the distance of the target from the user. Therefore, you can pretty easily mark out an arc-shaped path of possibility and just walk it from one end to the other. You can do this by ranging and marking the same point 5-10 times. All those points will line up on a gently arcing path. Its no nice, clean, single pinpoint, but it is still a tremendous aid in helping you find the animal’s trail. Frankly, the software should probably just mark an arc for you on the map instead of a single point. This would save you from having to mark the same point 5-10 times, and I believe is what Swarovski actually did.
Ballistic Software
As many of you are aware, by EU law, laser rangefinders made in the EU are not allowed to deliver ballistic solutions beyond 800 meters. This has been a huge pain in the butt because many of the best laser rangefinders are made in the EU. Leica, in particular, has long been a pioneer in this field. In the past, this typically meant that if you were shooting farther than 800 meters, you either had to take the extra step of manually entering the range your rangefinder returned into a separate unit such as a smart phone, or you had to link your laser rangefinder with a Kestrel and use its software. Workable but not ideal solutions, and each required the second unit (phone or kestrel) to be used at the time you were ranging to deliver the desired solution. I guess the EU’s argument was something like: beyond 800 meters is only for military, as nobody really takes shots that far hunting since it’s pretty questionable ethically. Well, that doesn’t mean the same guy that hunts with a product doesn’t also shoot some steel that far: I would bet most do. Leica has come up with a very clever solution to this 800 meter limitation and legal argument to back that solution. The solution is for the user to be able to upgrade to different software, not made in the EU, on your EU hardware. After all, it is not the EU made hardware that is returning the ballistic solution, it is the U.S. made software. Sort of like if you bought an EU made smartphone and then downloaded a ballistics app. It’s a clever concept and Leica has made it quite easy to do. There is a link in the included ballistic app that takes you to the applied ballistics website where you can pay your coin Litz and company to upgrade the application running on your binoculars to return longer ranges, use more advanced custom or personal ballistics calculations, gain a truing feature, and have a few more options in general. Importantly, this upgrade changes the software on both your phone and in the binos. Both are now capable of doing the longer range calculations without the other device present. You still need to link the binos to your phone to change what ballistic profile you drop in your binos, but they do not have to be linked when ranging to deliver the desired ballistic calculations. The binos store the last profile and settings uploaded for use unattached to the phone app. Through the course of this review, I used the Leica Pro binos with both the included AB ultralight software, and the upgraded AB elite software and used the binos linked to the phone while ranging and unlinked.
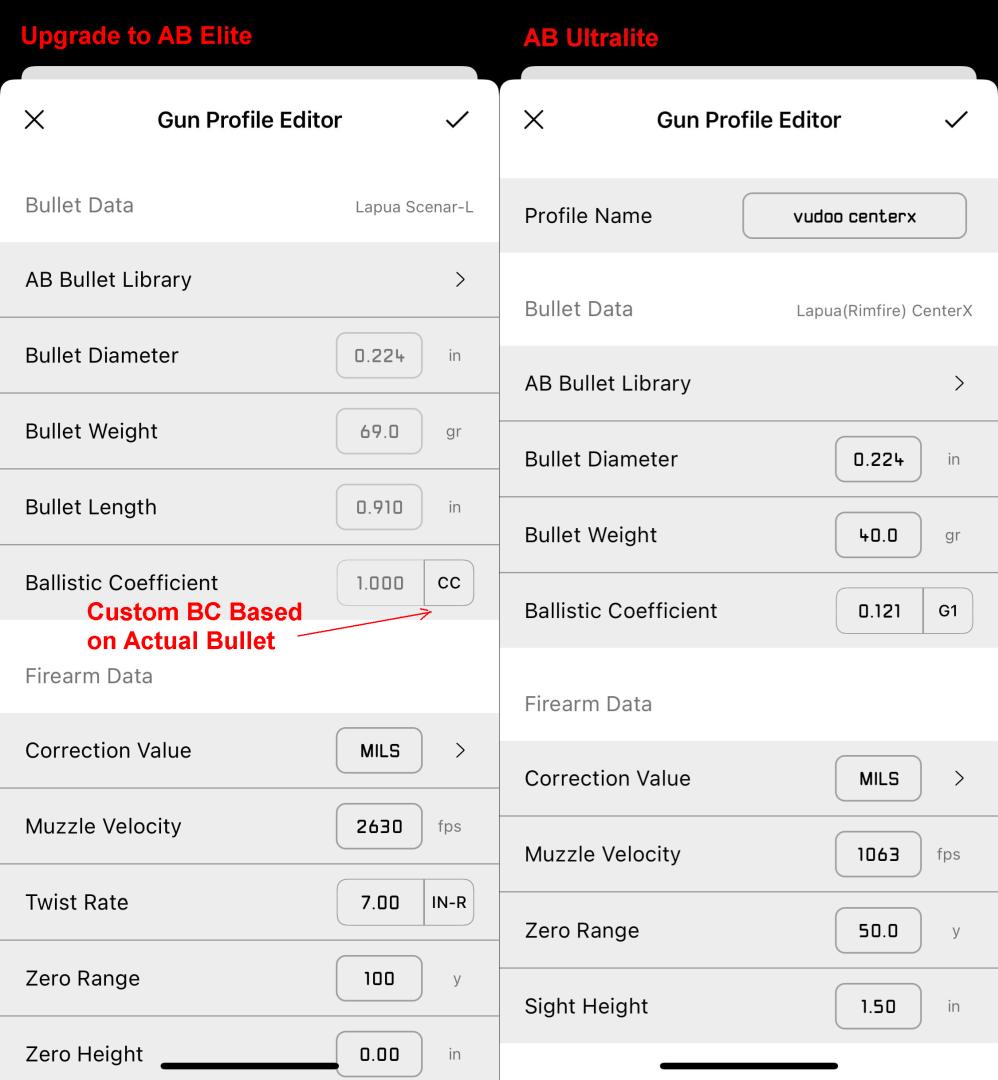
Of interest for those who own the last generation .com binos and monoculars, Leica has made available to you an upgrade to Applied Ballistics’ Ultralight software with the switch over to AB software from Leica’s previous in-house suite. I am quite impressed with this degree of after-the-sale service: Leica certainly didn’t have to do this. Those with the older product will get this upgrade through the new Leica Hunting app. Those with the new Pro units download the Leica Ballistics app. You should note that the old products unfortunately cannot be upgraded to AB Elite and their underlying calculations are not changing. This is essentially an upgrade in user interface and also an upgrade in bluetooth functionality and stability. A good deal of the reason for Leica switching to AB from their in-house software was actually user interface and bluetooth driven. AB has been doing ballistic solver apps for some time now for a number of parties and has become the industry leader in the field.
I would love to say that these Leica Pro binos had the first ever shooting related smartphone app to just work flawlessly for me right out of the box. This was a longshot, given the first version of the app I had was actually a beta version and it didn’t happen. There was actually something of a saga and this is much of why you’re getting the review now and not a month ago. The experience left me with an impression of just how quickly and responsively AB got to work on reported issues, as well as just how beta that beta software really was initially. The first issue I had related to ballistic software ironically wasn’t even software related. The first test binos I got just had a bad bluetooth chip and couldn’t maintain a steady connection to the phone. This manifested as an inability to upload any ballistics and getting conflicting messages concerning whether the binoculars were connected to bluetooth or not.
Once I got the second set of test binos, with working Bluetooth this time, I got down to running through the software. One of the first issues I encountered was what seemed a particularly persistent default, or perhaps a test profile for a 1-11.25 twist rate 175gr .308. All or part of this profile occasionally created itself or creeped into profiles I was in the process of making, replacing values I had specified with its own. Evidently, this issue showed up in the Sig 10k’s AB software as well. At the same time as I had the persistent 175gr profile issue, the sub-menu for muzzle velocity calibration and drop scale factor calibration was not working properly. My .22lr, for instance, got a calibrated muzzle velocity of 1.3million FPS. This is a bit more than the 1063 fps entered and quite a dramatic reaction to the tenth or two mil adjustment needed to true the model to my field data. After sending this information in, AB had an update out in a few days that banished the ghost .308 profile and the million feet per second calibration. The calibration was still off, though, in each profile I tried it on. So I sent in another message. The turnaround was even quicker this time and the calibration feature seems on point now. Interestingly, the actual profiles themselves never amiss during this process. It was more like the underlying AB engine was not totally coupled properly to the new Leica specific UI. Lastly, I found a bug wherein just part of a ballistic profile could be transferred to the binos. This resulted in a profile name and initial velocity from the new profile but the actual calculations from the old one. Not so good. Turnaround time on this one was a bit longer. A couple of weeks. It has been mostly remedied with an update earlier this week and will be completely fixed with the 1.1 update Monday. At this juncture, the partial transfer only occurs if you switch the active profile in the app when the binoculars are not turned on. In such case, when you turn the binoculars on, only a partial transfer (initial velocity and profile name) will occur.
Update 8-22-2022
Leica has released the Ballistics 1.1 update along with an associated firmware update for the binoculars themselves. This update fixes the potential for an incomplete ballistic profile transfer when the profile is changed in the app at a time the binoculars are not active. With this fix I am unaware of any current glitches in the software for the Geovid pro binos. Yay.
Also, The software update for the older .com models to using the newer Ballistics app has been delayed. They are thinking maybe October or so on that.
Lastly, the guys at AB have been furiously and regularly adding personal ballistic profiles to their library. There are a great deal more of them available now and many are not just duplicates of the 105gr 6mm Berger hybrid. Particularly juicy now is the .22lr section and the ELR type large bullets though there are a number more 6.5 and .308 bullets as well. The personal data models are beginning to be a very nice source and include a number of bullets for which a custom model had not previously been done. All of these models are available to all the AB elite users including both those who bought it through an upgrade to their Leica Geovid pro’s and everybody who bought Sig 10k’s as it is standard on these.
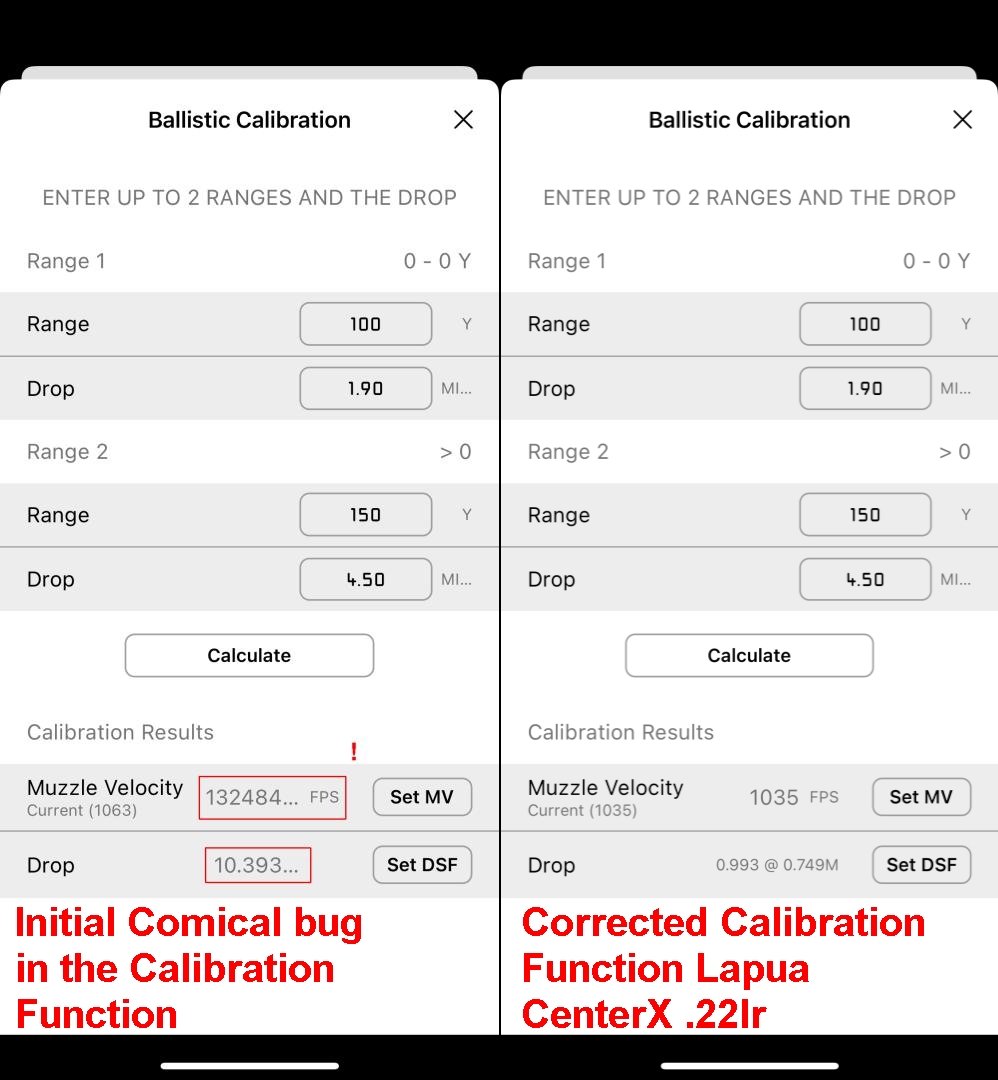
I have found this Leica skin, flavor, version of UI for AB’s underlying software quite nice. The menu options are simple, intuitive, and clean. So far I have pretty much found what I’m looking for quickly and easily. The Elite version differs from the default ultralight in offering a few more options, but with a layout that is basically the same. The biggest differences are that AB Elite does not limit solutions to 800M, includes custom and personal models for many bullets, has an adjustment for sight scale factor, has a feature for truing the muzzle velocity to your field data, and includes a second calibration for drop scale factor to true to your data and improve ballistic solutions beyond supersonic. I understand the calculations also add in a few other environmental factors as well. I think this included spin drift based on a wind you input and Coriolis. I poked around a little in the Custom and personal ballistic models to see what they have. In the Custom models they have a good number of common long range precision bullets in common calibers, but are by no means complete. When you wander away from the more common long range precision stuff to hunting bullets, for instance, the library gets thinner. You can switch to the Leica library, though this is not a custom model but rather just G7 based, and of course you can go the old-fashioned way of entering all your own bullet data manually if, as with the very nice 130gr 6.5CM Norma Scirocco hunting rounds I have some of, they don’t have the bullet in any database. However, there is also a tab to request a bullet, which will bring that bullet to the attention of the AB guys and flag it for potentially getting its own custom model, as AB is constantly adding new custom models. Perhaps I’ll do that on the Norma stuff tonight and see if a custom model beats this article to press. The request feature seems like a rather nice addition. As for that library of personal ballistic models, well, they’re all in there. Basically, all of them are based on a couple Berger and Hornady 6mm bullets. So, you end up with 500 or so very similar models you could choose from for a 6mm Berger 105gr hybrid. Gee, I wonder what competition shooters are using. These models are no doubt useful to the competitors who made them at events, but making them publicly available is of very limited usefulness and high redundancy.
Considerations for Timed Competition Use
In the last few years, Leica has clearly been making an effort to expand into precision rifle competition. Their PRS 5-30×56 scope being the most obvious thrust in that direction. Several of the features on the Geovid Pro’s are likewise intended to make it a better tool for competitors. The most obvious of these is the switch to using Applied Ballistics for the ballistic calculations. The switch improves the range and accuracy of the ballistic models and provides access to the ridiculous number of very competition driven personal ballistic models made by competitors using the current meta gear at events.
Of course, enthusiasm over competitive events incorporating unknown target locations and ranges has been growing recently and it did not take competitors long to realize the tremendous advantage of having laser rangefinding binoculars that incorporated ballistic solvers in such an event. A single tool, where previously you had binos + a laser range finder + a Kestrel or ballistic app, is a lot of time savings. Though these competitions offer a bit more time than previous known target known distance iterations, they are still pretty limited, and the quicker the better when it comes to getting to the ballistic solution. The Geovids return ranges quite fast, but they were not the quickest or the most flexible when it came to how the results were displayed because they weren’t originally designed with the idea that being 10 or 15 seconds faster really mattered. Leica has been working to improve this within the limitations of an in-bino display that can only handle one line of data at a time.
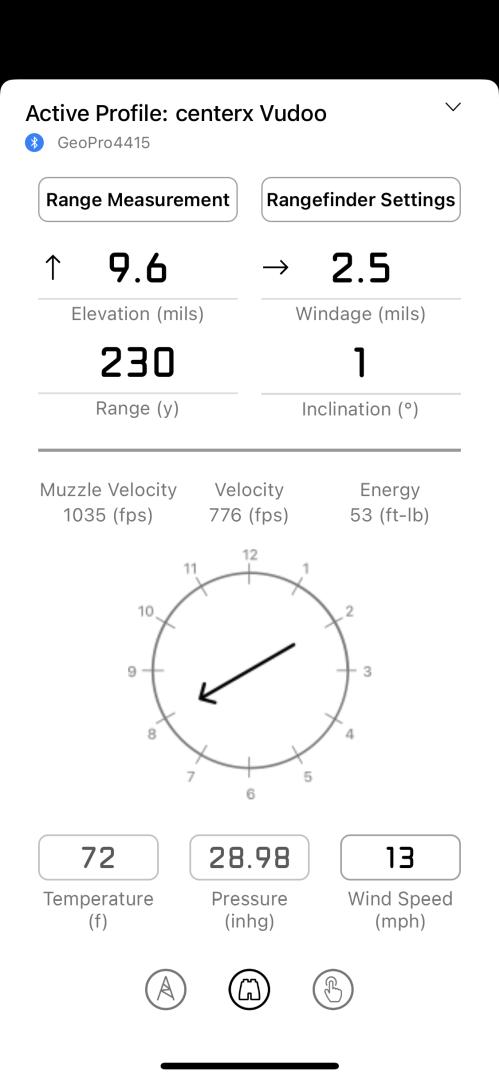
First off, when you range in phone-connected mode, all values immediately show up on the phone’s screen. So, if you have the phone mounted to an arm band or your rifle, or perhaps the spotter has the bino and the shooter the phone, the data is all up on one screen there immediately. In case you ranged the wrong object, you can now also interrupt the previously uninterruptible display cycle by hitting the range button again. This has been changed based on user feedback just since the launch a month or so ago, and it is certainly welcome. You can initiate the re-range as soon as 1.5seconds, as laser output regulations will not allow for faster emission of full power pulses. If you have a target you think will be tricky to range though, you can hold down the range key to produce a quick succession of lower power range returns releasing the key to get the ballistic solution once you hit a range number that looks like the right one. Lastly, Leica is considering adding options to allow the user to change order and duration on the current cycle of in-bino solution screens. Currently you get two cycles of two seconds for the range, two for the drop solution, and two for the wind-based a wind value you entered into the app.
Summary and Conclusion
Laser rangefinding binoculars with built-in ballistic software, atmospheric sensor suites, and geotagging functionality carry out an impressive number of functions. My evaluation of each one has extended this review to something of a chapter book. This multi-faceted nature puts manufacturers in a difficult spot as there are quite a number of different major functions that must be correct for customers to be interested. I think that Leica has done uniquely well with the Geovid Pros in hitting the major points: these being optical performance, laser performance, and ballistic Software.
Optically and ergonomically, these Geovids are both as comfortable and as optically good as high-end bird watching glass. They don’t feel or look like a clunky, uncomfortable, and oddly-tinted rangefinding product. They are therefore exceptional for long periods of use in target location, and observation. Being 32mm, they are also small, compact, and easy to carry. You’re going to use them for more than hunting and shooting. They are really good binoculars.
The laser integrated in the Geovids is likewise excellent. It features a tight .5 x 1.2 beam divergence and, in practice, returned more ranges on more targets than the venerable, and more powerful, Vectronix Terrapin I tested them alongside. Certainly, with the Sig 10k’s out, the Geovid Pros are not the farthest ranging consumer rangefinders out there, but, ELR guys aside, they will deliver ranges in excess of most long range shooters’ needs and are quite good at picking up targets within that range. Want to range a deer out to 1k in bright difficult conditions? No problem. The Geovid’s ranging performance is going to be farther than maximum ethical kill distance in pretty much any scenario for a long range hunter. They are also quite fast at returning a range.
With this new Geovid Pro iteration, Leica has finally fully switched from its 800M limited proprietary ballistics software to being able to host Applied Ballistics onboard the unit. With the upgrade to Elite this gives you the industry leading ballistics software and the best solutions you can get and it does so onboard the unit. The Geovids are the first premium European glass to do this. For many, this was probably the final piece of the puzzle. Great optics, a great laser, and great software. At time of release, I have found this software buggy, but they have squashed each bug remarkably quickly after I found it. I have found the Leica user interface to AB’s clean, intuitive, and a pleasure to use. They have also been responding quite quickly to feedback from timed competition shooters regarding options and changes to better suit the product to that unique use.
In addition to performing quite well on these most major aspects of LRF bino performance, Leica has a few other features. Its 10-year electronics, 30-year optics warranty is substantially better than most others. Leica has also sealed these units a bit tighter than most with the idea that you can hunt with them in higher altitudes (> 13k feet) than most competitors. The new ProTrack geomapping feature is helpful when it comes to finding game, even if isn’t everything it sounded like it might be. Leica is selling the Geovid Pro 32s with a $2,899 base price and it is $150 for the AB Elite upgrade that you will probably want. Though a huge chunk of change, this is a good deal less than its closest European competitors. Basically, I’m impressed with the Geovid Pros. In fact, I bought them out following my completion of this review.
Addendum: Marsupial Gear No-Mag Enclosed Harness
Note: Since the time of this review, Marsupial gear has updated the “No-Mag enclosed binocular pack” to a new version that does not feature the bungee type enclosure. I do not recommend this new version. It’s quality of construction is still excellent but the new closure mechanism does not open as generously and grips and holds the binos with enough force when open that it is difficult to take them out or replace them. As such, I don’t recommend it.
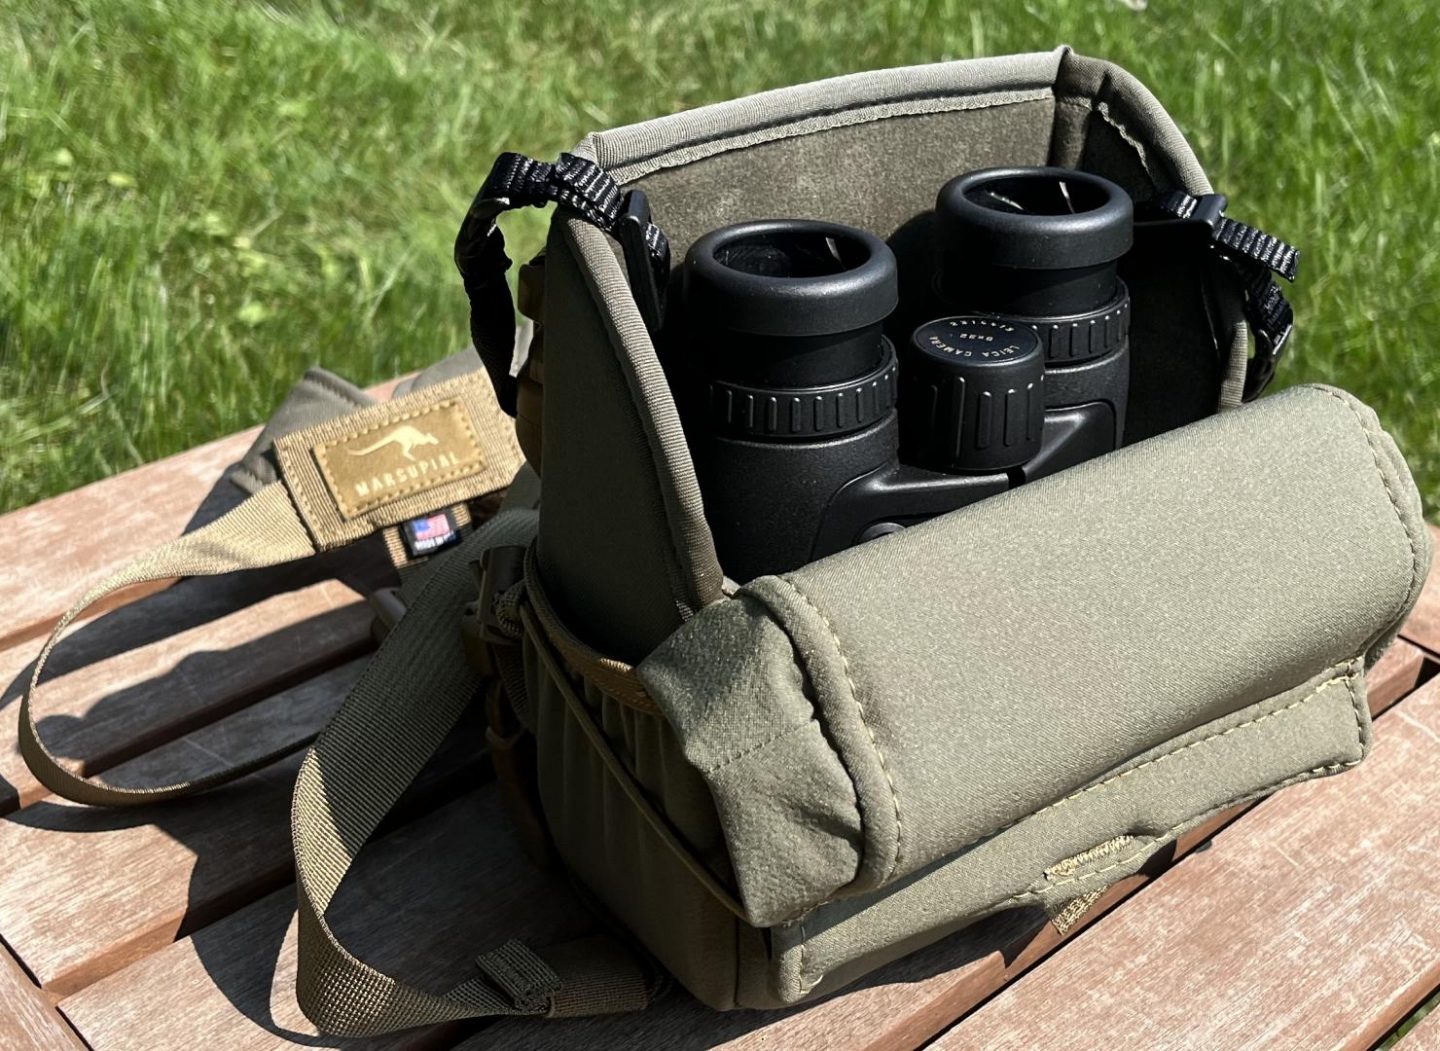
As mentioned in this review, the case the Geovid Pro’s come in is rather perfunctory. Useful to keep the binos save in storage or in transport, but not something anybody is going to use in the field. Since I bought the binos after the review, I went looking for a solution. I wanted a harness that was small enough and had detachable straps for taking the binos to the range. I also wanted one with Molle attachment points so I could add a water bottle holder for when I take the binos on a day hike with the kids and don’t want to carry any other pack. Of course, I want to be able to take the binos backpacking as well, so the harness had to have straps unobtrusive enough to not interfere with the backpack straps. The case itself also needs to have enough padding and a secure enough closure that I am comfortable it will protect the binos as a storage case. Lastly, I would rather not have magnets to interfere with the already shaky digital compass.
Really, I don’t ask a lot, do I? Well, after some misadventures with a couple cheap Chinese Amazon wannabees, one of which broke the first day used it, I bit the bullet and tried out a Marsupial Gear No-Mag Enclosed Binocular Pack (size small). I like it so much I decided to add this section to the review. The closure mechanism is brilliant. Easy open with one hand, a couple different open positions, and quite secure. The straps are comfortable and the harness rides nice and high. Quality of construction is downright excellent. Just so well done. The binos also fit like a golve. Couldn’t be happier.
