Hornady Comparator Readings

IndianCent

Private
Minuteman
Supporter
Feb 10, 2023
75
26
Idaho
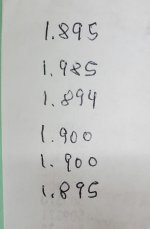
I bought a new 223 Cal rifle and I am using my Hornady Bullet Comparator. As experienced before with other rifles, I am getting different readings repeating the same process.
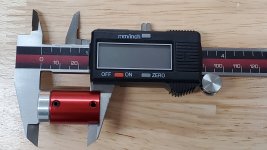
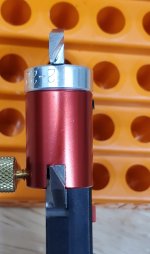
Attached are the readings and a picture of the comparator with a bullet in it. I am inserting the comparator cartridge into the chamber, making sure the shell seats all the way. After I verify that with a flashlight, I move the bullet gently forward until it stops at the leads. After that I use a cleaning rod that is inserted in the barrel to move the bullet slightly back from the leads and then push the bullet forward against the leads to get the final reading.
All this is done with minimal force to avoid pushing the bullet past the beginning of the leads.
The starting point for the freebore is usually two thousands off the leads, but my readings from the bullet comparator vary by as much as sixteen thousands, making the whole process worthless.
Does anybody have any suggestions as to what I need to do differently in order to get a more acceptable outcome?
 

Attachments

  • Comparator.jpg
    Comparator.jpg
    1.2 MB · Views: 44
  • Readings.jpg
    Readings.jpg
    190.4 KB · Views: 44
Remove ejector from bolt.
Take 3 fired cases that you don't mind scraping.
Place red loctite inside neck of case and place the bullet loaded long in the case.
Place case in chamber and close action.
Wait 30 secnds and open action.
Repeat 3 times.
 
Put the case in the rifle and then give a good push to push the bullet to the lands and then pull it out and measure it. You can feel if it's not done right but when done right it comes out with a good starting number. I usually do it 2 or 3 times and the numbers are usually pretty close so I just use the average and move on. The number is just a basic starting point.
 
  • Like
Reactions: IndianCent
In addition, be sure that the casehead is firmly seated/square to the caliper jaw.

Also, cheap calipers are often not repeatable ( no idea whether yours are, just sayin'). Does it return to 0.000 every time you close the jaws? Measure a suitable object multiple times, and see if you get the exact same numbers every time.
 
Last edited:
If this is a brand new rifle, the throat is probably going to change after the first 100 rounds anyways.

I push the bullet in until it stops, then remove it and take the measurement. Bullets are seated -.010 under that. Then I shoot that load and adjust in or out as needed for best results.
 
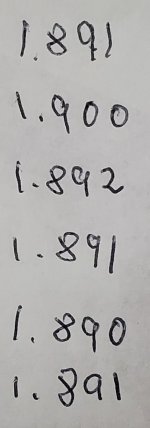
I took a second series of readings this morning and got much more consistant readings. This time I applied appox. 15 lbs of pressure on the bullet. I think these numbers are much easier to work with.
 

Attachments

  • Second reading.jpg
    Second reading.jpg
    76.6 KB · Views: 15
Last edited:
  • Like
Reactions: Rob01
I bought a new 223 Cal rifle and I am using my Hornady Bullet Comparator. As experienced before with other rifles, I am getting different readings repeating the same process.
Attached are the readings and a picture of the comparator with a bullet in it. I am inserting the comparator cartridge into the chamber, making sure the shell seats all the way. After I verify that with a flashlight, I move the bullet gently forward until it stops at the leads. After that I use a cleaning rod that is inserted in the barrel to move the bullet slightly back from the leads and then push the bullet forward against the leads to get the final reading.
All this is done with minimal force to avoid pushing the bullet past the beginning of the leads.
The starting point for the freebore is usually two thousands off the leads, but my readings from the bullet comparator vary by as much as sixteen thousands, making the whole process worthless.
Does anybody have any suggestions as to what I need to do differently in order to get a more acceptable outcome?
I'm going to have to make some assumptions here......

If you are using the Bullet Comparator in conjunction with the OAL Gauge (which I assume you would be), the OAL Gauge could be where your problem resides. Having said that, I have one that is probably 25 years old and as I recall, it's a"Stoney Point" (before Hornady bought Stoney Point).


The problem that I identified was that the set/locking screw tip in the OAL Gauge that locks the inner shaft (that pushes up against the bullet) comes to a very sharp point. When I would tighten it down on the inner shaft, it would create a divot/dimple on the (aluminum) mating surface of the inner shaft. Once that dimple was created, there was no way of getting rid of it. That means that every time you went to make a measurement (of the same rifle and round), you'd "lock" the set screw, but it would always re-center itself inside of the dimple on the inner shaft. So, even though you pressed the inner shaft up against the bullet (pushing the bullet's Ogive up against the lands), locking the setscrew would move the shaft to where the center of the dimple was, yielding an erroneous reading.

I hope that makes sense. I don't know if Stoney Point or Hornady ever got around to fixing that problem or not. A person could remove the setscrew, lightly face the tip on a grinder and flatten it out a little.

Remove the setscrew, remove the inner shaft and look at the interior mating surface (of the inner shaft). If it has dimples on it, I'd bet that is where your problem is.

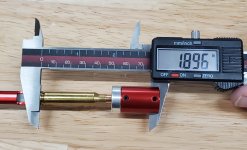
Oh, and another tip; Put your comparator/insert on the moveable jaw of your calipers and close the calipers. The bore of the insert should be centered over the fixed jaw of the calipers. Mine weren't, so I always mount my comparator/insert on the moveable jaw with the setscrew on the BACK of the calipers. That way, the bore is centered on the fixed jaw of the calipers when I close them.
 
  • Like
Reactions: IndianCent
Stop trying to be gingerly with the bullet. Just mash it into the throat. You’re not going to engrave the bullet with that tool. You trying to just kiss the lead is what giving you issues.
What he said. If can get the bullet to fall out of the barrel holding it upright....you didn't put enough pressure. You kind of need some good contact.
 
I'm going to have to make some assumptions here......

If you are using the Bullet Comparator in conjunction with the OAL Gauge (which I assume you would be), the OAL Gauge could be where your problem resides. Having said that, I have one that is probably 25 years old and as I recall, it's a"Stoney Point" (before Hornady bought Stoney Point).


The problem that I identified was that the set/locking screw tip in the OAL Gauge that locks the inner shaft (that pushes up against the bullet) comes to a very sharp point. When I would tighten it down on the inner shaft, it would create a divot/dimple on the (aluminum) mating surface of the inner shaft. Once that dimple was created, there was no way of getting rid of it. That means that every time you went to make a measurement (of the same rifle and round), you'd "lock" the set screw, but it would always re-center itself inside of the dimple on the inner shaft. So, even though you pressed the inner shaft up against the bullet (pushing the bullet's Ogive up against the lands), locking the setscrew would move the shaft to where the center of the dimple was, yielding an erroneous reading.

I hope that makes sense. I don't know if Stoney Point or Hornady ever got around to fixing that problem or not. A person could remove the setscrew, lightly face the tip on a grinder and flatten it out a little.

Remove the setscrew, remove the inner shaft and look at the interior mating surface (of the inner shaft). If it has dimples on it, I'd bet that is where your problem is.

Oh, and another tip; Put your comparator/insert on the moveable jaw of your calipers and close the calipers. The bore of the insert should be centered over the fixed jaw of the calipers. Mine weren't, so I always mount my comparator/insert on the moveable jaw with the setscrew on the BACK of the calipers. That way, the bore is centered on the fixed jaw of the calipers when I close them.

Thanks for the insight. I took three pictures that show how I use the gauge. The shaft does not show a dimple yet but a dark mark on the right side where the screw locks in place. I will not tighten the screw more than needed, just to avoid creating a dimple. Thanks for letting me know. Is the gauge mounted properly?
 

Attachments

  • Shaft.jpg
    Shaft.jpg
    132.4 KB · Views: 8
  • OAL Pic1.jpg
    OAL Pic1.jpg
    276.5 KB · Views: 8
  • OAL Pic2.jpg
    OAL Pic2.jpg
    210.9 KB · Views: 8
  • Like
Reactions: Threadcutter308
Stop trying to be gingerly with the bullet. Just mash it into the throat. You’re not going to engrave the bullet with that tool. You trying to just kiss the lead is what giving you issues.
THIS ^^^!

@IndianCent I used to try to barely let the bullets touch the lands, and I never got consistent readings when I was first learning how to use the Comparator tool. Then I eventually just started pushing that fucker up into the lands until it stops completely, and while holding pressure on both the tube, and plunger, I twist the knob to lock it into place. Then I let off pressure, and make my measurements. Now I only have to make about 3-5 runs to get a 100% accurate OAL measurement.

You will need a cleaning rod handy to give a slight nudge on the tip of the bullet to pop it out of the lands before removing the tool and case from your chamber. Nothing hard, just barely and easily run it up to it, and then give a little pressure, and pop the bullet loose from the front. Then pull the rod back about 3" and get ready for the next run. Repeat...
 
Thanks for the insight. I took three pictures that show how I use the gauge. The shaft does not show a dimple yet but a dark mark on the right side where the screw locks in place. I will not tighten the screw more than needed, just to avoid creating a dimple. Thanks for letting me know. Is the gauge mounted properly?
Something that I had forgotten about........

Stoney Point/Hornady "may" make the Comparator with the slot "offset" from center so that everything lines up properly when using the OAL gauge to take a measurement. It's an easy check.

I know what all my O-H dimensions for each caliber/chamber are and I have all my dies set for that/them. When I use the Comparator anymore, I'm checking loaded rounds as they come off the press. That's when/where I mount the comparator with the setscrew on the backside of the moveable caliper jaw.

Yes, your pics look correct. Pull the setscrew out of the OAL gauge. Is the face flat, or does it maybe have a rubber or plastic tip ? If so, they've address the dimpling problem.
 
THIS ^^^!

@IndianCent I used to try to barely let the bullets touch the lands, and I never got consistent readings when I was first learning how to use the Comparator tool. Then I eventually just started pushing that fucker up into the lands until it stops completely, and while holding pressure on both the tube, and plunger, I twist the knob to lock it into place. Then I let off pressure, and make my measurements. Now I only have to make about 3-5 runs to get a 100% accurate OAL measurement.

You will need a cleaning rod handy to give a slight nudge on the tip of the bullet to pop it out of the lands before removing the tool and case from your chamber. Nothing hard, just barely and easily run it up to it, and then give a little pressure, and pop the bullet loose from the front. Then pull the rod back about 3" and get ready for the next run. Repeat...
Thanks, I do just that. Once I started to put more pressure on the bullet, it was clinging to the lands. I use a cleaning rod as well.
 
  • Like
Reactions: FuhQ
Something that I had forgotten about........

Stoney Point/Hornady "may" make the Comparator with the slot "offset" from center so that everything lines up properly when using the OAL gauge to take a measurement. It's an easy check.

I know what all my O-H dimensions for each caliber/chamber are and I have all my dies set for that/them. When I use the Comparator anymore, I'm checking loaded rounds as they come off the press. That's when/where I mount the comparator with the setscrew on the backside of the moveable caliper jaw.

Yes, your pics look correct. Pull the setscrew out of the OAL gauge. Is the face flat, or does it maybe have a rubber or plastic tip ? If so, they've address the dimpling problem.
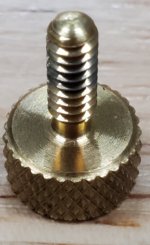
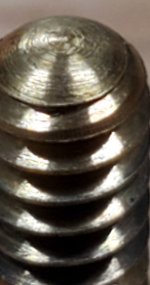
It looks like the tip has a minor recess in the center. There is no spike that would puncture the shaft.
 

Attachments

  • Screw Tip.jpg
    Screw Tip.jpg
    207 KB · Views: 10
  • Screw tip 2.jpg
    Screw tip 2.jpg
    144.9 KB · Views: 10
  • Like
Reactions: Threadcutter308
An exact reading off the land means little since it’s just a starting point. A whack the bullet home about 5 times. If I’m within 5 thou on all five I’m good. I pick a depth about 20 from that as a starting point and test from there and never worry about the lands again. But it takes a good thump with the cleaning rod to get the bullet out. It’s much easier to find Jam than barely touching.