ARC Xylo - wood cheek piece?

memilanuk

F'ing nuke
Full Member
Minuteman
Supporter
Mar 23, 2002
2,912
1,267
East Wenatchee WA
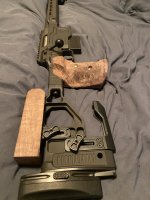
Recently picked up a used ARC Xylo chassis, and so far I'm liking it a lot. Got the 'large' grip for it, and like it even more ;)

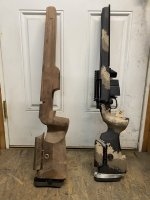
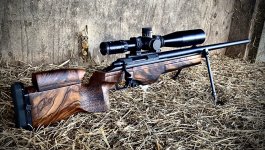
Decided to get some wood m-lok slot covers in walnut to match the grip... and got to thinking that a wood cheek piece really finish out the 'look' that I have pictured in my mind. I spoke with the guy @ ARC on the phone briefly and they said they knew people had done it, but didn't have any solid/specific leads on who to contact.

I dabble a little with woodworking myself, but I'm more the hand-tool (saw / plane / chisel / rasp / file) kind of woodworker... while I probably *could* make something that would fit and work, I'm not sure the final product would match the other parts and 'look' right, if ya know what I mean ;)

Anyone here either have or made a wood cheek piece for their Xylo (or other chassis) and able to give some leads, or even just tips?
 
I'll get a picture up when I get home from work this evening. A guy could do it with hand tools pretty easy. I cheated and used a mill but finished the shaping with files.

Edit found one
1000000021.jpg
 
I think I remember reading you saying the original design wasn't very friendly for off hand (weak side) shots; is that why you made yours more symmetric like that? I kind of like the way the original is biased to one side / open on the other, at least visually/aesthetically, but I see your point. I used to just drop the cheek piece entirely for the occasional weak side stage... but the time limits were a lot more generous back when I played what eventually became PRS. Probably not a good tactic for a serious competitor today.

My only real gripe with the whole chassis is that angled corner/ridge of the cheek piece isn't super comfy for my face. Certainly not 'bad', but something more with more of a radius and less angular/faceted on that one surface is kind of what I have in mind.

A guy could do it with hand tools pretty easy. I cheated and used a mill but finished the shaping with files.
I think I'm going to have to think a couple steps ahead a little as far as work holding... do some of the stuff like locating the holes, counter boring, any recesses/mortises while the wood is still one big block, and do the shaping after that. Already have some ideas cookin' about stopped chamfers, etc. Maybe on rev 2.0, though!
 
  • Like
Reactions: Ledzep
Yeah, I wasn't sure whether to post the question here, or in that thread. It was more bolt-gun specific so I dropped it here, but I'll ask there also.

Those are some sweet looking scales on there... did they do that via CNC, or by hand? I love that they timed the screw heads :love:
 
Yeah, I wasn't sure whether to post the question here, or in that thread. It was more bolt-gun specific so I dropped it here, but I'll ask there also.

Those are some sweet looking scales on there... did they do that via CNC, or by hand? I love that they timed the screw heads :love:

Probably hand cut than carved a bit before finishing on a sander.

Made a bland knife much more personalized.

I've never used it for much but if I needed it I would like it all the better.
 
  • Like
Reactions: M260 and memilanuk
Yeah, I wasn't sure whether to post the question here, or in that thread. It was more bolt-gun specific so I dropped it here, but I'll ask there also.

Those are some sweet looking scales on there... did they do that via CNC, or by hand? I love that they timed the screw heads :love:
Those scales are made 97% by hand. The only power tool used was a drill press for the screws.

All dimensioning was done with hand planes and a shooting board.

The scallops or whatever they’re called were carved out with a carving knife and finished with files. They were too skinny for me to feed them to the spindle sander.
 
Those scales are made 97% by hand. The only power tool used was a drill press for the screws.

All dimensioning was done with hand planes and a shooting board.
That's awesome 👍

The scallops or whatever they’re called were carved out with a carving knife and finished with files. They were too skinny for me to feed them to the spindle sander.

How thin do you think I could get away with wrapping wood around the angled plate that is the cheek piece on a Xylo, without it being too delicate at the edges? Figure I'll start with a thicker piece, inlet the plate into that (and work out how to fasten it in place), then flip it over and thin/contour the other side down as close as I dare...
 
That's awesome 👍


How thin do you think I could get away with wrapping wood around the angled plate that is the cheek piece on a Xylo, without it being too delicate at the edges? Figure I'll start with a thicker piece, inlet the plate into that (and work out how to fasten it in place), then flip it over and thin/contour the other side down as close as I dare...
Perhaps you could chamfer the shit out/cut down the top of the plate so you could have a beefy radius/ thicker sides on the wood .
 
That's awesome 👍


How thin do you think I could get away with wrapping wood around the angled plate that is the cheek piece on a Xylo, without it being too delicate at the edges? Figure I'll start with a thicker piece, inlet the plate into that (and work out how to fasten it in place), then flip it over and thin/contour the other side down as close as I dare...
I’m not sure. I’d have to see the angled plate. However, any outside edge should be rounded or chamfered as a best practice.
 
I’m not sure. I’d have to see the angled plate. However, any outside edge should be rounded or chamfered as a best practice.
I'm out of town for the weekend so I can't get to mine... but this pic is from the ARC web site:

DanBenowitz.jpg


It's a lefty, so everything is bass-ackwards but it kinda shows the angled piece. It's got a rubber cover over it so it looks thicker than it actually is.
 
Quarter sawn as far as grain?
Maybe. It really depends on what it’s mounted to. It’s not really in a high stress area. It’s just a check piece right? If it has bolts through it for adjustment then I’d put metal inserts into any holes to eliminate cracking.

I’d really have to see what everyone is talking about though.

ETA:

If it’s the part I circled then it looks like you just want a wood piece to cover it? I’d just make sure there are no hard angles on the attachment side, so a radius is your friend. Is there any way to mount it or would it just epoxy on?

IMG_6263.jpeg
 
Yup, that's it.

Currently the rubber cover peels off to expose two button-head T25 screws. Between 4 holes in the elevator/riser, and 5 or 6 slots in the shelf, the cheek piece is adjustable fore and aft, side to side, and can be skewed. Plus the elevator is reversible, so when flipped around you can get a ridiculous amount of side to side range. There are grooves in the underside of the rubber cover for the heads of the torx screws.

Here is a blown-up drawing of the chassis that may show the parts more clearly.
 
Ack. Replied earlier today, but I think my post got eaten by the site upgrade.

Bedding for a better fit is something I probably wouldn't have thought of otherwise, and why I asked the collective here for ideas. Thanks!

I don't think I want to 'bond' it though. Seems like that would negate any/all of the adjustability features, and I'd really like to keep those. It might be a matter of "yes, cool, it's adjustable" and then never really using it once I have it set... but I'd still like to retain the option. Currently noodling through whether I'd be better to come down from the top with recessed bolt heads - I think that's what @Ledzep probably did - or to come up from underneath with a couple machine screws to some small nuts epoxied into the wood, leaving the top smooth and flush.

I'd *really* like if I could make it something that could be popped on/off with concealed magnets, but that might make it a little too prone to spontaneous disassembly in the field. I had one cheek piece on a target rifle long ago where they did that... which made it prone to popping loose / wiggling under cheek pressure (we used a lot more back then) and recoil.

Either way, I think I'll probably do the initial mock-up / test fit with something simpler like poplar rather than walnut. I know walnut isn't exactly an exotic species on the CITES list, but we no longer have a local hardwood dealer and I have to either order stuff in or grab a chunk when I happen to be in a bigger city several hours away. Probably better to work out the details first.
 
Honestly I’d just try to replicate the top part out of wood, top down screws into the metal still but a wood sleeve that slides over metal angle from the back and maybe has a little set screw at the front to keep it from wiggling back and forth.
IMG_3295.jpeg

By sliding it on it would still allow you to adjust it with factory hardware.
 
  • Like
Reactions: memilanuk
How much of the original adjustment capability do you still have with that config?

Up and down, pretty much all of it. I lost some on the bottom, but it's able to adjust way lower than you'd ever actually use with any sighting system.

Front-to-back I had to pick where it needed to be and filed the "dish" shapes in based on where my face hit. And obviously side-to-side I have none. Where ever the screws line up, it runs centerline on mine.
 
  • Like
Reactions: memilanuk
Nice! I imagine you probably got some of the side-to-side from the scallops

I'm probably over thinking the hell out of this, but that's half the fun.

Between that top view of your cheek piece, and those knife handle scales @Bigfatcock posted... I'm considering doing something similar (scallops) on the fore-end slot covers. Hmmm... 🤔😁
 
I think you’ll enjoy the Project! Please post results… I’ve had so much fun with wood rifle stock making. I would like to eventually try a Xylo and carve custom grip, cheek etc.. working on a similar project on a vision chassis for an SSG 3000
 

Attachments

  • IMG_0452.jpeg
    IMG_0452.jpeg
    506.5 KB · Views: 31
  • IMG_9613.jpeg
    IMG_9613.jpeg
    452.7 KB · Views: 30
  • IMG_7054.jpeg
    IMG_7054.jpeg
    956.3 KB · Views: 30
  • Like
Reactions: memilanuk