Edited 8-13-12 – It has been brought to my attention that all my pictures are missing from this thread. Well, that's completely my fault. The server where I host my business website is the same place where I had those progress pictures hosted. I've recently started redesigning my website and those pics got deleted. I can't find any backups of them for the life of me. I have a Remington 700 that I am going to paint in the next few weeks. I will take new progress pictures of this project to go with the tutorial.
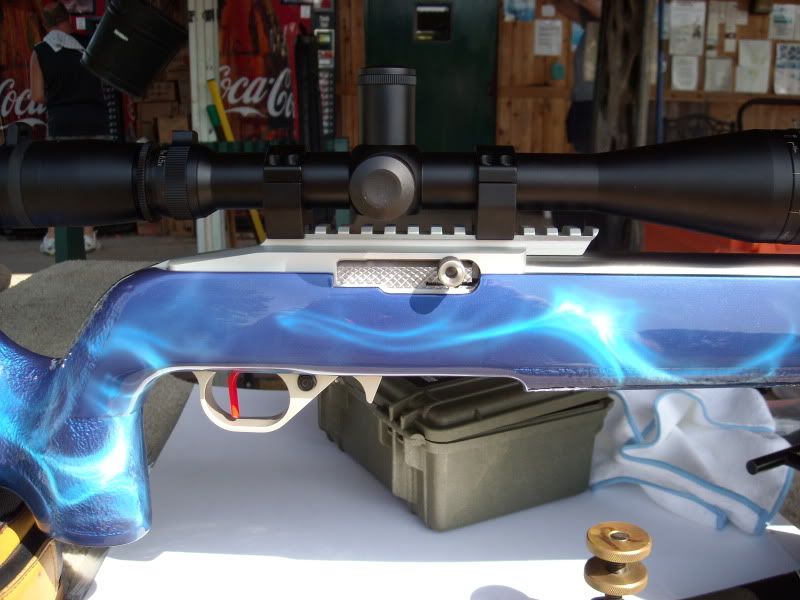
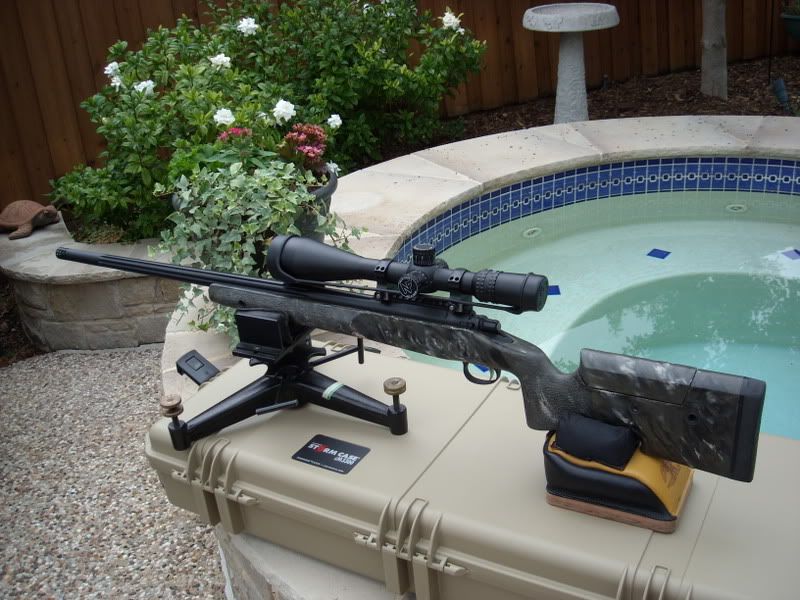
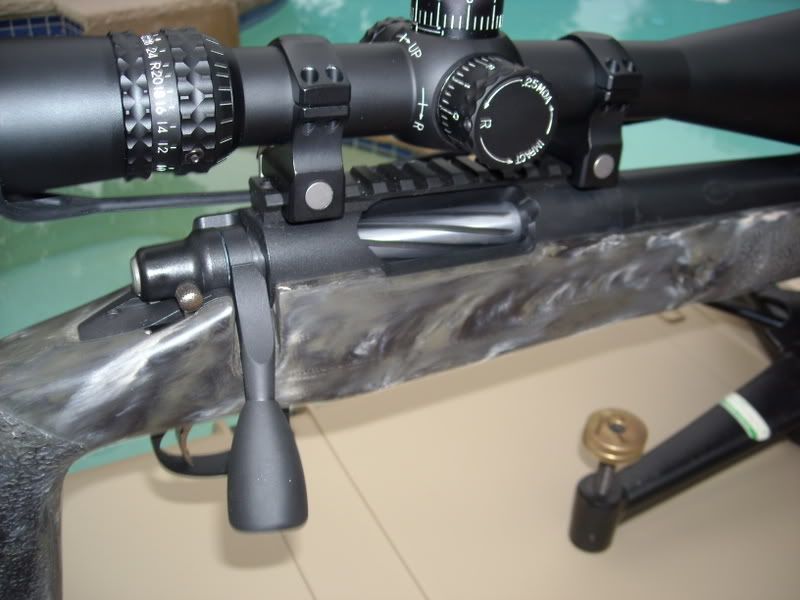
I believe most of the original tutorials will still be helpful even without pictures. For the meantime, I'll repost pictures of the finished rifles from the projects below along with some of my non-firearm artwork that I had posted up before.
Thanks for looking and sorry for the problems,
Matt
-----------------------------------------------------------------------
Hello everybody. I have lurked on this forum for a long time. I have never really posted much because there are numerous other people here who are far more knowledgeable and experienced in everything firearm and shooting related. I have been thinking about painting some of my firearms and have come to the conclusion that I may actually be able contribute something of value to this forum after all.
I am an artist with a fairly extensive knowledge of the airbrush. I am going to use this post to try to explain the different types of airbrushes and some aspects of their proper usage. Over the next few months I will start another thread with progress pictures and explanations as I actually paint some firearms. I intend to use Duracoat and will paint some solid color, some camouflage, and some “detailed” work (possibly skulls or something similar).
I am not always very good at explaining things so you will have to help me out and let me know when something is unclear or has been omitted. Also, please feel free to ask absolutely any questions on the subject and I will answer them to the best of my ability.
Please remember everything here is MY OPINION only, take it for what it's worth! As always, use proper safety. Some of these chemicals you will be spraying can be very dangerous. They can not only soak in through your lungs but also your eyes and skin. Do your research and read the MSDS sheets for your products. At the very least plan to spend the $30 or so on a proper respirator for your particular products and spray in a well ventilated area.
Types of Airbrushes
Internal Mix vs External Mix- The mix of an airbrush refers to whether the paint and air are mixed together inside the body of the airbrush or outside the body of the airbrush.
Single Action vs Double Action- When you push down the trigger of a single action airbrush both paint and air come out. (like spraying a “rattle can”/”Krylon”) When you push down the trigger of a double action airbrush only air comes out. While pushing down the trigger you can then pull back on the trigger and paint will come out. You can vary the amount of paint coming out of the airbrush by varying how far back you pull on the trigger.
There is absolutely no reason to purchase either an external mix or a single action airbrush. I'm not saying that if you already have one you shouldn't consider using it. With enough knowledge and experience, you can certainly make an amazing piece of artwork with one and you can certainly use it to adequately paint your firearm. However, you can find internal mix double action airbrushes for just as cheap, it will be easier to use, produce better quality results with less hassle and frustration, and have more functionality. Unless otherwise specified whenever I refer to an airbrush from here on out it I will be referring to an internal mix double action airbrush.
Siphon Feed vs Gravity Feed- The feed of an airbrush refers to how the paint enters the body of the airbrush. A gravity feed airbrush has a cup or bowl of some sort above the body of the airbrush and the paint naturally flows down into the body. A siphon feed airbrush has a cup or jar of some sort below the body of the airbrush and uses the airflow through the body to siphon paint up into the body of the airbrush. Neither one is necessarily better or worse than the other. In general siphon feed airbrushes will be used for more “production” type work such as T-Shirts and gravity feed airbrushes will be used for more detailed types of work such as fine art. As far as firearm painting is concerned I would suggest using a gravity feed over siphon feed. You will have a little bit less wasted paint and easier clean up. Either airbrush will work.
To make things a little bit more complicated for you. I use side feed airbrushes. There is no cup on top or jar on the bottom. There is a hole on the side of the airbrush where a cup is attached. Depending on the cup used this will be either a siphon feed or gravity feed system although it doesn't actually make any difference in this instance. I prefer side feed because it has the advantages of a gravity feed airbrush but there is no cup on top to obstruct either my view of what I'm painting or my finger from freely moving the trigger.
How an Airbrush Works
Very simply an airbrush is a tube with a needle and nozzle making a valve at one end. When the valve is opened an air paint mixture is allowed to spray out of the airbrush in a controlled fashion.
When you push the trigger of an airbrush, it opens a valve that lets the air flow through the body and out the tip of the airbrush. When you pull back on the trigger it moves the needle back through the body of the airbrush opening up the needle/nozzle valve that gives you control of the sprayed air paint mixture.
An on line search will surely give you a more detailed explanation. A cutaway view or exploded parts view of your particular airbrush will definitely help you understand how an airbrush works. Be sure to pay close attention to where all the o-rings are located.
Using an Airbrush
There are many factors that can be altered to change the spraying characteristics of the airbrush. Some of these are changed while airbrushing like trigger position, distance of airbrush from surface, speed/movement of the airbrush. Some can only be changed when not airbrushing. Such as thickness of paint being sprayed and air pressure (regulated at the compressor). It is all of these factors combined, in any given moment, that give you the desired characteristics and spray patter for any particular task.
It's important to consider the size of the nozzle when shopping for an airbrush. For something like firearms a relatively large nozzle is important for a couple reasons. It will allow you to have a wide spray with “lots” of paint being applied while still maintaining control of your spray. It will also allow you to use thicker paints and paints with larger pigments. Something in the .5mm to .35mm should work well for most applications. If you get much larger than .5mm you will lose some ability for detail. If you go much smaller than .35mm you will spend all of your time fighting the airbrush. You will be frustrated trying to get the paint mixture and air pressure just right. It will spray to little paint, spider, run, clog, spit, not spray smooth, etc...
Brands of Airbrush
There are many different brands to choose from. It is very much like firearms. All experienced airbrushers have their favorites. Choosing is very much personal preference.
As far as I'm concerned Iwata makes the best airbrushes. They are the best of the best. If you plan on doing a lot of airbrushing consider an Iwata. They are also one of the most expensive and have expensive replacement parts. As a professional it's completely worth the price to me, that may not be the case for an occasional user or hobbyist. Paasche makes a good affordable kit with different size needle nozzle combinations. They are, I believe, made in the USA. Badger makes a great product for a good price. They are also made in the USA and are known for their excellent customer service. Thayer and Chandler is another USA made brand that makes good quality airbrushes.
If you decide against Iwata stay with one of the brands I've listed, or at least made in the USA and you should be happy.
I will be the first to admit that there are certainly better airbrush artists out there; but, I am going to post up pictures of some of my non-firearm airbrush artwork to show you what can be done with an airbrush. All of this artwork was done by me and all of it is airbrushed. I also did all of the bodywork and clear coat where applicable.
I'm sure that was about as clear as mud so please let me know and I will try to make more sense of it. There is also no telling how much information I've accidentally left out so please let me know and ask any questions you have. I'll be glad to try and help you out. Also watch out for another thread sometime soon with more of a how to and actual work in progress pics of firearms being painted.