[IMG2=JSON]{"data-align":"none","data-size":"full","src":"http:\/\/i639.photobucket.com\/albums\/uu116\/ferrarif1racefan\/Anschutz5071Trigger_zps5032f145.jpg"}[/IMG2]
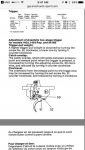
Here is the 5071. It should be close enough to your trigger to figure out. I copied this from another site, can't remember where.
First off, adjusting these triggers really is pretty simple if you'll take a few minutes to understand how they work and what adjustments are available. A two stage
trigger is different from most triggers in that it has a small amount of spring-loaded movement in the trigger before you reach the point where just a small amount of additional pressure causes the sear to release and the rifle to fire. Since most of these triggers are set up to fire with only a few ounces of pressure, the first stage allows you to stage the trigger pull-in other words, you are given the chance to contact the trigger, begin applying pressure, then know exactly at which point a small amount of additional pressure will release the shot.
Adjusting these triggers is actually quite easy. What I'm going to describe is how to set one up for true two-stage operation. The easiest way to begin is to back the first and second stage stop screws out 1-3 turns. These screws define how far the trigger blade travels throughout its entire range. It's best to start with a wider range, then adjust down to exactly what you want. After adjusting these screws out, pull the trigger. You should definitely feel the two-stage operation of the trigger now. You can also watch the internal operation of the trigger and notice the points at which each spring begins applying pressure to the trigger pull.
If you're going for the lightest pull possible, it's now time to adjust the spring tensions using the 1st & 2nd spring tension adjustment screws. When you turn them out, you lighten the tension supplied by the springs. The black or forward screw adjusts the first stage tension and the silver or rearward screw adjusts the second stage tension. As you turn them, you'll notice the little
arms move that are attached to rearward end of the springs. If you have the first and second stage screws turned out enough, you should definitely feel a light pressure on the trigger supplied by the first stage spring, then reach a point where the pressure increases as the second stage spring begins to apply tension.
Now for the tricky part- adjusting the sear engagement. As described above, you want the sear to release and the
gun to fire just at the point when you reach the second stage spring tension on the trigger and apply a slight amount of additional pressure on the trigger. The screw right in front of the trigger blade is the sear engagement adjustment. This screw adjusts the point in the trigger movement when the sear releases. Turning this screw in moves the sear release point forward in the trigger travel and turning it out moves the sear release point backwards in the trigger travel. You want to adjust it so that the sear releases after you've reached the second stage spring tension and apply just a bit more pressure to the trigger. To perform this adjustment, the trigger needs to be mounted to the action and the bolt installed. I also place a spent case in the chamber just to make sure the
firing pin doesn't peen the end of the
barrel. Place the spent case in chamber, close the bolt, then slowly pull the trigger. You should encounter light pressure throughout the first stage, then come to the stop point provided by the additional pressure supplied by the second stage spring, then hear the sear release just as you apply a bit more pressure to the trigger. If this doesn't occur, continue adjusting the sear engagement screw until it does.
Once you have the sear engagement properly set up, it's time to adjust the second stage stop. This adjustment simply limits how far rearward the trigger blade moves, You want to adjust it inwards until there is almost no amount of additional trigger travel AFTER the sear releases. You do need to make certain that the trigger can be pulled rearward enough so that the trigger releases EVERY TIME.
Now to the first stage stop adjustment. This one is a matter of preference. This screw simply limits how far forward the trigger can move when released. It sets the amount of first stage travel. You can set it up for a short or long amount of travel before reaching the second stage of the trigger, it is a matter of your preference. Once this adjustment is made, your trigger is set up for operation.
These triggers can be set up for only single stage operation. If you want a very light trigger, you can use the sear engagement adjustment screw to move the sear release point forward into the first stage trigger travel. Once you've adjusted it so that the sear releases during the first stage travel, you simply screw the second stage stop screw in to move the second stage stop point. One note of caution though...Where you set the second stage defines how much sear engagement overlap is present when the trigger is cocked and ready to fire. If you set it up so that there is very little creep in the trigger before the sear is released, you will run the risk of slam fires occurring due to the minimal sear overlap in the cocked position.
One other note about cleaning. Because these triggers are designed to work with very light spring pressures, they must be cleaned to work properly. Typically, they are cleaned with
brake or carb cleaner followed by being blown dry with compressed air. Some suggest applying light oil to the pivot points of the components. My personal opinion is that the triggers are probably designed to operate with no lubrication. The through pins are polished and applying oil will only attract gunk. At one point, my trigger seemingly became harder to operate and the trigger blade quit resetting all the way forward when set at the lightest spring pressures. I ended up disassembling it and found a buildup of gunk between the components and the housing that was causing the components to drag. Once it was cleaned up, I reassembled it with no oil applied and it worked perfectly again.