Can I get some feedback on how tight the fit between the recoil lug and the lug channel in the stock is on these ?
Join the Hide community
Get access to live stream, lessons, the post exchange, and chat with other snipers.
Register
Download Gravity Ballistics
Get help to accurately calculate and scope your sniper rifle using real shooting data.

Install the app
How to install the app on iOS
Follow along with the video below to see how to install our site as a web app on your home screen.
Note: This feature may not be available in some browsers.
You are using an out of date browser. It may not display this or other websites correctly.
You should upgrade or use an alternative browser.
You should upgrade or use an alternative browser.

Bergara b14 HMR stock question
- Thread starter Fair chase
- Start date
Can you be a little more specific? Do you mean tight left/right, snuggled up against the recoil load bearing surface, tight in front, or clearance underneath the lug?Can I get some feedback on how tight the fit between the recoil lug and the lug channel in the stock is on these ?
Sorry, not trying to be pedantic, just trying to understand which dimension you’re interested in.
I have a b14 ridge . I picked up a HMR stock to try. As I understand it the only difference between the b14 ridge and the b14 HMR is the stock.
Fit of the recoil lug on the HMR stock is sloppy to say the least .
Just wondering if this was the norm.
I seriously thinking about bedding the lug.
Fit of the recoil lug on the HMR stock is sloppy to say the least .
Just wondering if this was the norm.
I seriously thinking about bedding the lug.
It's not going to be tight, it's designed to be a drop in fit but as long as the back of the lug is touching the back of the recoil lug pocket, it's doing its job.
It’s close ,but not touching.
1 layer of masking tape won’t fit , but 2 layers of scotch tape will.
1 layer of masking tape won’t fit , but 2 layers of scotch tape will.

3 different loads shooting .25’s - .4’s in the ridge stock.
Put it in the HMR stock , and the wheels fall off.
Put it back in the ridge stock , and back to .25’s .
Any ideas other than bedding ?
Put it in the HMR stock , and the wheels fall off.
Put it back in the ridge stock , and back to .25’s .
Any ideas other than bedding ?
Mine had paint on the tops of the action screw channels, and I was noticing some of it flake off and stick to the action; I scraped all that off to get clean aluminum around the action screws, figured it’d be a better bedding surface than paint.
Also verify the action screw torque; the manual calls for 6.2 Nm (55 in-lb).
That’s about all I got, but at least you know it’s not an issue with the barreled action.
Also verify the action screw torque; the manual calls for 6.2 Nm (55 in-lb).
That’s about all I got, but at least you know it’s not an issue with the barreled action.
First thing I did was remove paint from the action screw , and lug channels .
Torqued to 50 . My wrench has a 50 and 57 setting . Afraid 57 might strip something out .
what do you think try bedding it and screw the resale value. , or move it on along ?
Torqued to 50 . My wrench has a 50 and 57 setting . Afraid 57 might strip something out .
what do you think try bedding it and screw the resale value. , or move it on along ?
I’m not convinced it’d mess up the resale value, especially since anyone who didn’t like the fit could just hog it out with a Dremel and re-bed for about $2 worth of materials and an hour of labor. I vote bed it, and if you don’t like the results, take $15 off the price and tell folks you bedded the lug so they might have to fiddle with that.
57 in-lb won’t strip anything out, I use a 7 Nm torque limiter for multiple actions and my Seekins ring rail screws. I like having one super portable tool for all of those, and my Vortex torque wrench tops out at 50 in-lbs anyway.
57 in-lb won’t strip anything out, I use a 7 Nm torque limiter for multiple actions and my Seekins ring rail screws. I like having one super portable tool for all of those, and my Vortex torque wrench tops out at 50 in-lbs anyway.
I wouldn’t do the tang, if it was me; I’d just make sure the receiver was sitting only on metal and not plastic/paint anywhere. If you really wanted to get wild (doesn’t seem you do) you could use a mill to cut a V-notch into each pillar top and have a V-block bedding system, but you might have to remove material along the whole centerline of the receiver to get it to sit that low. I’m just spitballing on that, couldn’t tell ya without taking my barreled action out of the stock.
I don’t really buy into skim bedding, but others obv feel differently; if I’m bedding action screw areas, I do pillars and a full receiver bed. In the HMR stock, it seems unnecessary due to the chassis core and you’re only touching that structure, really.
I don’t really buy into skim bedding, but others obv feel differently; if I’m bedding action screw areas, I do pillars and a full receiver bed. In the HMR stock, it seems unnecessary due to the chassis core and you’re only touching that structure, really.
Would it be beneficial to remove some of the metal from the rear of the lug channel , or just rough it up ?
I usually remove enough material to ensure there’s a good bit of bedding material present. I also like to hog out a couple nooks and crannies that the epoxy can get behind, to make it a truly permanent fit (i.e., it’s physically impossible for the bedding to pop out, even if the surface bond somehow failed). But that’s when I’m bedding a whole action, I’ve never bedded just a lug.
That said, I don’t think the nook-and-cranny approach is probably necessary in this case; after all, if it *does* pop loose (highly unlikely if you degrease well), you can just cut the crannies then and rebed.
Now you got me curious to check the fit on my lug...
That said, I don’t think the nook-and-cranny approach is probably necessary in this case; after all, if it *does* pop loose (highly unlikely if you degrease well), you can just cut the crannies then and rebed.
Now you got me curious to check the fit on my lug...
Well I took a dremel and removed material from around the tang screw contact point. Also from around the front action screw contact point . Also took some of the aluminum down from the top of the recoil lug channel . It appeared that the top of the lug channel was making hard contact on the bottom of the receiver with little to no pressure on the front action screw point.
Shot a lot better .
Probably going to go ahead and bed the lug and tang since I’ve got it relieved and the marine Tex .
Shot a lot better .
Probably going to go ahead and bed the lug and tang since I’ve got it relieved and the marine Tex .
Awesome, glad you got it behaving! I also appreciate you doing the research so I know what to take a hard look at next time I drop the stock hahaWell I took a dremel and removed material from around the tang screw contact point. Also from around the front action screw contact point . Also took some of the aluminum down from the top of the recoil lug channel . It appeared that the top of the lug channel was making hard contact on the bottom of the receiver with little to no pressure on the front action screw point.
Shot a lot better .
Probably going to go ahead and bed the lug and tang since I’ve got it relieved and the marine Tex .
Well after bedding the lug and tang with marine tex it is shooting like it is supposed to.
Shouldn’t have to do this with a mini chassis , but there you go.
Shouldn’t have to do this with a mini chassis , but there you go.
I actually just hogged out everything other than the pillars, based on your experience. I honestly think I’m gonna skip the bedding for now, I don’t really care what it looks like underneath and the material seemed waterproof after the paint case off.
Thanks for the info, hoping it tunes the performance of mine up as well.
Thanks for the info, hoping it tunes the performance of mine up as well.
Just getting it ridding on the pillars definitely made the biggest difference.
Bedding probably got me another .2 , and it’s now shooting like it was originally in the ridge stock.
Be sure it’s not binding on the top of the recoil lug pocket !
I am not real impressed with bergara’s lack of detail on the HMR stock.
Bedding probably got me another .2 , and it’s now shooting like it was originally in the ridge stock.
Be sure it’s not binding on the top of the recoil lug pocket !
I am not real impressed with bergara’s lack of detail on the HMR stock.
Oh, you actually saw an improvement from bedding too? Hmm.
Just a skim bed, or did you remove a lot of material?
Just a skim bed, or did you remove a lot of material?
Fair chase,Well after bedding the lug and tang with marine tex it is shooting like it is supposed to.
Shouldn’t have to do this with a mini chassis , but there you go.
Is there any chance you'd be willing to share pictures of your HMR stock bedding area?
I picked up an HMR and the accuracy I am getting is only so-so. About 1-1.25 MOA with match grade ammo.
I had the same inclination to clean the paint out of the area and I may have seen some small improvement there. The recoil lug seemed the most offensive though, the slot is much larger than the lug. The lug rests against the back wall pretty well which is good but there is a lot of rotation allowed and the front edge of the lug is not supported at all.
I'm debating my options, at this point I am thinking just cleaning up the bedding points on the rifle and also glass bedding the recoil lug may be enough. Any thoughts?
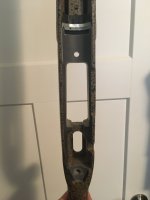
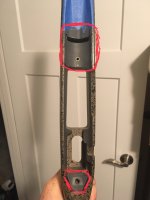
Here’s where I bedded mine, bedding areas outlined in red in the second photo.Fair chase,
Is there any chance you'd be willing to share pictures of your HMR stock bedding area?
I picked up an HMR and the accuracy I am getting is only so-so. About 1-1.25 MOA with match grade ammo.
I had the same inclination to clean the paint out of the area and I may have seen some small improvement there. The recoil lug seemed the most offensive though, the slot is much larger than the lug. The lug rests against the back wall pretty well which is good but there is a lot of rotation allowed and the front edge of the lug is not supported at all.
I'm debating my options, at this point I am thinking just cleaning up the bedding points on the rifle and also glass bedding the recoil lug may be enough. Any thoughts?
You mentioned supporting the front of the recoil lug; that shouldn’t be necessary, and honestly I wouldn’t advise it. The rear face of the recoil lug is the only part that needs support if the of the action is properly supported (bedded) from underneath right behind the lug and at the rear tang. If you support (bed) both the front and rear faces, you’re gonna have a hell of a time getting that action in and out of the stock, because the lug will be bound up between two opposing bedding surfaces, front and back.
I actually made this mistake on this bedding job, because I failed to tape the front of the lug. I had to beat the barreled action out of the stock with a 2x4. Seriously. A little gentle sanding on the front lug face allowed the action to squeeze back in there, but I just discovered I’m gonna need to Dremel out that front face anyway because my Vudoo lug is too thick to fit in there. Another item of note, the retaining pin for the bolt stop protrudes a bit out from the action, so it’s got a little stress point against the stock there. Yours may or may not stick out there like mine does, but at some point I’m gonna wanna pull that pin out and file it down. The black sections in the photos are where I took material out to try to make sure I only had contact in the bedded areas. Needed to remove a surprising amount of material to do that.
Let me know if you have any other questions.
ETA: I’m running a barrel nut setup, that’s why you see that big relief section right in front of the recoil lug. The reason I bedded in the first place it’s because when I put the new barrel on it was obviously off-center in the stock, and I’d debated bedding the stock before that so it made my decision for me.
Attachments
Thanks KnowNothing256, those pictures are helpful.
I should be more clear about the recoil lug, I was aware that it can be a bad idea to "box in" the lug too closely and run into assembly issues. My main concern was how much rotation the lug seemed to allow of the entire barreled action. That could be resolved with a tighter fit on the sides of the lugs (not the front necessarily). Maybe I'm chasing something not too critical in trying to resolve that though?
How much material did you grind away in those spots requiring it? Are we talking like a couple mm of depth?
The rotation in my mind should be mostly addressed by the action screws being centered in the bottom metal, but a snug-but-not-binding fit on the lug side’s is certainly another way to try to ensure that.Thanks KnowNothing256, those pictures are helpful.
I should be more clear about the recoil lug, I was aware that it can be a bad idea to "box in" the lug too closely and run into assembly issues. My main concern was how much rotation the lug seemed to allow of the entire barreled action. That could be resolved with a tighter fit on the sides of the lugs (not the front necessarily). Maybe I'm chasing something not too critical in trying to resolve that though?
How much material did you grind away in those spots requiring it? Are we talking like a couple mm of depth?
As for how much to remove, I did a good amount of hogging everywhere except under the rear tang, where I basically just removed the paint, left the aluminum pillar top, and removed some fiberglass around the pillar. I like several mm of epoxy depth everywhere I’m putting the gloop, but the rear tang is left high because I use the “stress-free bedding“ method from Richard Franklin, where you essentially suspend the barreled action between two points: the rear tang and a ring of tape wrapped thick around the barrel to hold it up and center it in the channel. A bit of bedding at the tang gives it a “slot” to drop into, probably doesn’t add much strength though. I make sure there’s tons of clearance below the action and around the lug, basically as much as I can create before I get tired of the Dremel or concerned that I’m compromising the strength of the stock.
Thanks for this, think I'm convinced to go ahead with bedding job. Nothing to lose aside from a few bucks and some potential to gain. Appreciate the photos and info.The rotation in my mind should be mostly addressed by the action screws being centered in the bottom metal, but a snug-but-not-binding fit on the lug side’s is certainly another way to try to ensure that.
As for how much to remove, I did a good amount of hogging everywhere except under the rear tang, where I basically just removed the paint, left the aluminum pillar top, and removed some fiberglass around the pillar. I like several mm of epoxy depth everywhere I’m putting the gloop, but the rear tang is left high because I use the “stress-free bedding“ method from Richard Franklin, where you essentially suspend the barreled action between two points: the rear tang and a ring of tape wrapped thick around the barrel to hold it up and center it in the channel. A bit of bedding at the tang gives it a “slot” to drop into, probably doesn’t add much strength though. I make sure there’s tons of clearance below the action and around the lug, basically as much as I can create before I get tired of the Dremel or concerned that I’m compromising the strength of the stock.
Similar threads
- Replies
- 5
- Views
- 282
- Replies
- 1
- Views
- 134
- Replies
- 6
- Views
- 431
