

Also posted this over on the Creedmoor forum.
I started out on this quest a while back in this thread... http://www.65creedmoor.com/index.php?topic=356.0
I've since moved from Colorado to Georgia and have my new reloading room up and running so I wanted to get back on this. I have a boatload of new .243 brass that I bought on sale, and it's also a personal challenge to see if I can do it. Well, I am calling it a success. After conversion I measured runout on the necks and they are between 0.0005" (half a thousandth) and zero. That is much better than I was honestly expecting. I am a happy camper, and I am a big fan of Hornady dies after seeing how well they maintain concentricity of resized cases and loaded rounds. After fire forming the cases are maintaining zero to 0.0005" runout.
The first issue I had in my previous attempts was the wall of the case collapsing when trying to resize in one step using the Hornady 6.5CM full length die.
So I decided to first move the shoulder down while maintaining the .243 shape. I did this by machining off 0.125" (1/8 inch) off the bottom of a Lee full length die so that I could push the case further into the die thereby moving the shoulder down to the same dimension of the 6.5 Creedmoor (1.520"). I also remove the expander ball assembly. Then the brass goes into the Hornady 6.5 Creedmoor die and it necks up the neck to 6.5mm and sets the 30 degree shoulder angle.
Steps:
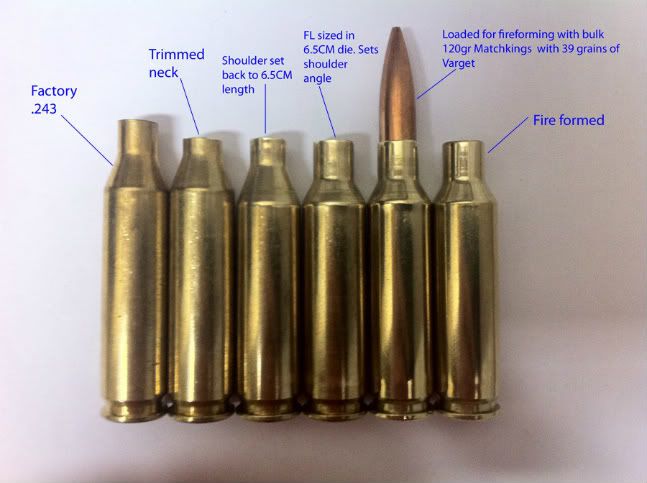
1) Trim the factory .243 neck on a trimmer down to 1.940". This sets the case length on the finished case exactly at the Creedmoor length of 1.920" once all is said and done. You have to do this step or you won't be able to process the brass into the Creedmoor die as it will just smash the neck into the top of the die.
2) Chamfer and deburr the case neck opening.
3) Lube the wall of the case with Imperial Sizing Wax. I stopped lubing the neck/shoulder altogether because I was getting small wrinkles in the shoulder in the next step even with almost no lube. As the should moves down the case it will get lubed from the lube applied to the wall.
4) Run the brass into the modified .243 Full-length die that is adjusted to set the shoulder to the Creedmoor dimension.
5) Run the brass into the factory Hornady full-length Creedmoor die. To me this is a step that has to be fine tuned with the rifle that is going to fire the cases. I adjust the die down little by little and resize a case until it will juuusssst allow the bolt to close with a slight drag. You want it just barely to touch the bolt face and the shoulder of the chamber. This way when you fire the cases it will set the shoulder perfectly to your chamber. This probably isn't critical since we all have no issue with firing factory brass that isn't that snug.
6) Load the brass and shoot it.

Here is a photo of each of my steps.
I started out on this quest a while back in this thread... http://www.65creedmoor.com/index.php?topic=356.0
I've since moved from Colorado to Georgia and have my new reloading room up and running so I wanted to get back on this. I have a boatload of new .243 brass that I bought on sale, and it's also a personal challenge to see if I can do it. Well, I am calling it a success. After conversion I measured runout on the necks and they are between 0.0005" (half a thousandth) and zero. That is much better than I was honestly expecting. I am a happy camper, and I am a big fan of Hornady dies after seeing how well they maintain concentricity of resized cases and loaded rounds. After fire forming the cases are maintaining zero to 0.0005" runout.
The first issue I had in my previous attempts was the wall of the case collapsing when trying to resize in one step using the Hornady 6.5CM full length die.
So I decided to first move the shoulder down while maintaining the .243 shape. I did this by machining off 0.125" (1/8 inch) off the bottom of a Lee full length die so that I could push the case further into the die thereby moving the shoulder down to the same dimension of the 6.5 Creedmoor (1.520"). I also remove the expander ball assembly. Then the brass goes into the Hornady 6.5 Creedmoor die and it necks up the neck to 6.5mm and sets the 30 degree shoulder angle.
Steps:
1) Trim the factory .243 neck on a trimmer down to 1.940". This sets the case length on the finished case exactly at the Creedmoor length of 1.920" once all is said and done. You have to do this step or you won't be able to process the brass into the Creedmoor die as it will just smash the neck into the top of the die.
2) Chamfer and deburr the case neck opening.
3) Lube the wall of the case with Imperial Sizing Wax. I stopped lubing the neck/shoulder altogether because I was getting small wrinkles in the shoulder in the next step even with almost no lube. As the should moves down the case it will get lubed from the lube applied to the wall.
4) Run the brass into the modified .243 Full-length die that is adjusted to set the shoulder to the Creedmoor dimension.
5) Run the brass into the factory Hornady full-length Creedmoor die. To me this is a step that has to be fine tuned with the rifle that is going to fire the cases. I adjust the die down little by little and resize a case until it will juuusssst allow the bolt to close with a slight drag. You want it just barely to touch the bolt face and the shoulder of the chamber. This way when you fire the cases it will set the shoulder perfectly to your chamber. This probably isn't critical since we all have no issue with firing factory brass that isn't that snug.
6) Load the brass and shoot it.
Here is a photo of each of my steps.

