Chapter 3: "Where’s my rilflings and where should I put them?"
So having prepped and primed our brass & sorted our bullets into identical lots now we need to know at what overall length we need to seat the bullet into the case. How do we figure that out?
Well there are a few ways to establish a great starting point, and after that during our load refinement the rifle will tell us what it wants- exactly what it wants.
So there are a number of ways of determining at what overall length (OAL) a loaded round’s bullet is engaging the riflings. I’m gonna cover my favorite. I feel it is the quickest and best way.
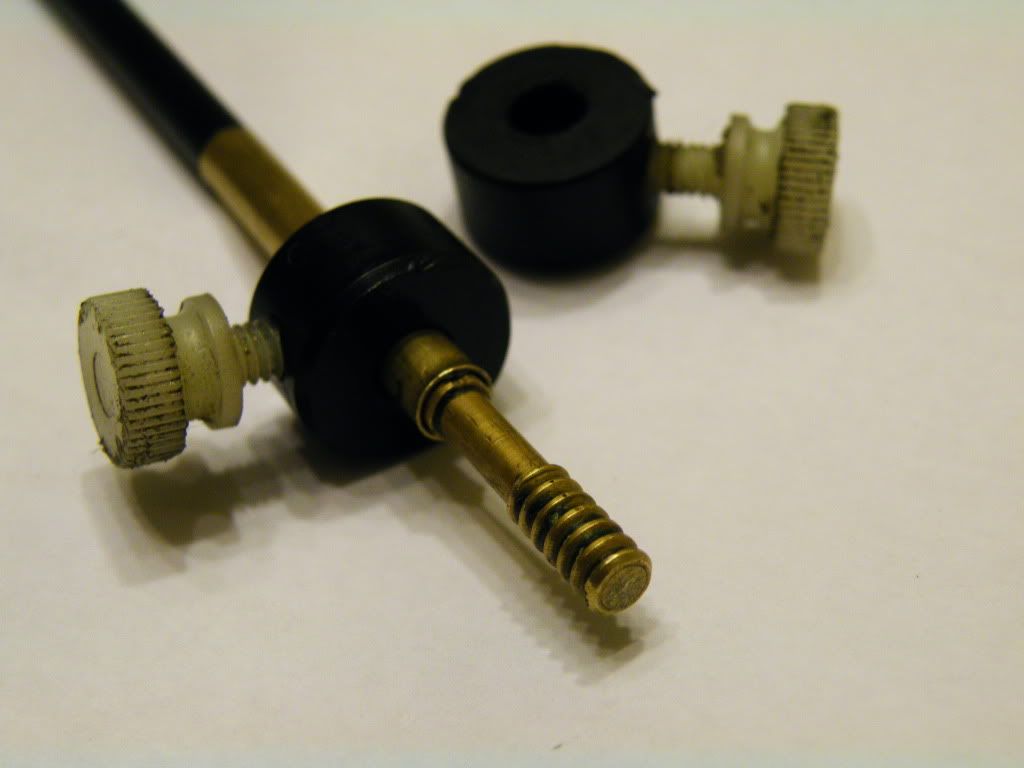
It is done by using a cleaning rod, a blunt patch jag and two rod stops. If your unfamiliar with rod stops, they are just that. Small round collars that clamp onto you rod to allow it only to go into the bore so far. This is normally used when stroking a bore with JB bore cleaner, ISSO paste, etc. so that the particular jag, brush or felt pellets your using to JB with do not pop out of the muzzle causing you to have to re-affix your JB/ISSO holder.
Rod stops at Brownells.com
There is a fine all stainless steel rig made for this purpose sold at Sinclair, but it is a good bit more expensive than simple & cheap cleaning rod stops.
Here they are...
Here's mine I'm referring to in this instructional:
Okay. First let’s wipe off the lugs on our bolt as well as the locking lugs of the action to ensure they are engaging bare metal to bare metal, without powder residue, grit or carbon pinned in between which would throw our measurement off by many thousandths. Make sure the bolt face is clean as well.
Close the bolt on an EMPTY chamber and to make this is an idiot proof operation let’s go ahead and put the trigger safety on. The following actions are easiest done by sitting the butt of the rifle on the floor with the weapon vertical. Bungee the barrel to the back of a chair or workbench (etc.) so it’s held in place. I in the past also have sat in a chair, placed the rifle butt on the floor and held the rifle vertical between my knees. Either needfully frees both hands to manipulate the rod and rod stops.
Now with the rod stops and blunt jag already on the cleaning rod go ahead and insert the cleaning rod into the muzzle end of the barrel and down the bore until the blunt jag is resting snugly against the bolt face.
Now we need to “zero out” our rod stops. We do this by holding the cleaning rod into the bore and snug against the bolt face. While holding there slide BOTH rod stops down snugly against the muzzle and tighten down the thumbscrews locking them in place. GAS GUNNER: pushing the rod against the bolt face you will feel it spring back a little then stop solidly. Make sure you have it pushed to a solid stop past the springiness.
Here's a picture of my stop's zero'd out on my rifle:
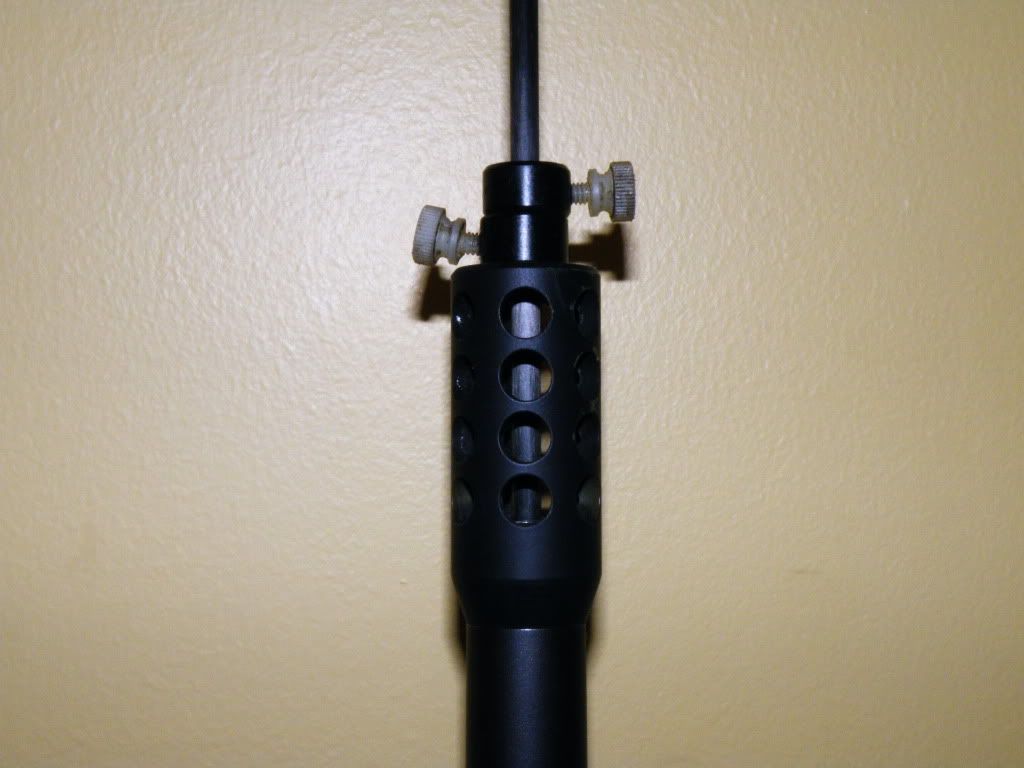
(What’s that you say? Sexy brake? Thanks I just made it this past week. It is my first ever and I thought it up, designed it and made it all while… well as i was making it! I tried it today. It works GREAT, but evidently it’s louder than the cries from hell. After I fired the first shot, everybody started backing away from the firing line! Great, they were a distraction anyway… : )
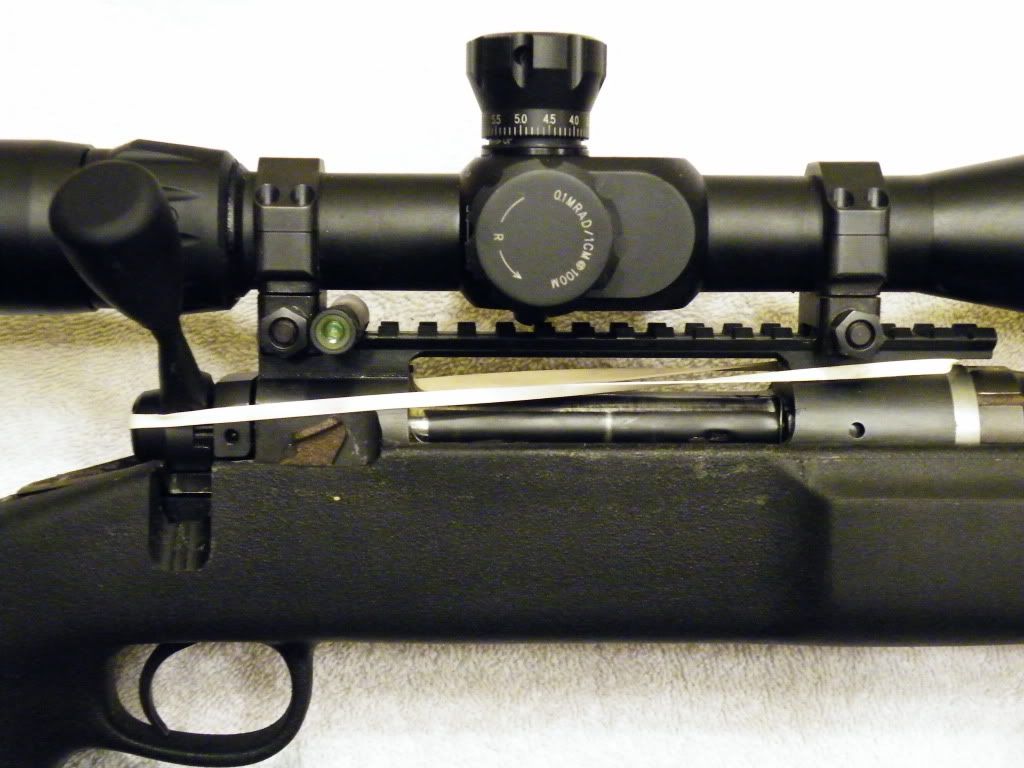
Now we need to take a resized, UNPRIMED (as in no primer) case, containing NO POWDER and seat a bullet long. Say .200” longer than book spec for the bullet you are using. Take this dummy round and gently slide it into the chamber. Bring the bolt up VERY gently behind it until you just feel the bullet touch the riflings in the bore. Now take a good rubber band and loop it over the scope and onto the back of the bolt to hold it in a forward position.
This insertion of the dummy round needs a gentle touch with both your hands, and in the holding of the bolt by the rubber band.. With the keen angle of the bullets ogive and the gentle angle of the lead-in on the rifling it is EASY to jam the bullet on deeper into the riflings and not know it.
Avoid doing this, but no need to have worrisome sweat bead up on your forehead. If you do jam it in an extra couple of thousandths it’s not the end of the world. We are only trying to find a good estimation here. We are going to refine this overall cartridge length as the LAST step in our load work-up. We just need a good start point for now.
GAS GUNNERS: your buffer spring serves as your rubber band. Point the weapon muzzle down. Drop the dummy round gently into the chamber. Now SLOWLY & GENTLY ease the bolt forward until it just touches the back of the dummy round. Gently ease your hand off the charging handle smoothly transferring the holding power to the buffer spring.
Now again with the weapon fixed in a vertical position slide the cleaning rod back down the bore until the blunt jag delicately comes to rest on the meplat of the bullet. Now loosen and slide the lower stop (the one already closest to the muzzle) down until it’s snug against the muzzle and tighten the thumb screw.
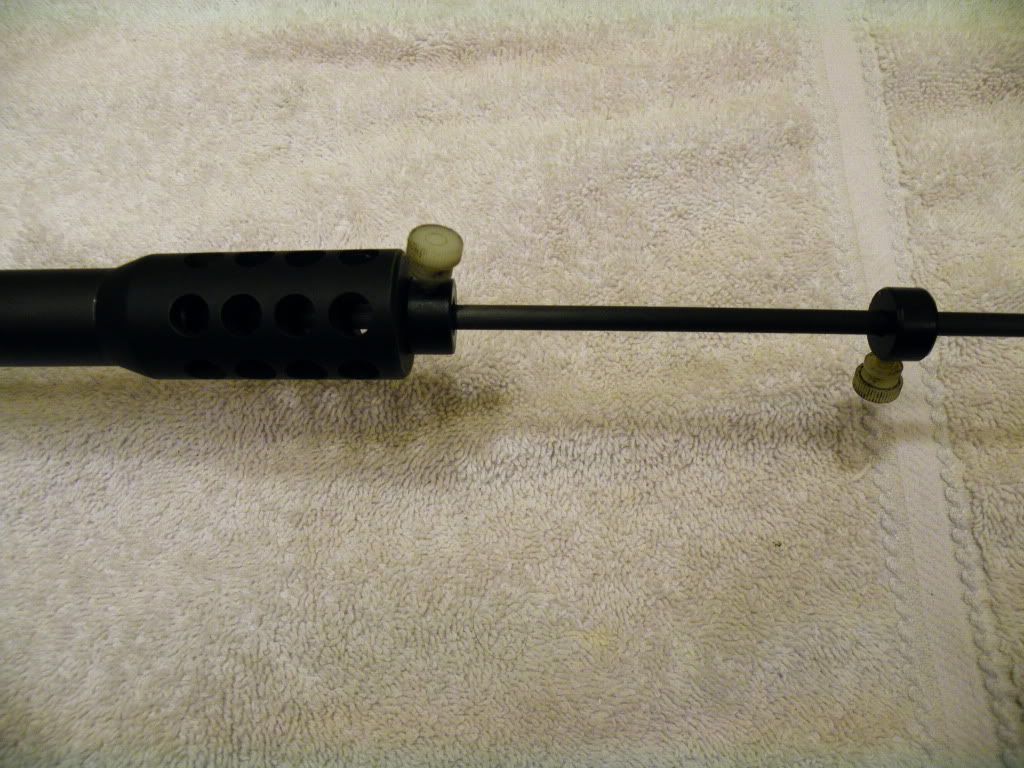
Remove the cleaning rod from the bore being careful not to bump the stops out of position. Take your calipers and measure the distance BETWEEN the rod stops.
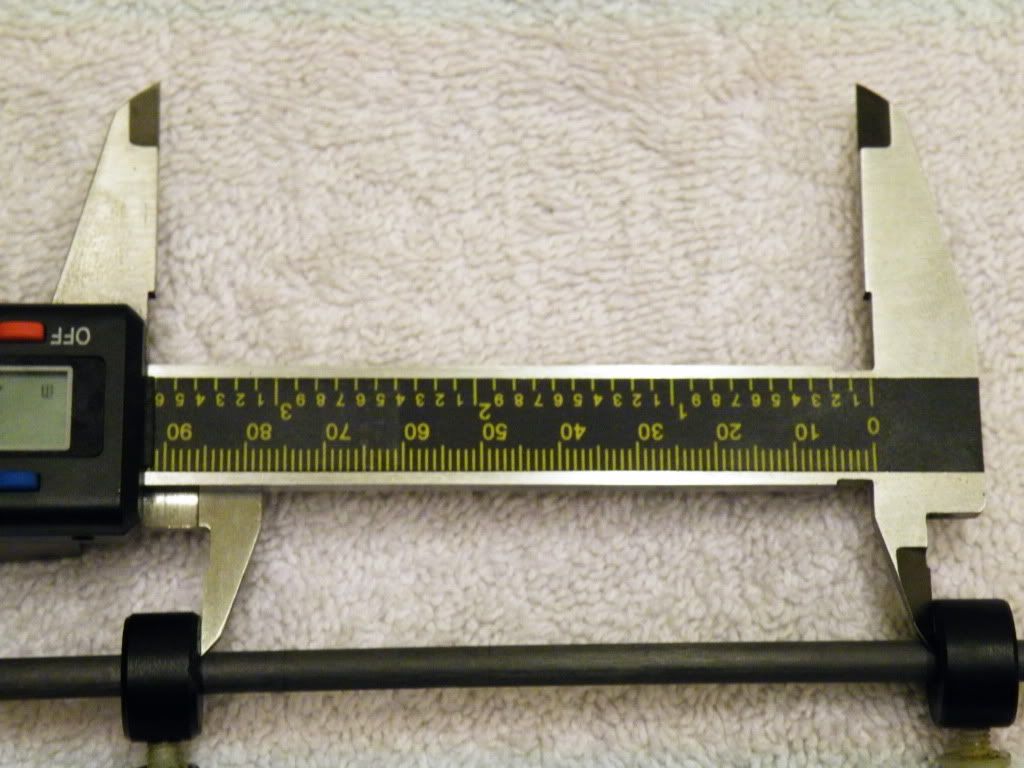
Write down that measurement. Now repeat the whole process two more times (so long as your not getting greatly differing measurements. If your getting more than a few thousandths difference between each measurement something is wrong and you'll not end up with good data.) and average all three. VIOLIN! You have the measurement for the cartridge overall length at which that bullet is just lightly touching the rilfings. Well done!
Now this is all well & good, but there is one critical thing you need to remember that we learned from Chapter 2: not all meplats are the same! This measurement is only good for THIS ONE PARTICULAR BULLET. Because we measured from IT'S MEPLAT, and seldom do two bullets have the same meplat squareness and length (microscopically speaking.)
So what do we do? We record the measurement off the ogive, which is the same from bullet to bullet and use that figure from now on. How do we do that? Slow down- I’m getting there.
Now take the dummy round that you did the Rod/Stops work with and place it in the loading press. Thread in your seating die to the lock ring as per normal. Back your seating stem or micrometer WAY WAY out. Now raise the dummy round up into the die all the way. While holding sufficient pressure on the press handle, begin screwing down the seating stem until you feel it touch the bullet.
Now raise the press handle removing the dummy round from the die. Screw in the stem just a little and raise the dummy again & seat the bullet to that depth the stem is currently at.
Now take the dummy round out and measure it, case head to meplat.
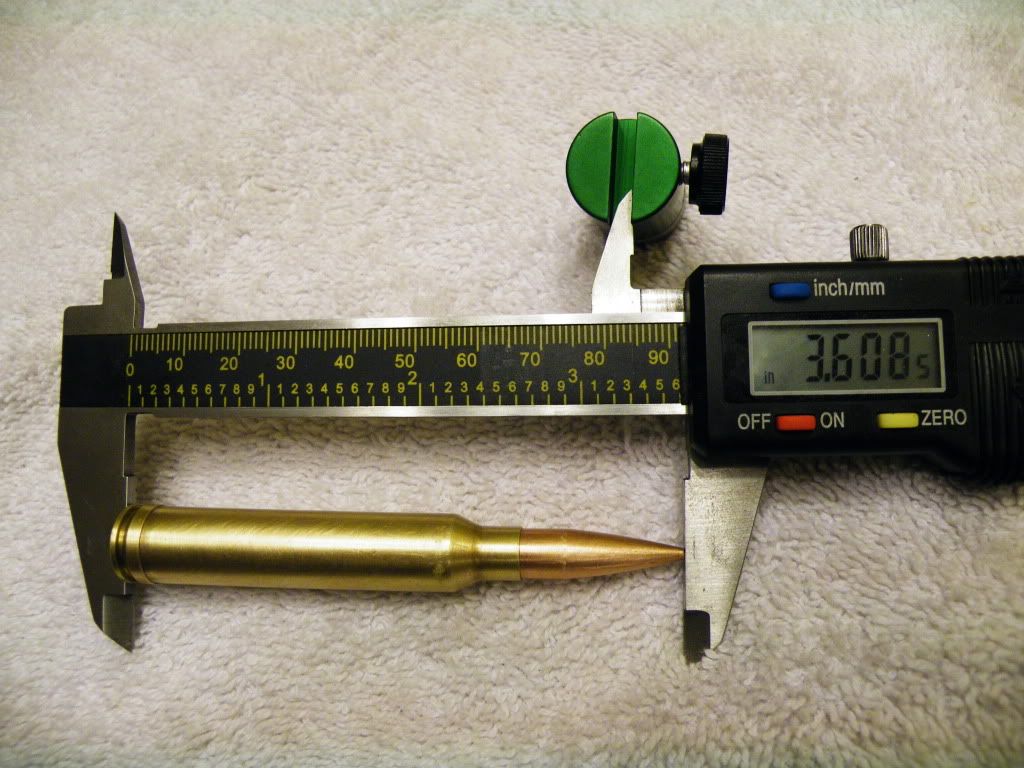
Continue this seating the bullet in the case a little more each time until you get it to the exact length you came up with from the cleaning rod stops routine. Now we’ll get that ogive measurement your jumping up & down for.
So get out your calipers, comparator body & the proper insert you that learned about in Chapters 1 & 2. This time you’ll only need one body (holder) and one caliber appropriate insert. Now open the jaws and attach the comparator assembly to one of the jaws.
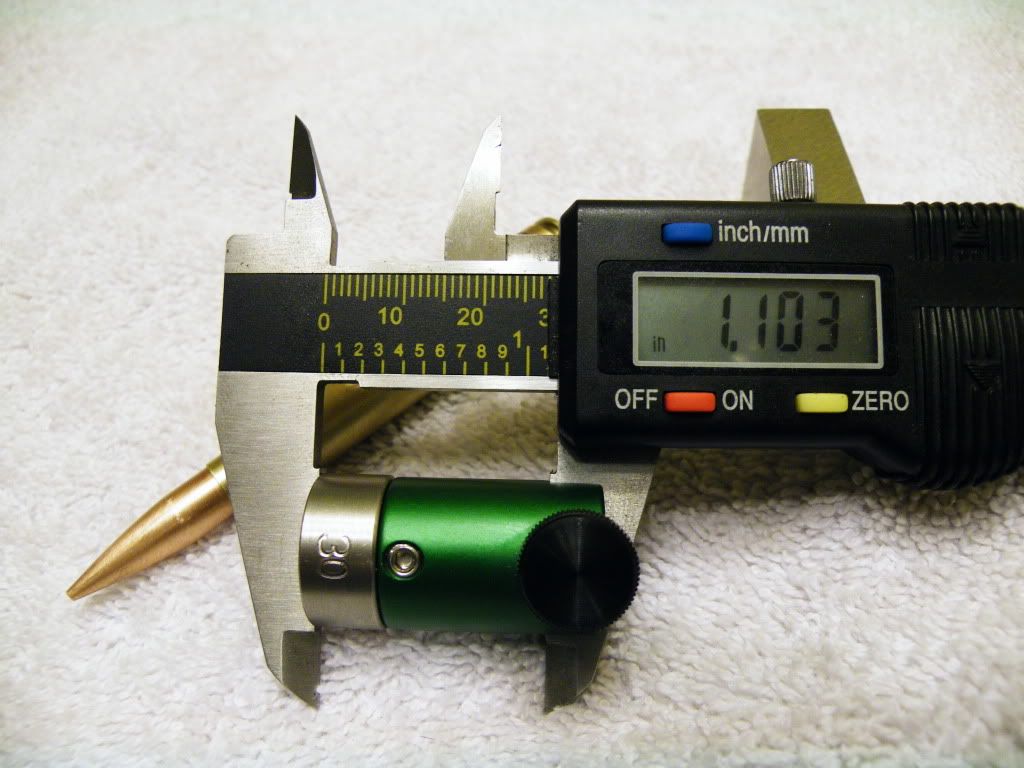
Now measure the dummy round we have set up to our case-head-to-meplat over all length. The comparator however measures off the ogive instead of the meplat. We CAN use this measurement bullet to bullet to bullet for this particular bullet make, weight and style we are working with and it will maintain good consistency. (210 VLD depicted here.)
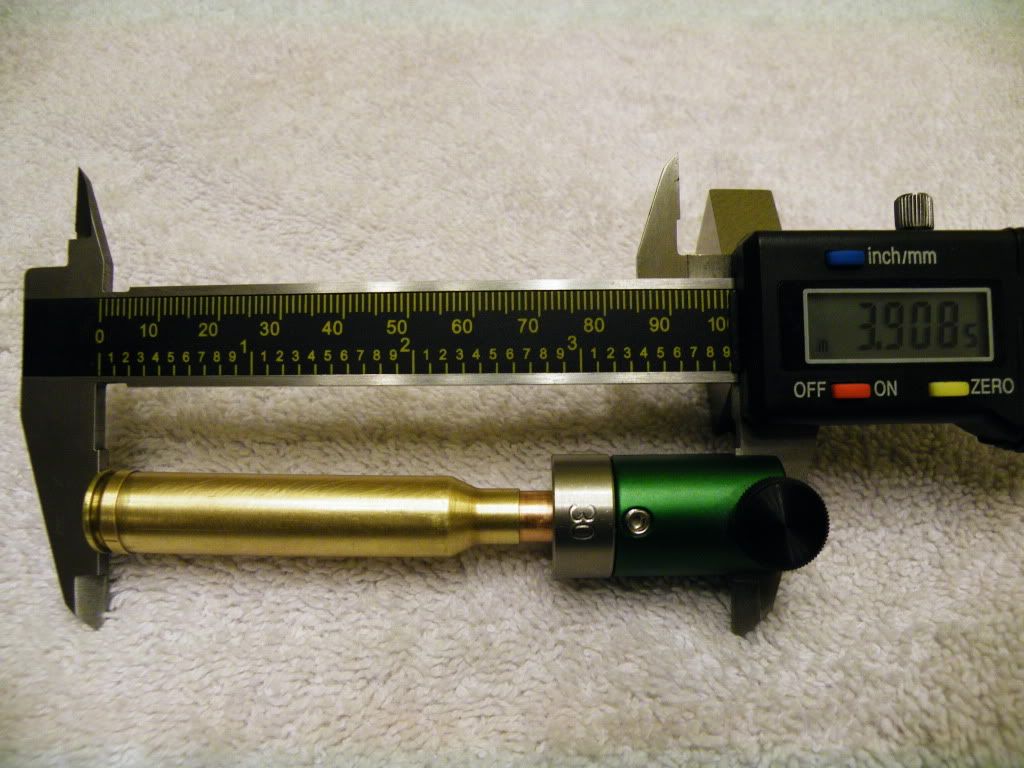
[ADDENDUM: if you shoot a lot to the tune of eventually shooting out and having to replace barrels, or your won over to my camp of trying to make your handloads as perfect as you can- SAVE THIS DUMMY ROUND. Label it, and put it in a safe place ot be used later.
As you shoot your rifle, the very start edge of the rifling will be eroded back from the "blow torch effect" of the hot gases coming from the mouth of the case as well as a piece of metal, aka "bullet" slamming into them time after time. This to explain that the very beginning of your rifling slowly moves towards the muzzle as it is eroded/worn away.
If your serious about accuracy- thought you have found THE perfect load you will have to "chase the rifling" as it's called. Say you found your rifle shoots amazing with a certain load and the bullet .008" jammed into the riflings. Well after a lot of rounds in a non-barrel burner cartridge, or some in a known barrel burner, though you load the OAL of the round the same it will not be the same in the end because the riflings are actually moving on you!
Hence as the barrel wears your your .008" jam is actually now only .004. then it's only .001 months later it is actually .003 JUMP. So to maintain that original .008" jam you'll have to keep actually loading you ammo longer and longer as you "chase(the wearing away of)the riflings." Periodically come back and repeat this initial OAL test to see where the start of the rifling is NOW, and you can again maintain that perfect .008 jammed in bullet to rifling relation you found in your load development.]
Lastly- one final note and word of caution. Now that we know at what measurement OFF THE OGIVE our bullet –touches- the riflings, we will start our load development .010” jammed into the riflings. That is .010” LONGER than the dimension we figured up through this described process. That number was just touching the riflings. Most rifles like to be about .010” in (“Jammed”) This is the OAL we will start our powder make & charge test’s with. (Next chapter.)
However <span style="color: #FF0000"><span style="text-decoration: underline"><span style="font-weight: bold">it is IMPERATIVE you understand the foll</span>owi</span>ng.</span> On occasion the rifle will prefer a different bullet/rifling relation. Perhaps it be .015” jammed, or .030” out of the rifling totally or .030” “jump.” But START ALL LOAD WORK JAMMED! This is because in the next chapter we are going to learn what actual MAX load for this rifle is with a given powder and this bullet. Being jammed into the riflings increases pressure! So as long as we learn our max powder charge while jammed, we are okay. HOWEVER, if we were to (think we) learn(ed) what max charge was without our bullet jammed and then jam it into the riflings, coupled with a max powder charge in search of a most accurate bullet setting we could blow up our rifle, loose both our eyes, our hearing a good portion of our face and destroy the rifle- that is if we come out of it alive. That all sounds scary, which is a good thing.
But so long as you START JAMMED and work towards JUMP your safe as can be. NEVER start jumping and move towards jammed when near or at MAX loads, no,no, no.
Well that covers determining where the bullet is in relation to the rifling and getting a good .010” jammed starting point. Next chapter is on experimenting with powders and charges.
-----------------------------------------------------------------------
This instructional took considerable time & effort. It is presented here for free. Enjoy! However if any one feels motivated to express appreciation a donation can be sent to the paypal account [email protected]. No big deal. Thanks! TresMon
So having prepped and primed our brass & sorted our bullets into identical lots now we need to know at what overall length we need to seat the bullet into the case. How do we figure that out?
Well there are a few ways to establish a great starting point, and after that during our load refinement the rifle will tell us what it wants- exactly what it wants.
So there are a number of ways of determining at what overall length (OAL) a loaded round’s bullet is engaging the riflings. I’m gonna cover my favorite. I feel it is the quickest and best way.
It is done by using a cleaning rod, a blunt patch jag and two rod stops. If your unfamiliar with rod stops, they are just that. Small round collars that clamp onto you rod to allow it only to go into the bore so far. This is normally used when stroking a bore with JB bore cleaner, ISSO paste, etc. so that the particular jag, brush or felt pellets your using to JB with do not pop out of the muzzle causing you to have to re-affix your JB/ISSO holder.
Rod stops at Brownells.com
There is a fine all stainless steel rig made for this purpose sold at Sinclair, but it is a good bit more expensive than simple & cheap cleaning rod stops.
Here they are...
Here's mine I'm referring to in this instructional:

Okay. First let’s wipe off the lugs on our bolt as well as the locking lugs of the action to ensure they are engaging bare metal to bare metal, without powder residue, grit or carbon pinned in between which would throw our measurement off by many thousandths. Make sure the bolt face is clean as well.
Close the bolt on an EMPTY chamber and to make this is an idiot proof operation let’s go ahead and put the trigger safety on. The following actions are easiest done by sitting the butt of the rifle on the floor with the weapon vertical. Bungee the barrel to the back of a chair or workbench (etc.) so it’s held in place. I in the past also have sat in a chair, placed the rifle butt on the floor and held the rifle vertical between my knees. Either needfully frees both hands to manipulate the rod and rod stops.
Now with the rod stops and blunt jag already on the cleaning rod go ahead and insert the cleaning rod into the muzzle end of the barrel and down the bore until the blunt jag is resting snugly against the bolt face.
Now we need to “zero out” our rod stops. We do this by holding the cleaning rod into the bore and snug against the bolt face. While holding there slide BOTH rod stops down snugly against the muzzle and tighten down the thumbscrews locking them in place. GAS GUNNER: pushing the rod against the bolt face you will feel it spring back a little then stop solidly. Make sure you have it pushed to a solid stop past the springiness.
Here's a picture of my stop's zero'd out on my rifle:

(What’s that you say? Sexy brake? Thanks I just made it this past week. It is my first ever and I thought it up, designed it and made it all while… well as i was making it! I tried it today. It works GREAT, but evidently it’s louder than the cries from hell. After I fired the first shot, everybody started backing away from the firing line! Great, they were a distraction anyway… : )
Now we need to take a resized, UNPRIMED (as in no primer) case, containing NO POWDER and seat a bullet long. Say .200” longer than book spec for the bullet you are using. Take this dummy round and gently slide it into the chamber. Bring the bolt up VERY gently behind it until you just feel the bullet touch the riflings in the bore. Now take a good rubber band and loop it over the scope and onto the back of the bolt to hold it in a forward position.
This insertion of the dummy round needs a gentle touch with both your hands, and in the holding of the bolt by the rubber band.. With the keen angle of the bullets ogive and the gentle angle of the lead-in on the rifling it is EASY to jam the bullet on deeper into the riflings and not know it.
Avoid doing this, but no need to have worrisome sweat bead up on your forehead. If you do jam it in an extra couple of thousandths it’s not the end of the world. We are only trying to find a good estimation here. We are going to refine this overall cartridge length as the LAST step in our load work-up. We just need a good start point for now.

GAS GUNNERS: your buffer spring serves as your rubber band. Point the weapon muzzle down. Drop the dummy round gently into the chamber. Now SLOWLY & GENTLY ease the bolt forward until it just touches the back of the dummy round. Gently ease your hand off the charging handle smoothly transferring the holding power to the buffer spring.
Now again with the weapon fixed in a vertical position slide the cleaning rod back down the bore until the blunt jag delicately comes to rest on the meplat of the bullet. Now loosen and slide the lower stop (the one already closest to the muzzle) down until it’s snug against the muzzle and tighten the thumb screw.

Remove the cleaning rod from the bore being careful not to bump the stops out of position. Take your calipers and measure the distance BETWEEN the rod stops.

Write down that measurement. Now repeat the whole process two more times (so long as your not getting greatly differing measurements. If your getting more than a few thousandths difference between each measurement something is wrong and you'll not end up with good data.) and average all three. VIOLIN! You have the measurement for the cartridge overall length at which that bullet is just lightly touching the rilfings. Well done!
Now this is all well & good, but there is one critical thing you need to remember that we learned from Chapter 2: not all meplats are the same! This measurement is only good for THIS ONE PARTICULAR BULLET. Because we measured from IT'S MEPLAT, and seldom do two bullets have the same meplat squareness and length (microscopically speaking.)
So what do we do? We record the measurement off the ogive, which is the same from bullet to bullet and use that figure from now on. How do we do that? Slow down- I’m getting there.
Now take the dummy round that you did the Rod/Stops work with and place it in the loading press. Thread in your seating die to the lock ring as per normal. Back your seating stem or micrometer WAY WAY out. Now raise the dummy round up into the die all the way. While holding sufficient pressure on the press handle, begin screwing down the seating stem until you feel it touch the bullet.
Now raise the press handle removing the dummy round from the die. Screw in the stem just a little and raise the dummy again & seat the bullet to that depth the stem is currently at.
Now take the dummy round out and measure it, case head to meplat.

Continue this seating the bullet in the case a little more each time until you get it to the exact length you came up with from the cleaning rod stops routine. Now we’ll get that ogive measurement your jumping up & down for.
So get out your calipers, comparator body & the proper insert you that learned about in Chapters 1 & 2. This time you’ll only need one body (holder) and one caliber appropriate insert. Now open the jaws and attach the comparator assembly to one of the jaws.

Now measure the dummy round we have set up to our case-head-to-meplat over all length. The comparator however measures off the ogive instead of the meplat. We CAN use this measurement bullet to bullet to bullet for this particular bullet make, weight and style we are working with and it will maintain good consistency. (210 VLD depicted here.)

[ADDENDUM: if you shoot a lot to the tune of eventually shooting out and having to replace barrels, or your won over to my camp of trying to make your handloads as perfect as you can- SAVE THIS DUMMY ROUND. Label it, and put it in a safe place ot be used later.
As you shoot your rifle, the very start edge of the rifling will be eroded back from the "blow torch effect" of the hot gases coming from the mouth of the case as well as a piece of metal, aka "bullet" slamming into them time after time. This to explain that the very beginning of your rifling slowly moves towards the muzzle as it is eroded/worn away.
If your serious about accuracy- thought you have found THE perfect load you will have to "chase the rifling" as it's called. Say you found your rifle shoots amazing with a certain load and the bullet .008" jammed into the riflings. Well after a lot of rounds in a non-barrel burner cartridge, or some in a known barrel burner, though you load the OAL of the round the same it will not be the same in the end because the riflings are actually moving on you!
Hence as the barrel wears your your .008" jam is actually now only .004. then it's only .001 months later it is actually .003 JUMP. So to maintain that original .008" jam you'll have to keep actually loading you ammo longer and longer as you "chase(the wearing away of)the riflings." Periodically come back and repeat this initial OAL test to see where the start of the rifling is NOW, and you can again maintain that perfect .008 jammed in bullet to rifling relation you found in your load development.]
Lastly- one final note and word of caution. Now that we know at what measurement OFF THE OGIVE our bullet –touches- the riflings, we will start our load development .010” jammed into the riflings. That is .010” LONGER than the dimension we figured up through this described process. That number was just touching the riflings. Most rifles like to be about .010” in (“Jammed”) This is the OAL we will start our powder make & charge test’s with. (Next chapter.)
However <span style="color: #FF0000"><span style="text-decoration: underline"><span style="font-weight: bold">it is IMPERATIVE you understand the foll</span>owi</span>ng.</span> On occasion the rifle will prefer a different bullet/rifling relation. Perhaps it be .015” jammed, or .030” out of the rifling totally or .030” “jump.” But START ALL LOAD WORK JAMMED! This is because in the next chapter we are going to learn what actual MAX load for this rifle is with a given powder and this bullet. Being jammed into the riflings increases pressure! So as long as we learn our max powder charge while jammed, we are okay. HOWEVER, if we were to (think we) learn(ed) what max charge was without our bullet jammed and then jam it into the riflings, coupled with a max powder charge in search of a most accurate bullet setting we could blow up our rifle, loose both our eyes, our hearing a good portion of our face and destroy the rifle- that is if we come out of it alive. That all sounds scary, which is a good thing.
But so long as you START JAMMED and work towards JUMP your safe as can be. NEVER start jumping and move towards jammed when near or at MAX loads, no,no, no.
Well that covers determining where the bullet is in relation to the rifling and getting a good .010” jammed starting point. Next chapter is on experimenting with powders and charges.
-----------------------------------------------------------------------
This instructional took considerable time & effort. It is presented here for free. Enjoy! However if any one feels motivated to express appreciation a donation can be sent to the paypal account [email protected]. No big deal. Thanks! TresMon


