• Get 30% off the first 3 months with code HIDE30

    Offer valid until 9/23! If you have an annual subscription on Sniper's Hide, subscribe below and you'll be refunded the difference.

    Subscribe
  • Having trouble using the site?

    Contact support

Howa 1500 blueprinting

Hey all,

New as a participant but long time forum reader.

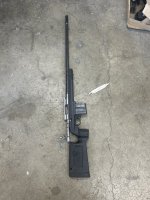
I’m blueprinting a howa 1500 short action. I bought a .308 copy in 2014 or so and it’s harvested several animals. Despite being generally happy with the performance, It would have left-right POI shifts in addition to the usual up/down when you change ammunition. I could shoot a 1ish moa group with a 168 grain round, and then switch to 200 grain ammo and I’d have to come over 5-6 inches to the side. This led to wanting to rebarrel it. I decided to go with 300 WSM, and I’m a machinist by trade, so I figured it’d be a fun project to do myself.

I routinely produce parts at work with tolerances ranging from +/- 0.001” to +/- 0.0003”, so I had every confidence taking it on.

I’ve been somewhat shocked at the tolerances on the action and wanted to hear if anyone else had similar experiences to mine.

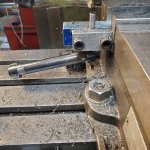
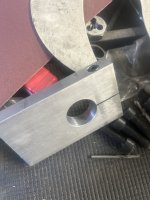
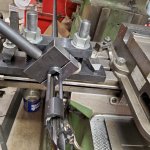
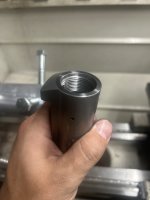
Starting with the action body itself: I built a spider fixture out of some spare aluminum and made perfect precise bushings for a rod to indicate the action in straight and true on my lathe. After getting the center of the action aligned within 0.0001”, I measured the face of it. I found that the front face of the action was out of square 0.006”, and the counterbore for the barrel out of concentricity 0.016”

I felt that this was excessive, made a note, and blueprinted the body.

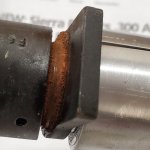
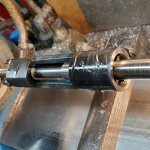
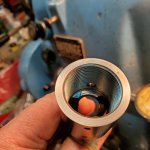
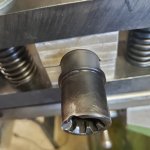
It’s necessary to increase the bolt face to accommodate the new round, so I chucked my bolt between a four jaw chuck and a steady rest. Here’s where I encountered serious error. I’m unable to get the bolt to run true, and have lost confidence in the bolt itself.

Upon measuring, I found that the firing pin hole is 0.007” off the center of the bolt body.

I’m going to proceed with the rebarreling, since it’s nearly impossible for me to end up worse than it was, but I’m curious if this is the standard amount of runout that one should expect. I genuinely believed that it would be less than .002” for my worst dimension.
 
Interested in hearing about the barrel. Relief cut, or….?
To be fair, you are correct that the barrel isn’t likely located by that bore on the action. My concern is that I figure the threads for the barrel are concentric to that bore since it makes sense to cut them at the same time. The threads aren’t simple to measure concentricity on, but they did seem to cut harder on one side when I chased them to straight.

Regrettably, I let a buddy take the old barrel for something he’s working on.
 
I'm curious what your process for removing the factory barrel was. Ive heard these are on there pretty tight.

As far as the blueprinting...
Most everything I've heard of the howas is that they are very consistent from action to action and hardly ever require truing them.
 
I am a retired machinist, I build all my rifles. I "blueprint" my actions, or as I prefer, true them up.
Anyone attempting to do so needs to buy some books and videos on it, shortens the learning curve.
It takes expensive carbide ground tooling especially for the job to make it easy.
Removing the barrel from the action, sometimes requires cutting it off, as this rusted on thread appearance.
Threads are cut .010 oversize, locking abutments cut perpendicular all at the same time.
The bolt raceway can be cut to uniform size first if sleeving the bolt, and the bolt cut for sleeves, then machined for clearence, the Borden bumps added and relieved for super tight lock up, for target rifles only, IMO as lockup is tight, and not needed for 1/4" 5 shot group accuracy.
The ground carbide mandrel and tap to face the action perpendicular to the new threads.
Dykem blue still on the bolt to check lug engagement with reciever is 100% as go gauge is inserted during chambering. M16 extractor was installed.
A bolt knob fixture made for the Bridgeport mill. Then a whole host of fixtures tor other things like silver brazing bolt knobs.
When cutting the back of the locking lugs for 100% engagement, just enough to clean up, super thin skim cut .001". Or it will mess with the bolt cam. And may have to re-silver braze the bolt handle.
So got the Bartlein barrel in at noon.
Took the barrel off the old action, trued the action, chambered the new Bartlein barrel, and theeaded it for a brake, did the m16 extractor, the bolt knob, assembled the rifle. Reloaded new brass and match bullets, all done with rifle and reloading.

The next day I was out shooting it.
Shot 13, 5 shot groups with different powders and different match bullets.
The average of the 13, 5 shot groups was .313" no barrel breakin no cleaning just shooting.
It takes too many paragraphs to describe, and it's better to buy content on barreling by the best. Plus it's gonna cost ya in tooling, depending on how far down the accuracy hole you want to go.
It shoots as good as I can hold. A better shooter is needed to bring out the full potential.
One can do this, just educate yourself first, and expect to spend some cash to learn and tool up.
 

Attachments

  • 20210602_165618.jpg
    20210602_165618.jpg
    386.7 KB · Views: 35
  • 20211122_231529.jpg
    20211122_231529.jpg
    327.6 KB · Views: 35
  • 20210608_004516.jpg
    20210608_004516.jpg
    830.4 KB · Views: 35
  • 20210611_230254.jpg
    20210611_230254.jpg
    401.6 KB · Views: 32
  • 20211015_183823.jpg
    20211015_183823.jpg
    429.2 KB · Views: 32
  • 20210603_230502.jpg
    20210603_230502.jpg
    505.9 KB · Views: 30
  • 20211014_010807.jpg
    20211014_010807.jpg
    399.6 KB · Views: 32
I'm curious what your process for removing the factory barrel was. Ive heard these are on there pretty tight.

As far as the blueprinting...
Most everything I've heard of the howas is that they are very consistent from action to action and hardly ever require truing them.
I cut a hole 0.003” over the barrel diameter, drilled and tapped a bolt hole along one side, notched it so it could clamp. Then I clamped it tight onto the barrel, put the action into a press, and unscrewed it. Wasn’t a big deal.

I’m wondering if my action was an end of day on a Friday one that snuck through.

I'm gonna remove factory howa barrel either today or tomorrow. I have the threads soaking in penetrating oil since yesterday afternoon. I have the action upside down and put some oil in the recoil lug hole because it leads to the barrel threads. Every time I put oil, it seems to be going into the threads because I fill the hole and in a few minutes, it's empty. Hopefully it's not too bad.
 
I cut a hole 0.003” over the barrel diameter, drilled and tapped a bolt hole along one side, notched it so it could clamp. Then I clamped it tight onto the barrel, put the action into a press, and unscrewed it. Wasn’t a big deal.

I’m wondering if my action was an end of day on a Friday one that snuck through.
 

Attachments

  • image.jpg
    image.jpg
    342.1 KB · Views: 14
  • Like
Reactions: stello1001
I'm curious what your process for removing the factory barrel was. Ive heard these are on there pretty tight.
Tighten the heck out of your vice bolts. Just the action wrench wasn’t enough for me, put a 4’ piece of 2.5” pipe on as an extension and it broke free easy enough once I tightened the vice bolts enough to stop spinning.
It was tight, but not insurmountable.
 
I use a tool made for the job, a barrel vise and action wrench. With aluminum inserts made on the mill and cut in half. Grease hardened 1" bolts and nuts cause you're gonna use a lever on the 1.5" wrench, and another lever on the action wrench.
Also apply electrical tape to the reciever where the action wrench is clamped.
It works for AR barrel extensions also.
The vise is clamped to the table of the Bridgeport mill, ya need a very sturdy bench that's anchored down.
 

Attachments

  • 20240820_181400.jpg
    20240820_181400.jpg
    416.2 KB · Views: 12
  • 20240524_233212.jpg
    20240524_233212.jpg
    650.5 KB · Views: 12
Tighten the heck out of your vice bolts. Just the action wrench wasn’t enough for me, put a 4’ piece of 2.5” pipe on as an extension and it broke free easy enough once I tightened the vice bolts enough to stop spinning.
It was tight, but not insurmountable.

I have plenty of ridgid conduit in all sizes laying around and square tubing along with regular pipes too.

I'm sure I can come up with a decently sized one if not I'll just cut it at 4ish feet.

Should I let the aluminum vice contact the barrel or put some cardboard in between?
 
I have plenty of ridgid conduit in all sizes laying around and square tubing along with regular pipes too.

I'm sure I can come up with a decently sized one if not I'll just cut it at 4ish feet.

Should I let the aluminum vice contact the barrel or put some cardboard in between?
I use one of my old business cards but whatever you deem necessary, start safe and proceed accordingly. Maybe raw with resin ends up being what it takes for you, idk
 
  • Like
Reactions: stello1001
I use one of my old business cards but whatever you deem necessary, start safe and proceed accordingly. Maybe raw with resin ends up being what it takes for you, idk

I just did it. I was prepared for a nightmare. I've never done any type of barrel change. Broke free real easy...
I did end up using a bit of cardboard on barrel and action as well as rosin.

20240918_212806.jpg


Didn't even use a cheater pipe, just the standard handle that came with the action wrench.
 
  • Like
Reactions: 45-90 and spife7980
I am a retired machinist, I build all my rifles. I "blueprint" my actions, or as I prefer, true them up.
Anyone attempting to do so needs to buy some books and videos on it, shortens the learning curve.
It takes expensive carbide ground tooling especially for the job to make it easy.
Removing the barrel from the action, sometimes requires cutting it off, as this rusted on thread appearance.
Threads are cut .010 oversize, locking abutments cut perpendicular all at the same time.
The bolt raceway can be cut to uniform size first if sleeving the bolt, and the bolt cut for sleeves, then machined for clearence, the Borden bumps added and relieved for super tight lock up, for target rifles only, IMO as lockup is tight, and not needed for 1/4" 5 shot group accuracy.
The ground carbide mandrel and tap to face the action perpendicular to the new threads.
Dykem blue still on the bolt to check lug engagement with reciever is 100% as go gauge is inserted during chambering. M16 extractor was installed.
A bolt knob fixture made for the Bridgeport mill. Then a whole host of fixtures tor other things like silver brazing bolt knobs.
When cutting the back of the locking lugs for 100% engagement, just enough to clean up, super thin skim cut .001". Or it will mess with the bolt cam. And may have to re-silver braze the bolt handle.
So got the Bartlein barrel in at noon.
Took the barrel off the old action, trued the action, chambered the new Bartlein barrel, and theeaded it for a brake, did the m16 extractor, the bolt knob, assembled the rifle. Reloaded new brass and match bullets, all done with rifle and reloading.

The next day I was out shooting it.
Shot 13, 5 shot groups with different powders and different match bullets.
The average of the 13, 5 shot groups was .313" no barrel breakin no cleaning just shooting.
It takes too many paragraphs to describe, and it's better to buy content on barreling by the best. Plus it's gonna cost ya in tooling, depending on how far down the accuracy hole you want to go.
It shoots as good as I can hold. A better shooter is needed to bring out the full potential.
One can do this, just educate yourself first, and expect to spend some cash to learn and tool up.
Lots of good advice. I agree with everything you’ve said. I have lots of tooling already and I’m no stranger to making new fixtures. Some of my cutting is carbide, some ceramic, and worst case the occasional chunk of cobalt or HSS.

I decided to chase the inside of the barrel threads single-point on the lathe rather than buying a tap because I didn’t think the tap would stay as concentric.

How common is sleeving the bolt? I recognize that I’m likely going too deep into the weeds, but I wasn’t pleased with the straightness of the bolt itself.
 
  • Like
Reactions: 45-90
The tap is solid carbide ground on long shaft with interchangeable bushings for centering the shaft inside front and rear bridges, so it cuts in line with the bolt bore raceway. Centering the raceway, bolt, and reciever threads. Unlike a regular tap, if the threads are off center of the raceway, it cuts them on center to the raceway. Lugs are cut the same way everything centered to the bolt raceway.
Sleeving the bolt requires the reciever bolt raceway be cut uniform all the way through, then the bolt is cut for sleeves, the sleeves turned down for a nice slip fit inside the raceway. The bolt is then relieved on the sleeves opposite where the bolt locks in the reciever...giving no movement in the locked position but relieved for smooth bolt operation in the unlocked position when extracting cartridges.
Different rifle builders do a few things differently, some you may try some you may not.. some you may disagree with.
That's why I push buying books and videos from promenant builders who sell or make videos available to the public. I have some that are what one would consider outdated in many respects, to techniques used...but yet they build pretty accurate rifles.
A 1/2" 5 shot group bolt gun is not difficult, just a good chambering job in a premium barrel, with good action bedding, and barrel free float in most cases, will get the 1/2" accuracy required, without touching the reciever, if it's machined pretty good. But that's not the case in many instances, CNC or not ya need quality people to get a quality job...but that's changing. Quality robotics with digital feed back, with instant inspection.
I used to qualify new CNC mills, to see if they were up to holding the toletences for the job being assigned to them, before putting them into production.
They are not perfection, some are better than others. Magnify their inconsistencies enough in inspection, and view the irregularities. Circle interpolation is where many fail when scrutinized. Not all CNC lathe pockets make it to X zero are centered when commanded to do so...it only takes one crash. I set those up for roughing only on that particular CNC center.
I bring this up cause everything is CNC manufacturing, and everyone has the capability to produce the same exact action, to the same quality regardless of the name on the action....if they choose.
But it takes good machines, quality conscious machinist make the difference, day in, and day out, all the time 100% accurate.
No diversity hires....
 
  • Like
Reactions: Engineered-details
Thanks for the input. I couldn’t agree more. I spend a lot of time day to day programming and setting up cncs. When I’m not lucky I spend a fair amount of time troubleshooting also.

It’s surprising how few people are aware machines aren’t perfect. If you’re using a Cnc to measure its own parts, you’re probing on the same scales that made the parts and it isn’t necessarily correct in the real world.

When I was fighting the bolt runout, my head was racing to find a solution. I considered cutting out a complete replacement part. I’m not planning to do that, but if it comes down to it these aren’t the most challenging parts.

If I do any more of these or find the time I’ll be reading some books for sure. Thanks for cluing me into the bolt sleeving. It sounds like a lot more work, but could be useful.

I cut the threads concentric to the bolt raceway and it took quite a bit off of one side before I cleaned up concentric to the raceways. I’ll put it together and see how it shoots, then if necessary I’ll go back and take a crack at sleeving it. (Hopefully not)

Again, I appreciate the help.
 

Attachments

  • image.jpg
    image.jpg
    239.7 KB · Views: 7
  • Like
Reactions: 45-90
Concentric threads (as you have done) are super important. That will help. The receiver fave is also vital.

You are over thinking the firing pin and bolt face. A few thou is nothing. The bolt float is more than that.

Ive always found howa's to be insanely consistent in size and machine specs. To the point you can make prefit barrels for them.
 
  • Like
Reactions: stello1001