Join the Hide community
Get access to live stream, lessons, the post exchange, and chat with other snipers.
Register
Download Gravity Ballistics
Get help to accurately calculate and scope your sniper rifle using real shooting data.

Install the app
How to install the app on iOS
Follow along with the video below to see how to install our site as a web app on your home screen.
Note: This feature may not be available in some browsers.
You are using an out of date browser. It may not display this or other websites correctly.
You should upgrade or use an alternative browser.
You should upgrade or use an alternative browser.
Is bedding the AR barrel a myth? What's the best way?
- Thread starter KCode
- Start date
They basically made a case for shimming by mentioning the manufacturers that use an interference fit. I do both, i shim and use green loctite as a sorta lube to help the shimmed extension go into the upper. I’ve personally seen fliers disappear by doing so.

I like to build all mine with an interference fit between the upper and the barrel. Either with an undersized upper, or by shimming the barrel to the upper. I aim for .0005-.0010in of total interference. Ive never personally tried the green locktite method, but it seems to work well for guys. I would only do it though if the difference in fit between my upper and barrel was so little that i couldnt wrap it with shim stock.
As far as lapping the face of the upper is concerned, i wouldnt do it unless you had a way to measure the perpendicularity between the axis of the bore of the upper and the face of the upper. Most people wont have the tools to do that, but if you have a buddy with a machine shop they could probably set you up. I have never tried the lapping tools, but i just dont trust the design as whole to make the face any more square than it currently is. I have no personal experience lapping the face.
In my opinion, the main thing your trying to combat with a bedded barrel is POI and POA deviation. I dont think bedding will really do much to shrink your groups. Your rifle will only be more accurate because your POI wont move around so much through different conditions and positions.
Yes, I lap it while I got it apart.I need to look into shimming. Never heard of this or how it's done.
Do you still lap the upper?
You can do all of that stuff if it gives you more confidence in your build but if you're test-fitting your barrel into your upper and it's rattling around (and assuming that your barrel extension is not somehow undersized), I'd be looking for a better quality upper receiver.
Is this how you guys shim? Never heard of this until today!
That's not how i do mine.
Ill measure the bore and the OD of the extension. pick a piece of shim stock for the desired fit. Cut the shim stock so it can wrap around the extension with a t gap where the ends would meet and so that it doesnt get in the way of the feed ramps. Then ill glue the shim stock to the barrel extension.
Once the glue is dry, ill heat the upper and thermal fit the barrel to the upper.
I like that idea, what glue do you use?That's not how i do mine.
Ill measure the bore and the OD of the extension. pick a piece of shim stock for the desired fit. Cut the shim stock so it can wrap around the extension with a t gap where the ends would meet and so that it doesnt get in the way of the feed ramps. Then ill glue the shim stock to the barrel extension.
Once the glue is dry, ill heat the upper and thermal fit the barrel to the upper.
I like that idea, what glue do you use?
Blue loctite. There are probably better choices, but it has worked for me and is always sitting on the bench. Make sure to check the OD for consistency after it dries so you dont get jammed up when putting the barrel in.
Easy experiment:
Step 1: Don't bed the barrel extension. Shoot it for groups.
Step 2: Bed the extension. Shoot it for groups and compare.
Step 1: Don't bed the barrel extension. Shoot it for groups.
Step 2: Bed the extension. Shoot it for groups and compare.
AMU already spent years doing that with fleet-testing across many rifles.Easy experiment:
Step 1: Don't bed the barrel extension. Shoot it for groups.
Step 2: Bed the extension. Shoot it for groups and compare.
Joe Carlos said they saw verifiable differences. Here’s a great video on it:
Short story is Brownell’s needs to only allow dudes in their 40s and older who have spent decades with the specific skill set make these videos, not inexperienced guys who still don’t know a fraction of what they need to before issuing out anything instructional.
Put the kids behind the camera, editing, and all of that where they have appropriate skills, not in front of the camera where they are still in the amateur stage and learning the basics.
Put the kids behind the camera, editing, and all of that where they have appropriate skills, not in front of the camera where they are still in the amateur stage and learning the basics.
AMU already spent years doing that with fleet-testing across many rifles.
Joe Carlos said they saw verifiable differences. Here’s a great video on it:
That's great. A video that shows making the extension to receiver fit absolute tight because shooters saw bubbles. Did the shooters complain about precision prior to this discovery? That wasn't covered in the video. So, I say again, test this shit for yourself!
Last edited:
That's great. A video that shows making the extension to receiver fit absolute tight because shooters saw bubbles. Did the shooters complain about precision prior to this discovery? That wasn't covered in the video. So, I say again, test this shit for yourself!
I believe Joe has said (either in that video or elsewhere) that they inferred the possibility of there being room for improvement after seeing the bubbles.
And then did exactly as you suggest, they tested it, saw groups improve and flyers decrease, and then continued to work on ways to further refine the idea of creating an interference fit, moving from bedding, to shimming, and finally to custom oversized barrel extensions.
So they made an observation, created a hypothesis, and then tested it, repeatedly, until they had arrived what seemed to be the best possible solution.
I've tried both bedding and using shims. Both improved the way the rifle shot, with shims seeming to be a bit better.
YES! Test everything! Build the data!So they made an observation, created a hypothesis, and then tested it, repeatedly, until they had arrived what seemed to be the best possible solution.
I've tried both bedding and using shims. Both improved the way the rifle shot, with shims seeming to be a bit better.
I took a 6.5 Grendel upper and tried to get it to shoot consistently by bedding and shimming the barrel. It got better, but not where I was comfortable letting a 9yo loose with it on deer.
I ordered a BCM stripped upper receiver based on recommendations here and replaced that original upper receiver. It went from a 2+ MOA rifle to a sub 1.5 MOA with a proven Nosler 120gr BT in several rifles. I can't recall the barrel manufacture, but it was long, heavy, unwieldy with a can and I wasn't happy with the accuracy, so I sent it packing.
I ordered me a 6.5 Grendel Satern barrel from LoLo Tactical and I tried the barrel in that old receiver, it was inconsistent, 3 - 4 MOA inconsistent. I pulled the barrel and installed it another stripped BCM upper, it was so tight I had to put the upper receiver in the oven and the barrel in the freezer. That setup is a less than a MOA rifle and probably better in the right hands with that Nosler 120gr BT load.
I know, sample of 2. For me, it took me from a bed the extension, bed and shim the extension to a keep BCM stripped uppers around for everything.
I wasn't aware that you could physically move the barrel enough on a properly torqued upper as Joe suggests. That makes my brain hurt and intrigues me to know exactly what is happening with all those DIY builds during use. Surely someone has figured out a way to quantify it other than at the target. Strain gages possibly?
I don't think that bedding is intended to make a 4 MOA rifle into a 1 MOA rifle. I believe it's to help a 1 MOA rifle more capable of shooting 0.8 MOA. 0.2 MOA at the muzzle of an 18" barrel is roughly equivalent to 0.001" of deflection or movement.
I agree, and if you have a rifle that spits good groups with a semi cold barrel but starts throwing fliers as it heats up, then it would probably benefit from truing the face and shimming/bedding.I don't think that bedding is intended to make a 4 MOA rifle into a 1 MOA rifle. I believe it's to help a 1 MOA rifle more capable of shooting 0.8 MOA. 0.2 MOA at the muzzle of an 18" barrel is roughly equivalent to 0.001" of deflection or movement.
I’ve experimented both ways and can say that it definitely helps. Maybe not with tight uppers (ie BCM) but definitely with sloppy fits.
There is the litmus test!I agree, and if you have a rifle that spits good groups with a semi cold barrel but starts throwing fliers as it heats up, then it would probably benefit from truing the face and shimming/bedding.
Do all barrel extensions need to be bedded to shoot good? No
Will bedding an extension make it shoot better? Possibly.
Will bedding an extension make it shoot worse? I will say highly unlikely.
Last edited:
My comment to the above post:
The three comments make sense and agree with them as they stand. I would add that for those who want to try it, the means are affordable, the process is simple, and the time invested is not a lot.
I do it, and have recommended it in the past. I haven't built any AR's in quite some time, but if I do; I'll do both again.
For me, it's a case of wearing a belt and suspenders too; and it doesn't even look weird.
Greg
I use shims if I happen to being using an upper receiver that is not a thermal fit. I do not use loctite. I have had good luck using shims. I have lapped receivers, but not entirely sure if it has much benefit.
Good to hear from you sir.My comment to the above post:
The three comments make sense and agree with them as they stand. I would add that for those who want to try it, the means are affordable, the process is simple, and the time invested is not a lot.
I do it, and have recommended it in the past. I haven't built any AR's in quite some time, but if I do; I'll do both again.
For me, it's a case of wearing a belt and suspenders too; and it doesn't even look weird.
Greg
I have good shooters that I bedded and good shooters that I didn't. It's really easy to pull barrels when they are not glued in.
I dont think shimming adds anything vs just bedding the extention. I like loctite 609. I like to see if a barrel shoots before I glue it in. Lol.

Old dudes response to lapping the receiver face… “ohh dear”. That’s about how I feel about it. I trust a $250K+ CNC to make the receiver face straight more than I trust a $30 lapping tool in a Milwaukee.
He makes a point about tightening the barrel nut down gripping the extension, but that’s putting more stress on the receiver and also deforming it to the barrel extension. Whether it’s enough to make a difference I don’t know but I do know that reducing stress on precision rifle components is generally a good thing.
The fact that right in the beginning of the video the dweeb admits it’s “personal” because people do it a way opposite of how he’s always done it with grease instead tells me about all I need to know.
I believe that bedding the extension and shimming it if the gap is large enough makes a difference and the results I’ve gotten supports it. I’ve taken accurate factory uppers apart and bedded them and they’ve gotten more accurate and consistent so it’s pretty apparent to me that it works.
The 620 fills everything and gets hard AF for a perfect fit. I let it cure for two days with the barrel nut just snug enough to seat everything well and then come back and torque it down. I don’t know how much PSI the extension to receiver surfaces see when it’s tightened down but I’d bet it’s not as much as the compression strength of the 620.
Seems simple to me
Just like trying a bolt action
If the receiver to barrel has precision fit as the different metals heat they continue to shoot well. If not as the metal expand and touch the bad fitting parts the rifle will start to change impact
Of course on an AR this may not be as big a difference as on a bolt but it will be some change
In the 1990’s Remington basically bedded the barrel to the action in Remington PSS rifles with what looked like a lock tite product to fix the issue with accuracy they were having from poorly machined barrel/receiver fittings
Ever see a $30 setup on a $750,000 machine? I have. It produces junk that isn’t right.Old dudes response to lapping the receiver face… “ohh dear”. That’s about how I feel about it. I trust a $250K+ CNC to make the receiver face straight more than I trust a $30 lapping tool in a Milwaukee.
Also a good setup on a $50,000 machine can possibly make parts square and true.
And I’ll quote a part of the next gentleman’s post as another reference. In the 90s Remington was using decent machines, fixtures or tooling was probably junk. Or wore out. Or their expensive machine was wore out.
In the 1990’s Remington basically bedded the barrel to the action in Remington PSS rifles with what looked like a lock tite product to fix the issue with accuracy they were having from poorly machined barrel/receiver fittings
Short story is Brownell’s needs to only allow dudes in their 40s and older who have spent decades with the specific skill set make these videos, not inexperienced guys who still don’t know a fraction of what they need to before issuing out anything instructional.
Put the kids behind the camera, editing, and all of that where they have appropriate skills, not in front of the camera where they are still in the amateur stage and learning the basics.
LOL. Yea, that works out well too. Randy Selby "The Real Gunsmith" is a fine example of just relying on age and "experience." It doesn't take a 40yr old to become an SME.
Also, that "kid" in the video is either in his 40's or very close to it, and has been a gunsmith for 15 years or so. He guest instructs at several gunsmithing schools around the country.
And yes, I'm well into my 40's.
I don't think I'd take either of their instruction based on what I've seen in their videos.
I have not used shims on any of mine but I have lapped and loctite 620 all of mine. It has made a measurable difference in the rifles I tested before doing it. Now it's part of the initial build process. Even if it doesn't help it certainly won't hurt.
I wasn't aware that you could physically move the barrel enough on a properly torqued upper as Joe suggests. That makes my brain hurt and intrigues me to know exactly what is happening with all those DIY builds during use. Surely someone has figured out a way to quantify it other than at the target. Strain gages possibly?
As to moving a barrel, I have always figured it was something to do with heat causing a very,very slight "shift" , kinda like those "tink" noises you can hear on a car motor while cooling down. Lame example, but ya get what I mean.
And shimming removes the ability / minimizes to "shift" around.
To me, even a slight / tiny shift will show up on target at 100yds. And if precision is what we want, removing a variable helps.
That’s the wrong kind of loctite. That’s for threads.Blue loctite. There are probably better choices, but it has worked for me and is always sitting on the bench. Make sure to check the OD for consistency after it dries so you dont get jammed up when putting the barrel in.
You want a retaining compound for cylindrical parts. Loctite 609 or 620 are what you want to use. I believe it’s just a difference of temperature tolerance.
I use 620 to keep the bedding reliable longer during strings of fire. I have not tested both 609 and 620 to see if/when it softens during strings of fire of certain lengths/cadences. Just going with the higher temp to play it safe. And I can still remove barrels with a mallet and a thick dowel.
Old dudes response to lapping the receiver face… “ohh dear”. That’s about how I feel about it. I trust a $250K+ CNC to make the receiver face straight more than I trust a $30 lapping tool in a Milwaukee.
…
I generally agree sentiment, but disagree with this application. The problem isn’t with the CNC milling that the uppers get. The problem is with irregularities in the surface after the Type III anodizing. If I slide a barrel into the receiver and it can rock slightly while I’m applying rearward pressure, that’s a problem. I’ve experienced that and then after lapping the receiver face, it stays nice and flat against the receiver when applying both rearward and lateral forces.
I’ve also heard reports that people are able to swap optics between uppers and observe more similar zeros than before they lapped. Essentially evidence that the barrels are now all more inline with the receiver. I don’t actually have those data though.
Yup. I use a heat gun, wooden dowel (roughly the diameter of the barrel extension), and a mallet. Though, the heat gun doesn’t seem to soften it up much, but it may do so just enough to make it easier to break free when using force.Can you ever remove the barrel once you 620 it to the receiver?
I generally agree sentiment, but disagree with this application. The problem isn’t with the CNC milling that the uppers get. The problem is with irregularities in the surface after the Type III anodizing. If I slide a barrel into the receiver and it can rock slightly while I’m applying rearward pressure, that’s a problem. I’ve experienced that and then after lapping the receiver face, it stays nice and flat against the receiver when applying both rearward and lateral forces.
I’ve also heard reports that people are able to swap optics between uppers and observe more similar zeros than before they lapped. Essentially evidence that the barrels are now all more inline with the receiver. I don’t actually have those data though.
But when you lap the face, how do you know when too much is too much and how do you know how to avoid making it worse?
CLE suggested against lapping due to this very reason, you can make it worse.
I'm not against lapping but I can see where you could screw it up easily. Not sure if I ever did or not.
I
I agree, anodizing can be considered a bearing surface and could make the extension shift easier because of the slicker surface, by removing it from the face it gives a nice flat surface of raw material that should be a little more grippy. After doing so, i always use brake cleaner to degrease all mating surfaces.I generally agree sentiment, but disagree with this application. The problem isn’t with the CNC milling that the uppers get. The problem is with irregularities in the surface after the Type III anodizing. If I slide a barrel into the receiver and it can rock slightly while I’m applying rearward pressure, that’s a problem. I’ve experienced that and then after lapping the receiver face, it stays nice and flat against the receiver when applying both rearward and lateral forces.
I’ve also heard reports that people are able to swap optics between uppers and observe more similar zeros than before they lapped. Essentially evidence that the barrels are now all more inline with the receiver. I don’t actually have those data though.
But when you lap the face, how do you know when too much is too much and how do you know how to avoid making it worse?
CLE suggested against lapping due to this very reason, you can make it worse.
I'm not against lapping but I can see where you could screw it up easily. Not sure if I ever did or not.
That’s a good question. I take it down until I start to see aluminum at least over half the surface. Then I check for fitment. I continue if it still doesn’t seem to sit perfectly flat. Generally, there’s still a little anodizing visible when I’m happy with how the barrel extension sits on the receiver face.
I realize it’s possible to ruin things, but if one is even averagely capable and patient, then it would be hard to mess up. Personally, I’ve switched to doing it by hand instead of a drill. I was using 600 grit compound from Brownells and it was just painfully slow. I switched to 220 grit lapping compound and I can easily do it by hand now. You just need to be real careful to keep the lapping compound to only the receiver face. This is easier to do when doing it by hand.
Easy experiment:
Step 1: Don't bed the barrel extension. Shoot it for groups.
Step 2: Bed the extension. Shoot it for groups and compare.
I'd have to dig through several hundred test results to find it, but I did this test in our 200yd tunnel and in my rifle it made an immediate and apparent difference.
This is off of memory, but the rifle was shooting roughly 2.5-3" groups (20 shots, 2x 10 shot strings) at 200yd and after bedding the barrel it was in the 1.8-2.2" ballpark.
Also, adjusting gas settings makes a difference for mean radius through the occurrence of errant fliers (lowest gas to reliably run the gun is best). Gas setting also moves MPOI. This is worse the longer and skinnier your barrel. .936" GB is the only way if you really want consistency.
Handguard pressure moves MPOI, even with the beefy Seekins/Aero uppers. It's worse with M4 uppers. This can be vertical or horizontal. For example I had a .15-.20 mil shift between bipod and bagged on a barricade. A coworker's rifle was closer to 0.35-0.40 mils. Inducing torque from uneven bipod landing caused horizontal shifting.
In short, the AR was designed to be a light weight battle rifle, and the pursuit of precision is an after-thought full of bandaids. Someone should make an M-lok/ARCA AR-15 lower in the same vein as that Springfield Armory rifle with the extendo fore-end lower, and someone should make 316 or 416 Stainless press-fit uppers to go onto said lowers if you want to keep AR-15 commonality for small parts but use the rifle for pure precision. YMMV.
Seeking did that with their redesigned ar-15 upper. It’s beefed up at the front area where the flexing occurs.I'd have to dig through several hundred test results to find it, but I did this test in our 200yd tunnel and in my rifle it made an immediate and apparent difference.
This is off of memory, but the rifle was shooting roughly 2.5-3" groups (20 shots, 2x 10 shot strings) at 200yd and after bedding the barrel it was in the 1.8-2.2" ballpark.
Also, adjusting gas settings makes a difference for mean radius through the occurrence of errant fliers (lowest gas to reliably run the gun is best). Gas setting also moves MPOI. This is worse the longer and skinnier your barrel. .936" GB is the only way if you really want consistency.
Handguard pressure moves MPOI, even with the beefy Seekins/Aero uppers. It's worse with M4 uppers. This can be vertical or horizontal. For example I had a .15-.20 mil shift between bipod and bagged on a barricade. A coworker's rifle was closer to 0.35-0.40 mils. Inducing torque from uneven bipod landing caused horizontal shifting.
In short, the AR was designed to be a light weight battle rifle, and the pursuit of precision is an after-thought full of bandaids. Someone should make an M-lok/ARCA AR-15 lower in the same vein as that Springfield Armory rifle with the extendo fore-end lower, and someone should make 316 or 416 Stainless press-fit uppers to go onto said lowers if you want to keep AR-15 commonality for small parts but use the rifle for pure precision. YMMV.
Seeking did that with their redesigned ar-15 upper. It’s beefed up at the front area where the flexing occurs.
Do you have a link to it?
My rifle was built with this and still had all of the issues outlined above:
IRMT-3 Upper
<p><strong>iRMT-3 Upper</strong></p> <p>Designed for extreme accuracy and durability under real-world stress, the iRMT-3 upper receiver allows your barrel to be a true free float system. With the handguard attaching directly
 seekinsprecision.com
Modulus of elasticity of is the primary reason I suggest building an upper out of stainless. For the same input force and part geometry, deflection will be roughly 1/3 with stainless. Also, isolating the fore-end (bipod mount, bag interface, etc..) from the upper will greatly eliminate that input force to begin with.
Yes, action rod, mallet and heatCan you ever remove the barrel once you 620 it to the receiver?
I actually had a steel rod turned to match the face.
Couldn't agree more! Someone needs to make a billet steel or SS upper for the AR. Hard to believe no one has done this yet.Do you have a link to it?
My rifle was built with this and still had all of the issues outlined above:
IRMT-3 Upper
<p><strong>iRMT-3 Upper</strong></p> <p>Designed for extreme accuracy and durability under real-world stress, the iRMT-3 upper receiver allows your barrel to be a true free float system. With the handguard attaching directly
Modulus of elasticity of is the primary reason I suggest building an upper out of stainless. For the same input force and part geometry, deflection will be roughly 1/3 with stainless. Also, isolating the fore-end (bipod mount, bag interface, etc..) from the upper will greatly eliminate that input force to begin with.
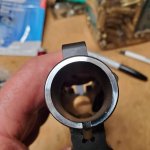
Here, is a perfect example of CNC machined part. It is not perfect. Metal is slightly swaged out of the bore the face has tool drag back circular gouges and uneven across its face. A .001" truing cut did not clean it up as the anodized area shows. Look at the finish of the two cuts, and the unevenness of the orginal face cut. As retired machinist with 35 yrs experience in old school machines and back to college, for programmer/ operator of CNC machines, it's easy to recognize these faults, and know why they exist, in a production atmosphere. It takes more than an expensive machine tool, to make super quality parts. And why we see so much manufactured crap, or unacceptable parts in our firearms.
Attachments
Oh duh, you said you ARE getting deflection with the seekins. Sorry.Do you have a link to it?
My rifle was built with this and still had all of the issues outlined above:
IRMT-3 Upper
<p><strong>iRMT-3 Upper</strong></p> <p>Designed for extreme accuracy and durability under real-world stress, the iRMT-3 upper receiver allows your barrel to be a true free float system. With the handguard attaching directly
Modulus of elasticity of is the primary reason I suggest building an upper out of stainless. For the same input force and part geometry, deflection will be roughly 1/3 with stainless. Also, isolating the fore-end (bipod mount, bag interface, etc..) from the upper will greatly eliminate that input force to begin with.
Yeah a steel receiver would be rad!
The barrel extension spigot
Odds are that even after truing the face the bore is conical. It's pretty unlikely the face looks like that and the bore is strait.
Here, is a perfect example of CNC machined part. It is not perfect. Metal is slightly swaged out of the bore the face has tool drag back circular gouges and uneven across its face. A .001" truing cut did not clean it up as the anodized area shows. Look at the finish of the two cuts, and the unevenness of the orginal face cut. As retired machinist with 35 yrs experience in old school machines and back to college, for programmer/ operator of CNC machines, it's easy to recognize these faults, and know why they exist, in a production atmosphere. It takes more than an expensive machine tool, to make super quality parts. And why we see so much manufactured crap, or unacceptable parts in our firearms.
Odds are that even after truing the face the bore is conical. It's pretty unlikely the face looks like that and the bore is strait.
I have a seekins upper with a white oak barrel that seemed to fit good and didn't rattle but could barely manage moa. I bedded the extension and now the worst groups are considerably smaller than that. I tried everything else and that finally fixed it.
Also, my brand new hart match barrel on my rem 700 was shooting 3 moa because I must have ruined mcmillan's inlet job when I made room for the longer recoil lug. It seemed to fit just fine and you couldn't tell by looking at it, but bedding it with devcon shrunk it from 3 moa to 1/2 moa with the same ammo.
The most accurate barrel in the world won't shoot to it's potential if it can shift while firing. I never believed it made that big of difference until I saw it first hand. Epoxy and loctite is cheap.
Similar threads
- Replies
- 28
- Views
- 2K
- Replies
- 8
- Views
- 511
