• Win a RIX Storm S3 Thermal Imaging Scope!

    To enter, all you need to do is add an image of yourself at the range below!

    Join the contest

Is the bubble level on the MPA comp chassis scripture?

10ring1

The Zohan
Full Member
Minuteman
Aug 9, 2012
936
404
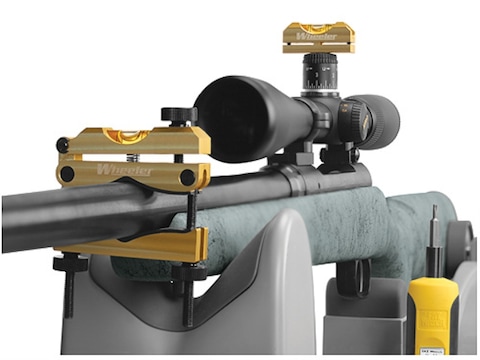
Backstory:. Had my vudoo barreled action in a Grayboe Ridgeback and had everything level. The reticle, stock bubble level, sendit level, everything... perfect. Almost perfect tall target test.

I wanted to try my setup in my MPA comp chassis from my centerfire just to see how the chassis would run in Nrl22 matches. I look through the scope and the level is way off. I level the MPA with the bubble level on the stock and it the scope is way off. The sendit and scope are level to the barrels action. Everything looks good with the install on the MPA.

Should I consider the bubble level on the MPA the be all end all? Or could that be off before I go moving the scope (which I loathe).

Thanks in advance
 
I don’t trust it. On mine, it’s loose and spins even with the screws tightened down. I’m sure you could make it level, but not sure how long it would stay that way.
 
  • Like
Reactions: 10ring1
Do yourself a favor. Forget the MPA chassis has a "level." Or cover it up. Or take it out and...

I have two MPA BA Comp chassis, one of them containing a Vudoo. I have Vortex bubble levels on all my scopes. I align the reticle with a plumb line, clamp the Vortex level in place well forward on the scope, verify against the plumb, and then mount the scope on the rifles using the Vortex level to level, and finally verify everything against the plumb line.

Never, not once, has either MPA chassis level been anywhere near a match to the other levels set up as described. Even after removing one of the chassis levels and shimming it into "correctness," recoil jolted it into total uselessness within a few rounds. I've never looked at either one since.
 
It's not just you... It can get even worse, too... It's become fairly common to have a bubble level built into a scope mount or scope rings, too. Depending on how that's built, it could also be more or less accurate. For instance, Hawkin's scope rings have a bubble level built into the cap of the rear ring. Good luck getting that level to match the chassis, and the bubble level hanging off the scope or scope rail.

Right now, I level the scope and then hang a level off the scope, and that's all I use. I'm ignoring my chassis level at the moment. I can't really see it without pulling my head off the gun, anyway. But, eventually, I'll calibrate the chassis level, just "because"...
 
I went to an ABS seminar put on by Bryan Litz, last spring.

He was asked how he levels a scope.

He stated that he mounts the scope on the rifle as level as possible to the rifle. It just has to be close.

I use the Wheeler leveling device.

Then he stated that any external level should be placed on the scope itself. Think of the Vortex levels that mount on the scope tube.

Then he either draws a line on a large piece of paper or poster board like the one he uses for the tall target test but makes sure it's level. A plumb-bob on a line will also do. That's what I use as well.

He puts the rifle on the bench and aligns the vertical cross hairs with the plumb line and adjusts the external level accordingly.

One advantage to having an external level on the scope and not anywhere else is that the scope can be removed and replaced without the process of re-leveling the optic.

That's been my method for years and it works. There are probably some people that disagree with the technique that Litz and I use.

Nevertheless, I'll take the word of a guy who's team wins the King of the 2 mile contests and makes a living out of the science of long range shooting.
 
Confucius say a man with a watch knows what time it is; a man with two is never sure.

Another way to consider the tiny levels built into chassis, rings, etc. - if you want to draw a straight line across a 4-foot poster, would it be easier with a standard ruler or one about an inch long? The wider the level, the easier - and faster - it's going to be to glance at it while you're on the gun.
 
I have an MPA comp chassis and After leveling my scope to a plum line, I laid prone, with the scope mounted on the rifle, and checked the bubble level. When my scope was plum with the line, i looked at my chassis bubble and it was perfectly centered........ Did I get lucky? when I shoot I level the scope/rifle based on the chassis level.
 
I went to an ABS seminar put on by Bryan Litz, last spring.

He was asked how he levels a scope.

He stated that he mounts the scope on the rifle as level as possible to the rifle. It just has to be close.

I use the Wheeler leveling device.

Then he stated that any external level should be placed on the scope itself. Think of the Vortex levels that mount on the scope tube.

Then he either draws a line on a large piece of paper or poster board like the one he uses for the tall target test but makes sure it's level. A plumb-bob on a line will also do. That's what I use as well.

He puts the rifle on the bench and aligns the vertical cross hairs with the plumb line and adjusts the external level accordingly.

One advantage to having an external level on the scope and not anywhere else is that the scope can be removed and replaced without the process of re-leveling the optic.

That's been my method for years and it works. There are probably some people that disagree with the technique that Litz and I use.

Nevertheless, I'll take the word of a guy who's team wins the King of the 2 mile contests and makes a living out of the science of long range shooting.

I assume he puts a level on the rifle as well
 
I assume he puts a level on the rifle as well

Not sure if you're asking if he puts a level on the rifle to align the scope during the mounting process or for when he shoots the rifle.

Either way, he didn't elaborate too much on the actual method of mounting the scope to the rifle. My impression was that he intended to get the scope as level with a rifle that has also been leveled as much as possible.

What was critical was that the cross hairs in the scope should be level with the earth more than squared with the rifle.

I've been using the Wheeler scope leveling kit when mounting the scope.

If someone is unfamiliar with the wheeler system here's how it works:

1) put the small level on a flat part of the rifle, such as a receiver or scope base.

2) put the barrel level on the barrel as shown below.

3) rotate the rifle so that the small level's bubble is centered.

4) use the thumb=wheel on the barrel level to center that bubble.

5) both the small level and the barrel level should have their bubbles centered.

6) remove the small level and mount the scope with the proper eye relief.

7) with the bubble centered in the barrel level, rotate the scope as needed to center the bubble in the small level as shown below.

8) torque the ring screws to spec all the while keeping the bubble centered in the small level while the barrel level is also centered.

189016.jpg


After the scope is mounted to the rifle, my favorite go-to scope level is the Vortex scope level. I put it on the scope and align it to correspond with the barrel level to get everything close as possible.


rac_bubble-level_1in-1_0006_w.jpg


Then I head out to the range for a final calibration.

I have a plumb bob tied to a fluorescent pink mason line. That's so it's easy to see. It's hung about 50 yards away.

Then I put the rifle on some sandbags if not using a bipod. Secure the buttstock with a sandbag and loosen the screw on the scope level.

The cross hairs are aligned with the mason line while adjusting the scope level so the bubble is centered.

So far that method has worked for me.
 
I have a MPA comp also. The chassis level is pretty close to the scope level mounted with Wheeler levels and a plum bob. I need to get around to shimming it. My gripe is on my MPA chassis, the level isn't a bubble level, it's a ball floating in the cylinder and reacts opposite of the bubble level on my scope.
Anyone got any info on a replacement cylinder for the MPA that is actually a bubble level?
I'm a bit OCD and it drives me nuts sometimes. Covering is an option, but not the best option for me. Remember OCD!! LOL

I don’t have an MPA chassis but the level in the chassis is basically a turn and slip indicator like one used in an airplane.

Here’s a link for replacement bubble levels that you might be able to use in lieu of the turn and slip indicator.

https://www.amazon.com/Universal-Precision-Acrylic-Bubble-LEVEL/dp/B00QUHPVWE

On the other hand, you might be able to remove the bubble level (tube) from the scope level and replace it with a turn and slip indicator (aka inclinometer). Which is what I might try as I like the turn and slip indicator. I’ve been using them for over four decades.
 
The MPA level is actually an inclinometer. It has a curve to it, it's just not very good. Replaced mine with some higher end levels. Cost a bit much more because I had to buy 10 at a time from Europe, but finding the correct size was difficult. Was something like 8mm x 25mm. Still need to use O rings though as the foam in the chassis is keeping it from level. Need to figure that one out still.
 
The MPA level is actually an inclinometer. It has a curve to it, it's just not very good. Replaced mine with some higher end levels. Cost a bit much more because I had to buy 10 at a time from Europe, but finding the correct size was difficult. Was something like 8mm x 25mm. Still need to use O rings though as the foam in the chassis is keeping it from level. Need to figure that one out still.
loveha,
If you get a chance, is it possible to verify the size needed. I would like to replace my inclinometer with a bubble level. I have done the google search to no avail. Any help would be greatly appreciated.
 
Would have to bring them to work to mic, I don't own any calipers, used a machist rule to get the best measurements I could and converted. So won't have that info till tomorrow.

Maybe somebody has a set with an MPA and will beat me to it.

This is where I bought them from though if you don't trust Chinese Amazon/Ebay trash.
 
  • Like
Reactions: JRosson
Levels I bought were 7mm x 25mm. O-rings to go around would need to be about 1/32 thick. I tried some size 010 at 1/16 thick and it wouldn't go in, even with force. So I took the O-ring cut it in half and laid the halfs on there side. Gave enough resistance to be tightened down and shows level to the chassis with another level.
20200219_232920.jpg

20200219_233325.jpg
 
The ONLY thing that matters is that the reticle is level to the ground. Put a piece of electrical tape over the MPA level and move forward.
This right here. I was way too hung up on it and now only use it when I have to reattach my muzzle brake. The inclinometer on my MPA chassis always lagged behind any other level that would go on my gun. When I mounted my scope I covered the chassis level, mounted the scope plum to a piece of 550 with some washers at the end, and confirmed when everything was torqued. The bead in the level was touching the left witness line. I then put an old A-1st level on my scope and witnessed that to my reticle. The MPA level would always lag behind the A-1st level and sometimes I would have to give it a thud to move the bead. My advice...get your reticle leveled to gravity and don't bother with that inclinometer. Give the below video a look. Your senses will have much better resolution than any level...provided you don't have a cold.