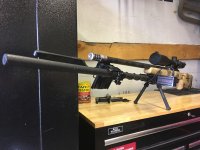
Since we’re all still supposed to be inside here is a simple DIY mod for the magnetospeed sporter I did awhile ago. The idea here is to add a 3/8” threaded nut to the inside of the bayonet which allows it to be mounted free from the barrel in a variety of ways. The best part is this won’t interfere with original mounting strap.
Tools:
Hand file/bench grinder
Tooth picks?
Supplies:
1/4” - 20 nut
JB weld original
All I did was file down 2 of the corners to an arc and removed a little bit from the flat on the opposite side.


This allows the nut to drop down into the kind of center channel in the bayonet.

The hole in the bottom has to be opened ever so slightly so I just used a bolt to thread the plastic.

Once I was happy with the fit of the nut, I just filled in the bottom with JB weld.

As for mounting hardware I’m using 15mm lightweight rods which is a spec from the film world (if your curious https://thecinelens.com/2014/01/27/iris-rods-a-simple-explanation/) this stuff is cheap and easy to get with crazy variety. You want to mount a bunch of things to a tripod you can make it happen with this stuff.
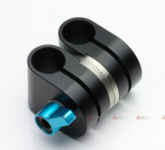
Anyways I’m using a NATO clamp to 15mm rod and then I have use a little 15mm threaded block since it doesn’t have a recoil lug for the pic rail.

I then have a choice of carbon, aluminum or steel rods but have stuck with the carbon rods cause of weight. Now I have only used this mod in conjunction with a 12” magic arm at the range and that seemed to work fine other than 3 “error-2” instances over 2 range sessions; in total it was around 55 rounds.

Since I’ve been sitting around; I finally came up with a direct rod mounted set up using a “cheese” rod support. This setup is very ridged and just barely works for my barrel contour. I haven’t tested it yet since my range is closed but will get out there as soon as I can.

I’m still looking for another mounting option that will give me more flexibility at the bayonet without adding a bunch of weight. This has also shown me how much flex there is around the bravo for-end mlok slots, this is where most of the play is for me with this setup.
Hope this helps some folks and gives you some ideas.
Tools:
Hand file/bench grinder
Tooth picks?
Supplies:
1/4” - 20 nut
JB weld original
All I did was file down 2 of the corners to an arc and removed a little bit from the flat on the opposite side.
This allows the nut to drop down into the kind of center channel in the bayonet.
The hole in the bottom has to be opened ever so slightly so I just used a bolt to thread the plastic.
Once I was happy with the fit of the nut, I just filled in the bottom with JB weld.
As for mounting hardware I’m using 15mm lightweight rods which is a spec from the film world (if your curious https://thecinelens.com/2014/01/27/iris-rods-a-simple-explanation/) this stuff is cheap and easy to get with crazy variety. You want to mount a bunch of things to a tripod you can make it happen with this stuff.
Anyways I’m using a NATO clamp to 15mm rod and then I have use a little 15mm threaded block since it doesn’t have a recoil lug for the pic rail.
I then have a choice of carbon, aluminum or steel rods but have stuck with the carbon rods cause of weight. Now I have only used this mod in conjunction with a 12” magic arm at the range and that seemed to work fine other than 3 “error-2” instances over 2 range sessions; in total it was around 55 rounds.
Since I’ve been sitting around; I finally came up with a direct rod mounted set up using a “cheese” rod support. This setup is very ridged and just barely works for my barrel contour. I haven’t tested it yet since my range is closed but will get out there as soon as I can.
I’m still looking for another mounting option that will give me more flexibility at the bayonet without adding a bunch of weight. This has also shown me how much flex there is around the bravo for-end mlok slots, this is where most of the play is for me with this setup.
Hope this helps some folks and gives you some ideas.
Last edited:


