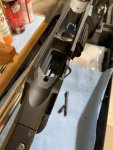
For above asking about bedding an MDT ACC - here you go...
Not the most perfect work, but considering I'd never bedded a rifle before, I'm not crying about it either. Most of the imperfections in the bedding are actually from too much wax buildup on the action that I didn't wipe "smooth" because I was nervous about gluing my action to my chassis.
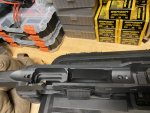
Step 1 - you can clearly see the (small) contact areas with the chassis. Remember, this is by design on a chassis rifle. Either you have the chassis machined perfectly to cradle a round action (what bedding does), or the action can only have a single waterline of contact against the vblocks. Its why chassis are awesomely interchangeable, but still have minimal contact area with the action.
View attachment 7292990
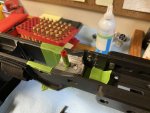
Step 2 - Dremel made quick work of grinding cerakote and dimpling/checkering the aluminum to give the epoxy more surface area and "texture" to bind to. I probably could have gone "deeper" in hindsight, but grinding up this nice chassis to fit it to a specific action was a bit tough to swallow. I taped off the areas where I didn't want epoxy flowing, used Johnson paste wax on everything, and straws as dam in the action holes. Read up on some bedding threads and all this stuff is pretty straight forward.
Because I was nervous sally - i actually bedded it with plumbers putty once as a practices run, so I could then scrape off the putty (don't forget it leaves a grease film behind) to see approximately how much epoxy I really needed. For a skim bed like this, its a whole lot less than you'd think!
View attachment 7292992
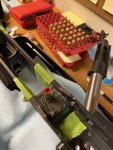
Step 3 -Mix up your slow set epoxy (I used JBWeld 24hr cure) and apply it on there after triple checking you've waxed any and everything that could come intocontact with it.
View attachment 7292996
Step 4 - use electrical tape, surgeons tube, or in my case when neither of those would hold the action without the barrel torquing it, I waxed the action screws and just installed them with my fingers until I saw epoxy flowing/squeezing from tension. Don't torque them down with a wrench.
Didn't take pictures here because I was nervous about getting extra epoxy off, etc. Acetone cleans epoxy and doesn't hurt cerakote, wipe up liberally.
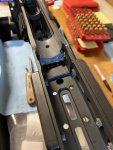
Step 5 - Check the leftover epoxy as it hardens because that is how hard the epoxy in the action will be. Once its "hard enough", but still just barely pliable enough to cut with a knife/razor/utility, thats when I popped my action out to clean up any squeeze out around the lug, in the magwell, etc. That was basically overnight 8 hours for me. Then I put the action back in as before, finger tightened the screws and waited another day before finally taking it out, cleaning up all the wax, etc.
View attachment 7293004
View attachment 7293005
Step 6 - Miller time if you didn't totally fuck up your thousand dollar chassis.
Hope that is useful for anyone who is considering DIY.


