Call Fritz @ Black Canyon CustomsHow did you go about sweeping the handle?
Join the Hide community
Get access to live stream, lessons, the post exchange, and chat with other snipers.
Register
Download Gravity Ballistics
Get help to accurately calculate and scope your sniper rifle using real shooting data.

Install the app
How to install the app on iOS
Follow along with the video below to see how to install our site as a web app on your home screen.
Note: This feature may not be available in some browsers.
-
Having trouble using the site?
Contact support
You are using an out of date browser. It may not display this or other websites correctly.
You should upgrade or use an alternative browser.
You should upgrade or use an alternative browser.

Poor man’s AI picture thread (AICS)
- Thread starter Islas82
- Start date

Pivoting or solid bolt handle with that swept one?Call Fritz @ Black Canyon Customs
Curtis Axiom short action 6.5PRC in an AT-X AICS. Pretty snappy, not great for PRS.

That's way too many thumbholes, you should sell me one instead :,)View attachment 8195122
I’ve got a few AICS 2.0s and an AI AT
View attachment 8195138
And some spares….
View attachment 8195144
53 in/lb as per printed instructions included with the AT-X AICS chassis.And finally whats the action bolt torque values for front and rear?
Would be nice if the at-x manual had this info
Hey guys, I have a post 14 AX AICS and I am looking for a short arca rail that is designed for the 14 slot extended palm/hand guard. I know that sawtooth makes one for the 11 slot but I was wondering if anybody knew of one that would be compatible with the 14 slot for the long action configuration.
BAX Accuracy International Plate
Explore the AI BAX Plate from RRS. Engineered for precision alignment, it offers a robust, reliable mounting solution for your advanced outdoor equipment.
 rrssoar.com
I think this is what you are asking about, not sure though.
CDG dasher and 223View attachment 8263932I have the same setup and really love your sweeping bolt handle. Can you please tell me where you bought it?
Got a couple, FuAX and fake at. Badger 2013s, 6.5prc

2013 6.5creed, there's 4 other barrels for it in 6-6.5creed

2013 6.5creed, there's 4 other barrels for it in 6-6.5creed
Is the panels green on the inside or are they black as well?Sold this AICS 2.0 in 308 recently:
View attachment 8222584
And this AICS 2.0 in 6.5CM:
View attachment 8222593
Skins were black.Is the panels green on the inside or are they black as well?
Awesome. Bought a used ai aics chassis 1.5 legacy which is black on the outside but the od green on the inside of the panels so i guess they are painted. Need to remove the black paint somehow, its pretty stuck atm.Skins were black.
Thanks. What is MEK?Blast cabinet with aluminum oxide. Or MEK or paint stripper.
It is also known as methyl ethyl ketone (MEK)
2-Butanone is a manufactured chemical but it is also present in the environment from natural sources. It is a colorless liquid with a sharp, sweet odor. 2-Butanone is produced in large quantities. Nearly half of its use is in paints and other coatings because it will quickly evaporate into the air and it dissolves many substances.
2-Butanone is a manufactured chemical but it is also present in the environment from natural sources. It is a colorless liquid with a sharp, sweet odor. 2-Butanone is produced in large quantities. Nearly half of its use is in paints and other coatings because it will quickly evaporate into the air and it dissolves many substances.
Would it not harm the panels with the blasting ?Blast cabinet with aluminum oxide. Or MEK or paint stripper.

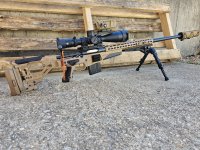
New 30 inch Brux heavy varmint 1-10 twist for one of my thousand yard rifles by my favorite PWS 2112.


Previous barrel was 23.5 inches


Previous barrel was 23.5 inches
Last edited:
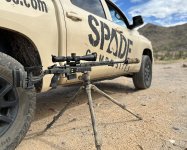
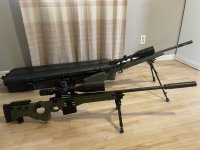
Not sure if the cost of all the hardware on this thing still qualifies as “poor”, but…
View attachment 8367739
Ken- is that a Barrett BORS? Is it operable?
Hey, Al. Yup, it’s a Barrett BORS on a S&B 5-25x56 PMII. Just got the setup in hand very recently. The BORS turns on and cycles through the menu options fully, from what limited time I have spent fiddling with the unit so far. Reading through the operations manual now before giving the BORS a test run (hopefully soon).Ken- is that a Barrett BORS? Is it operable?
Need more pictures of that rifle, sooo nice
Static function test of the BORS menu options, including selection and zero of cartridge, and spinning the elevation dial post “zero cartridge”, indicates the unit is fully operational. Will look forward to seeing how the unit holds up on the range.Ken- is that a Barrett BORS? Is it operable?
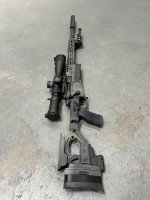
Which magazines are you using with this? Also, what did you do about the trigger hanger? Thanks.ARC CDG. 22GT. Bix 2-stage.
View attachment 8371339
AIAW magazine. Like the ATX magazine, but without the small lip at the top front.Which magazines are you using with this? Also, what did you do about the trigger hanger? Thanks.
Trigger hangar fits just fine. But I did remove the rear magazine guide bracket. Runs fine without it.
I like the MKMachining grip, and added a self-made thumb rest and rear bag rider.
Here’s this R700 LA in an AICS life cycle, so far.Need more pictures of that rifle, sooo nice
Originaly built in 2007 by a local gun plumber on an E prefix action with a PTG bolt he had lying around for use in unofficial F class matches on Quantico’s Range 4.
It was in green AICS 1.5 I bought new for under $600 from Midway, probably, and wore an 8.5-25X50 Mk IV on an BO base, rings and had an FTE brake.
All the pictures of this version are on a hard drive somewhere. Shot 208 Hornady AMAX over RL22 and 155 Scenars over IMR 4895. Barrel lasted 1800 rounds.
For the next version I had a PWS 2112 install another barrel and shit can the PTG bolt for a Rem LA bolt. This barrel is 23.5in
I used it for matches on Range 4 still with the Mk IV
Then I scored a used Gen 2 Razor for it
And hit the milk jug cold bore at 1K. A hit is a hit.
With 208 ELDMs over RL17
Then came a surplus Mk13 AICS 2.0
And a NF 35X ATACR and I found some green skins
This barrel lasted 1800 rounds so it currently wears the 30in 10 twist Brux by the same PWS 2112
Same reamer by the same dude with head space within .001 of the last barrel.
The additional 6.5in added quite a bit of velocity for the same 208 Berger over RL17 load.
I think I need to back it down.

Last edited:
Bolt handle broke off of it due to poor brazing from PTG. Should have been TIG welded to begin with. This is why I referred to the original builder as a gun plumber.Just curious, why did you get rid of the PTG bolt? I really like mine...
Before it broke, the handle was also improperly timed for primary extraction- mostly ejected the cases back on to the magazine follower.
I hated it.
But this is a thread about AICSs right? So what happened to the LA 1.5 AICS?
I put black skins on it and sold it to another Range 4 guy. The green skins go sold to a guy who “liked” my previous post.
The Range 4 guy decided he wanted an AICS 2.0 so I converted his 1.5 to a 2.0 because I had all the parts.
Howzat done? First remove the skins.
Use MAPP gas to heat the reciver/butt skeleton joint until it smokes and smells like burning hair. Drive out both 8mm pins with a punch.

Drive the butt skeleton off the receiver section with a block of wood

Remove all the old epoxy from the joint and install the hinge and folding butt skeleton. Drive the pins back into the joint.

The dimensions have not changed from the AICS to the new style AT AICS, so either kind will work. The only difference is the hinge.
Now you have to figure out where the latching mechanism goes into the receiver section of the chassis.

Use a M5-08 screw that the head has been cut off of and pointed to locate the spot for the male portion of the latch by screwing in into the flooding butt skeleton female latch screw hole.
You’ll need the male and female latches for this.

Center punch and use a drill press

Thread

Install male latch

Install female portion into butt skeleton and test

Put the skins back on and make sure you haven’t ruined your chassis by drilling holes in the wrong place.

And you’re done

I put black skins on it and sold it to another Range 4 guy. The green skins go sold to a guy who “liked” my previous post.
The Range 4 guy decided he wanted an AICS 2.0 so I converted his 1.5 to a 2.0 because I had all the parts.
Howzat done? First remove the skins.
Use MAPP gas to heat the reciver/butt skeleton joint until it smokes and smells like burning hair. Drive out both 8mm pins with a punch.
Drive the butt skeleton off the receiver section with a block of wood
Remove all the old epoxy from the joint and install the hinge and folding butt skeleton. Drive the pins back into the joint.
The dimensions have not changed from the AICS to the new style AT AICS, so either kind will work. The only difference is the hinge.
Now you have to figure out where the latching mechanism goes into the receiver section of the chassis.
Use a M5-08 screw that the head has been cut off of and pointed to locate the spot for the male portion of the latch by screwing in into the flooding butt skeleton female latch screw hole.
You’ll need the male and female latches for this.
Center punch and use a drill press
Thread
Install male latch
Install female portion into butt skeleton and test
Put the skins back on and make sure you haven’t ruined your chassis by drilling holes in the wrong place.
And you’re done
Last edited:
So nice, cant get enough of these chassis! Its just something special about them.Here’s this R700 LA in an AICS life cycle, so far.
Originaly built in 2007 by a local gun plumber on an E prefix action with a PTG bolt he had lying around for use in unofficial F class matches on Quantico’s Range 4.
It was in green AICS 1.5 I bought new for under $600 from Midway, probably, and wore an 8.5-25X50 Mk IV on an BO base, rings and had an FTE brake.
All the pictures of this version are on a hard drive somewhere. Shot 208 Hornady AMAX over RL22 and 155 Scenars over IMR 4895. Barrel lasted 1800 rounds.
For the next version I had a PWS 2112 install another barrel and shit can the PTG bolt for a Rem LA bolt. This barrel is 23.5in
View attachment 8375348
I used it for matches on Range 4 still with the Mk IV
View attachment 8375349
Then I scored a used Gen 2 Razor for it
View attachment 8375351
And hit the milk jug cold bore at 1K. A hit is a hit.
View attachment 8375350
With 208 ELDMs over RL17
View attachment 8375359
Then came a surplus Mk13 AICS 2.0
View attachment 8375355
And a NF 35X ATACR and I found some green skins
View attachment 8375356
This barrel lasted 1800 rounds so it currently wears the 30in 10 twist Brux by the same PWS 2112
View attachment 8375357
Same reamer by the same dude with head space within .001 of the last barrel.
The additional 6.5in added quite a bit of velocity for the same 208 Berger over RL17 load.
View attachment 8375358
I think I need to back it down.
So now i just need to find folding skins on legacy chassis, and hinge…should be easyBut this is a thread about AICSs right? So what happened to the LA 1.5 AICS?
I put black skins on it and sold it to another Range 4 guy. The green skins go sold to a guy who “liked” my previous post.
The Range 4 guy decided he wanted an AICS 2.0 so I converted his 1.5 to a 2.0 because I had all the parts.
Howzat done? First remove the skins.
Use MAPP gas to heat the reciver/butt skeleton joint until it smokes and smells like burning hair. Drive out both 8mm pins with a punch.
View attachment 8376132
Drive the butt skeleton off the receiver section with a block of wood
View attachment 8376133
Remove all the old epoxy from the joint and install the hinge and folding butt skeleton. Drive the pins back into the joint.
View attachment 8376135
The dimensions have not changed from the AICS to the new style AT AICS, so either kind will work. The only difference is the hinge.
Now you have to figure out where the latching mechanism goes into the receiver section of the chassis.
View attachment 8376138
Use a M5-08 screw that the head has been cut off of and pointed to locate the spot for the male portion of the latch by screwing in into the flooding butt skeleton female latch screw hole.
You’ll need the male and female latches for this.
View attachment 8376136
Center punch and use a drill press
View attachment 8376140
Thread
View attachment 8376141
Install male latch View attachment 8376144
Install female portion into butt skeleton and test
View attachment 8376143
Put the skins back on and make sure you haven’t ruined your chassis by drilling holes in the wrong place.
View attachment 8376145
And you’re done
View attachment 8376164

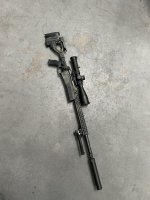
Hi guys.
Posting this in here as it's not a proper one
 It's actually a .243 Remington 700 action and barrel on an AI chassis. Timney 2 stage trigger. Wildcat predator 12 mod. Alas B10 bipod.It's topped with a Hik Alpex A50E day/night scope and Weaver mounts.
I rattle canned it myself some 18 years ago. Still going strong.
Posting this in here as it's not a proper one
I rattle canned it myself some 18 years ago. Still going strong.
so, let me get this straight.
you can use an AT chassis and then get the "old school" AICS/AW thumbhole folding skins and everything lines up GTG?
you can use an AT chassis and then get the "old school" AICS/AW thumbhole folding skins and everything lines up GTG?
Yes. And no. The chassis frame itself is mostly exactly the same. However, there are some slight differences in two main areas, the bolt handle and front sling attachment points, that will either require modifying the legacy skins (different cutout for the AT’s flush cups vs AW and legacy AICS HK style sling hook attachment plates) or will just look a bit funky (legacy AICS had a square shroud surrounding the bolt handle area, which means the legacy skins have a big square cutout right there for them).so, let me get this straight.
you can use an AT chassis and then get the "old school" AICS/AW thumbhole folding skins and everything lines up GTG?
Check this out:so, let me get this straight.
you can use an AT chassis and then get the "old school" AICS/AW thumbhole folding skins and everything lines up GTG?
AT rifle vandalism part 1
Strip AT rifle, remove all flush cups because we don’t need no stinkin’ flush cups, mark cuts for skins with tape.
View attachment 8352844
View attachment 8352831
Cut skins as necessary with razor saw
View attachment 8352832
View attachment 8352833
Test fit
View attachment 8352834
View attachment 8352835
View attachment 8352836
Hey! One of the skin screws won’t pass through the chassis fore end! Use a 1/8” transfer punch to mark it.
View attachment 8352837
And drill a 15/64 hole because that’s what all the other holes in the chassis are.
View attachment 8352838
To be continued…
What about the barrel clamp bolt access hole?
Stop whining.
Use a 17/32 transfer punch and your AT fore skins to mark it and then drill a hole.
Start with a small bit and work your way up to 17/32.
Don’t be an idiot. Drill a 1/8 hole from the inside and then work up to the final size from the outside in. Chamfer the hole from the outside.
Dremels are for pussies who vape strawberry flavored shit.
View attachment 8352852
View attachment 8352854
Real men smoke Pall Malls and have COPD by age 50.
Check your work, if a 4mm allen socket fits, you’re golden.
View attachment 8352867
AT rifle vandalism, continued.
I’ve got a drill press in the garage but it’s crowded out there what with the nice car that’s never seen rain or salt on the trickle charger and all, and I think I’m out of propane for the heater anyhow.
View attachment 8353737
Anyway, it’s more fun to drive 10 minutes to your buddy’s machine shop and watch him drill holes in your chassis on his Bridgeport.
He’s not a gun guy at all but he’s knocked out by the interrupted threads in the receiver for the barrel.
View attachment 8353743
View attachment 8353869
I go home and assemble my shit. Everything is going swimmingly until I function check the rifle.
The trigger is stuck solid and won’t budge. Upon further investigation, I discover the mount for the trigger shoe is hanging up on the skins at the top of the skin’s trigger opening.
View attachment 8353746
The triangle shaped piece at the top rear of the trigger opening has to go. Razor saw:
View attachment 8353756
It worked!
View attachment 8353751
I had him counter bore the “stupid idea” early fore end for the counter sunk screw mounting of the late fore end. Maybe this summer I’ll debond the fore end and switch over to the early front sling swivel style.
Probably about the same time I pop off these skins and DuraCoat them OD green. It’s too cold to paint with that nasty stuff now.
Before
View attachment 8353873
After
View attachment 8353789
Edited to add- this mod will work with AICS skins, too.
With the AICS, you’ll have the big square bolt opening for the R700.
You won’t have to modify the trigger opening because that’s already done.
This is because the rear action mounting bolt opening is at the rear of the trigger opening.
Last edited:
Holy cow, this is awesome! Keep posting updatesCheck this out:
AT rifle vandalism part 1
Strip AT rifle, remove all flush cups because we don’t need no stinkin’ flush cups, mark cuts for skins with tape.
View attachment 8352844
View attachment 8352831
Cut skins as necessary with razor saw
View attachment 8352832
View attachment 8352833
Test fit
View attachment 8352834
View attachment 8352835
View attachment 8352836
Hey! One of the skin screws won’t pass through the chassis fore end! Use a 1/8” transfer punch to mark it.
View attachment 8352837
And drill a 15/64 hole because that’s what all the other holes in the chassis are.
View attachment 8352838
To be continued…
What about the barrel clamp bolt access hole?
Stop whining.
Use a 17/32 transfer punch and your AT fore skins to mark it and then drill a hole.
Start with a small bit and work your way up to 17/32.
Don’t be an idiot. Drill a 1/8 hole from the inside and then work up to the final size from the outside in. Chamfer the hole from the outside.
Dremels are for pussies who vape strawberry flavored shit.
View attachment 8352852
View attachment 8352854
Real men smoke Pall Malls and have COPD by age 50.
Check your work, if a 4mm allen socket fits, you’re golden.
View attachment 8352867


Holy cow, this is awesome! Keep posting updates
I painted my shit with WWII OD Green DuraCoat a couple days ago since the weather is less sucky.
Done.
Obviously this is an Accuracy International AT rifle with AE Mk1 skins but this also works on AT AICS chassis with AICS skins for R700s.
Shit?
Because it's not an AI in the ai pic thread?
possibly Savage, definitely not Sako, or JP Sauer.
Similar threads
- Replies
- 7
- Views
- 327
- Replies
- 6
- Views
- 1K
- Replies
- 4
- Views
- 443
