Update:
Here is the link where you can find all the info you need for the wiring etc:
http://www.ar15.com/mobile/topic.html?b=3&f=4&t=292695
My setup was slightly different, in that I wanted a larger table, as some of you have pointed out. Working on a large piece of foam on a small table makes it a challange to keep everything flat. Another reason why I chose to do what I did was the fact that the last thing I need is "tool" that will take up a bunch of space, only to be used a few times a year IF that!
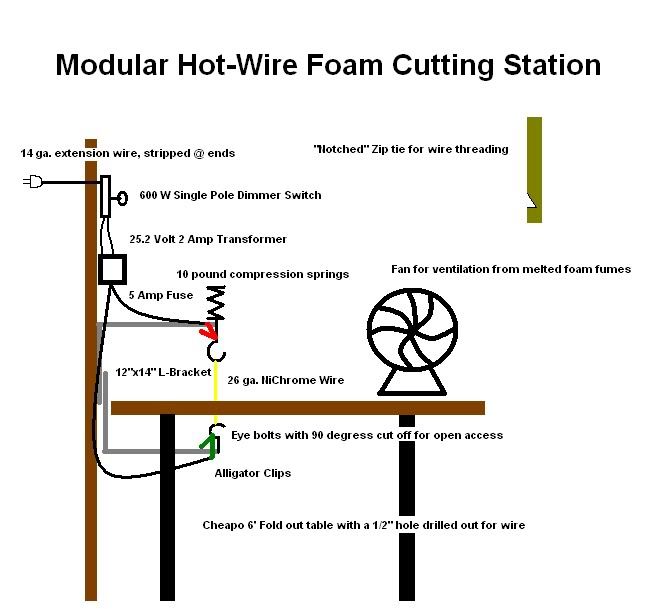
Here is a diagram of what my setup looked like:

Here are the links to the items I bought:
Springs
L-Brackets
Eye Bolts
Dimmer Switch
Transformer
Alligator Clips
NiChrome Wire
Everything cost me about $30 sans the case/foam of course.
With everything mounted on a 2"x4" and using an existing cheap fold out table, I only had a drill a small 1/2" hole to make everything work together. I not only saved money, but saved space without needing to build another table even if it is only 2'x2'.
I used the wall and the table to keep the 2"x4" vertically stable (could have anchored it down better, but again, I wanted to keep things simple and "non-permanent"). In the ar15 thread, you will also notice that some people had the spring on the bottom. I found it much better to have it on the top, because with numerous cuts, you need to "unhook" the cable many times. By having the spring on top, you can simply compress the spring, give the wire some slack and unhook easily without having to go underneath the tables.

One detail which was not really covered in the 40+ Pages from the ar15 thread was how to easily thread the wire through the pilot hole. I wanted to use something which minimal profile so I cut out a small triangle shape on a 1/8" zip tie and used that to punch through the foam and fish through the wire to the top hook. I should state that I have a hoop formed on both ends of the wire for easy installation on to the hooks.
I also bought longer eye bolts with a longer spring to give me plenty of adjustment of the wire tension. I had some washers and nuts to help move both top and bottom hook up and down to get the perfect working tension on the wire which is very important along with the temperature of the wire. If it's not tight enough, you get sloppy lines...too tight, you will snap the wire. For temperature, too cold would mean too slow and you end up pulling on the wire. Too hot, and you end up having to go too fast or risk melting too much around the wire like a watery pen on a piece of paper if you dont move it. And one last thing...you want to keep the wire less than a foot long, otherwise there would be too much current draw and resistance, and might blow the transformer. You also want it to be shorter so its easier to cut with.
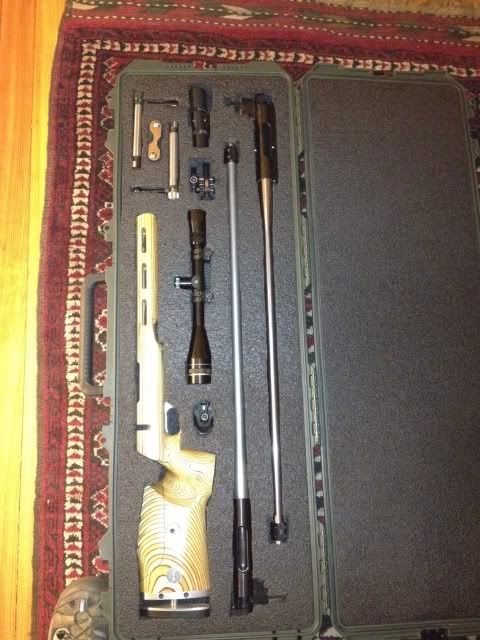
During the days before I got all my material, I layed everything out on the ground and went through MULTIPLE configurations on how I wanted everything to be laid out. I wanted the nighforce to be at the top near the handle so it would not have too much weight resting on it. I had to lay the but stock vertically (which requires cutting of all 3 layers of foam) to make sure I had enough space so that all cuts were at least an inch away from each other. Once the stencils were traced out with a pen connected to a right triangle ruler (to make sure the pen was always perpendicular to the paper), I traced the inside with a highlighter to give me a 1/4" border. I then outlined the inside highlighter lines for the final cut line. This made sure that the items would be snugg in the foam and the fitment is perfect...not too tight, and definately not loose.


Pix were taken with an iPhone...will update with better pix


I do still plan to get some better pix for you guys, but not enough time to get things out again...but feel free to ask if you have any questions! It was actually a really fun project!
Here is the link where you can find all the info you need for the wiring etc:
http://www.ar15.com/mobile/topic.html?b=3&f=4&t=292695
My setup was slightly different, in that I wanted a larger table, as some of you have pointed out. Working on a large piece of foam on a small table makes it a challange to keep everything flat. Another reason why I chose to do what I did was the fact that the last thing I need is "tool" that will take up a bunch of space, only to be used a few times a year IF that!
Here is a diagram of what my setup looked like:

Here are the links to the items I bought:
Springs
L-Brackets
Eye Bolts
Dimmer Switch
Transformer
Alligator Clips
NiChrome Wire
Everything cost me about $30 sans the case/foam of course.
With everything mounted on a 2"x4" and using an existing cheap fold out table, I only had a drill a small 1/2" hole to make everything work together. I not only saved money, but saved space without needing to build another table even if it is only 2'x2'.
I used the wall and the table to keep the 2"x4" vertically stable (could have anchored it down better, but again, I wanted to keep things simple and "non-permanent"). In the ar15 thread, you will also notice that some people had the spring on the bottom. I found it much better to have it on the top, because with numerous cuts, you need to "unhook" the cable many times. By having the spring on top, you can simply compress the spring, give the wire some slack and unhook easily without having to go underneath the tables.

One detail which was not really covered in the 40+ Pages from the ar15 thread was how to easily thread the wire through the pilot hole. I wanted to use something which minimal profile so I cut out a small triangle shape on a 1/8" zip tie and used that to punch through the foam and fish through the wire to the top hook. I should state that I have a hoop formed on both ends of the wire for easy installation on to the hooks.
I also bought longer eye bolts with a longer spring to give me plenty of adjustment of the wire tension. I had some washers and nuts to help move both top and bottom hook up and down to get the perfect working tension on the wire which is very important along with the temperature of the wire. If it's not tight enough, you get sloppy lines...too tight, you will snap the wire. For temperature, too cold would mean too slow and you end up pulling on the wire. Too hot, and you end up having to go too fast or risk melting too much around the wire like a watery pen on a piece of paper if you dont move it. And one last thing...you want to keep the wire less than a foot long, otherwise there would be too much current draw and resistance, and might blow the transformer. You also want it to be shorter so its easier to cut with.
During the days before I got all my material, I layed everything out on the ground and went through MULTIPLE configurations on how I wanted everything to be laid out. I wanted the nighforce to be at the top near the handle so it would not have too much weight resting on it. I had to lay the but stock vertically (which requires cutting of all 3 layers of foam) to make sure I had enough space so that all cuts were at least an inch away from each other. Once the stencils were traced out with a pen connected to a right triangle ruler (to make sure the pen was always perpendicular to the paper), I traced the inside with a highlighter to give me a 1/4" border. I then outlined the inside highlighter lines for the final cut line. This made sure that the items would be snugg in the foam and the fitment is perfect...not too tight, and definately not loose.


Pix were taken with an iPhone...will update with better pix


I do still plan to get some better pix for you guys, but not enough time to get things out again...but feel free to ask if you have any questions! It was actually a really fun project!


