Join the Hide community
Get access to live stream, lessons, the post exchange, and chat with other snipers.
Register
Download Gravity Ballistics
Get help to accurately calculate and scope your sniper rifle using real shooting data.

Install the app
How to install the app on iOS
Follow along with the video below to see how to install our site as a web app on your home screen.
Note: This feature may not be available in some browsers.
You are using an out of date browser. It may not display this or other websites correctly.
You should upgrade or use an alternative browser.
You should upgrade or use an alternative browser.
varmints aren't going to dig this
- Thread starter my human host
- Start date
that's a nice rig. "for looks" go the extra mile, get one of these trigger guards if he's still making them:
http://www.scout.com/military/snipers-hide/forums/5517-rimfire/14654918-cz-455-trigger-guard
http://www.ebay.com/itm/ALUMINIUM-TRIGGER-GUARD-FOR-CZ-455-/121634602496
https://www.atlasworxs.com/collections/trigger-guards/products/cz455-aluminium-trigger-guard
a little pricey, but it pulls it all together.
another item(s) i truly enjoy is the extended mag release and mag well from DIP if you don't already have them installed:
http://www.diproductsinc.com/Detail.aspx?PROD=1189987&CAT=3600
http://www.diproductsinc.com/Detail.aspx?PROD=1173629&CAT=3600
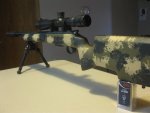
Looks like a cz455 wearing a sightron scope, and a sparrow at the end.
Should be a really great shooter
Should be a really great shooter
I'll get some stuff posted in the next few days. I have a few pics of what I've done so far.
Work is kicking my ass this week and I need a little time to organize my thoughts on the rifle.
Can is actually an Omega. I opted to recut the threads on the 22lr barrel to 5/8 24. I threaded the 22 mag barrel pictured 5/8 24 as well.
Don't currently own a dedicated rimfire can.
Work is kicking my ass this week and I need a little time to organize my thoughts on the rifle.
Can is actually an Omega. I opted to recut the threads on the 22lr barrel to 5/8 24. I threaded the 22 mag barrel pictured 5/8 24 as well.
Don't currently own a dedicated rimfire can.
Hope you guys don't mind, but I think I'll start this out with some observations and an opinion or two. I don't claim to be anyone special and I'm working with an example of one. Feel free to take this stuff with a grain of salt if you like.
Inspecting the barrels:
The 22lr barrel was first up. If a chamber has a serious runout issue, it will normally be visible with a borescope. I saw no sign of runout in this chamber. The throat is quite rough, though. Toolmarks aplenty.
Moving down the bore I found 4 or 5 short sections where the lapping did not clean up or even really touch the toolmarks. Safe to say these roughly 1/4 inch long sections are somewhat larger in diameter than the rest of the bore.
The crown showed no apparent runout. The chamfer on the end of the bore was again a bit rough, but I couldn't see any sign of burrs that might contact a bullet upon exit. I had this barrel in the lathe later on to recut the threads to 5/8 24 and confirmed with a few light cuts that the crown was indeed concentric to the bore.
I only had a brief range session with this barrel and it was prior to fully bedding the action. Eley subsonic hp's were shooting slightly over 1 inch wide and an 1 3/4 to 2 inch vertical groups at 100yds. I suspect the barrel will shoot well, but it's going to need some time to settle in. I'll get back to fiddling with it this summer......
Next up was the 22wmr barrel. This was an off the shelf CZ tube I purchased from Midway.
Here again the chamber looks good with no blatant runout issues. The throat showed a few very small toolmarks, but nothing that will cause any troubles.
The bore in this barrel took me by surprise. It is hands down the nicest bore I've seen in a factory barrel. Looked like a Shilen select match in there. While the lands in the 22lr barrel had a rounded, somewhat over lapped appearance, the 22wmr barrel had a nice crisp look to it. Very impressed with it.
The crown on this barrel showed .0005 to .00075 runout when I put it in the lathe to cut it for my can. Probably not enough to cause any problems. Again the chamfer on the end of the bore had a chewed up appearance, but I couldn't find any burrs that would have contacted the bullets. Recut it anyways....
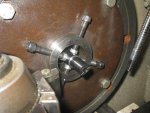
I had previously installed this barrel and used a sampling of a couple different lots of CCI ammo with some .006 thick tape to get an idea of how well the headspace fit the ammo I have on hand. I found that the bolt would close easily on most and with the slightest resistance on some. It might come back to bite me on the ass later on, but I decided to dial in the chamber end in the lathe and swipe .004 off the shoulder of the barrel. To be clear, I don't doubt that those clearances are within specs. I have a lathe, so why the fuck not? I'll attach a pic of the cut I made. Let me know if you have trouble viewing the attachments and I'll get them hosted on pb and repost. More to come....
Inspecting the barrels:
The 22lr barrel was first up. If a chamber has a serious runout issue, it will normally be visible with a borescope. I saw no sign of runout in this chamber. The throat is quite rough, though. Toolmarks aplenty.
Moving down the bore I found 4 or 5 short sections where the lapping did not clean up or even really touch the toolmarks. Safe to say these roughly 1/4 inch long sections are somewhat larger in diameter than the rest of the bore.
The crown showed no apparent runout. The chamfer on the end of the bore was again a bit rough, but I couldn't see any sign of burrs that might contact a bullet upon exit. I had this barrel in the lathe later on to recut the threads to 5/8 24 and confirmed with a few light cuts that the crown was indeed concentric to the bore.
I only had a brief range session with this barrel and it was prior to fully bedding the action. Eley subsonic hp's were shooting slightly over 1 inch wide and an 1 3/4 to 2 inch vertical groups at 100yds. I suspect the barrel will shoot well, but it's going to need some time to settle in. I'll get back to fiddling with it this summer......
Next up was the 22wmr barrel. This was an off the shelf CZ tube I purchased from Midway.
Here again the chamber looks good with no blatant runout issues. The throat showed a few very small toolmarks, but nothing that will cause any troubles.
The bore in this barrel took me by surprise. It is hands down the nicest bore I've seen in a factory barrel. Looked like a Shilen select match in there. While the lands in the 22lr barrel had a rounded, somewhat over lapped appearance, the 22wmr barrel had a nice crisp look to it. Very impressed with it.
The crown on this barrel showed .0005 to .00075 runout when I put it in the lathe to cut it for my can. Probably not enough to cause any problems. Again the chamfer on the end of the bore had a chewed up appearance, but I couldn't find any burrs that would have contacted the bullets. Recut it anyways....
I had previously installed this barrel and used a sampling of a couple different lots of CCI ammo with some .006 thick tape to get an idea of how well the headspace fit the ammo I have on hand. I found that the bolt would close easily on most and with the slightest resistance on some. It might come back to bite me on the ass later on, but I decided to dial in the chamber end in the lathe and swipe .004 off the shoulder of the barrel. To be clear, I don't doubt that those clearances are within specs. I have a lathe, so why the fuck not? I'll attach a pic of the cut I made. Let me know if you have trouble viewing the attachments and I'll get them hosted on pb and repost. More to come....
Attachments
Last edited:
Dead sexy! Varmints won't know what has happened to them when the exploded in half. I love my 22 mags. When it hits, i love the thwacking sound it makes. You hear it and its like music to my ears. Is that wrong? If it is, I don't want to be right.
Agreed. The difference in killing power between the 22lr and the 22wmr is the reason I'm going through the hassle and expense of setting this rifle up.
I've owned a couple different 22 magnums over the years, the last being a stainless Marlin microgroove I let go roughly 15 yrs ago. Been missing it ever since.
I've owned a couple different 22 magnums over the years, the last being a stainless Marlin microgroove I let go roughly 15 yrs ago. Been missing it ever since.
On with the show.
The Stock:
Out of the box, the stock had quite a few fitting issues. The bolt handle was making hard contact with the stock. Easily corrected with a round file.
The plastic mag well that is fastened to the bottom of the action was also making hard contact with the stock to the point were it was a pita remove and reinstall the action in the stock. I chose to correct that problem in the mill.
I had noticed from the start that the barrel was about .030 off center in the channel. Clearly there was some stress somewhere or the inletting was a little wacky.
First order of business was to get a rail mounted for my Atlas. Here is a quick and dirty way to get the job done on a stock with two front swivels. Little JB Weld and some blank rail..
Attachments
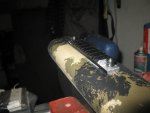
I chose to mill some clearance to relieve the stress on the action prior to bedding. I had previously bedded the tang and chose to leave a bit of that bedding intact to act as a rear pillar during the bedding process. After milling out the stock for bedding, I reinstalled the barreled action and used a feeler gage to verify the only places the action was contacting the stock were the front pillar and the bedding I had left under the tang. To my delight, the barrel was now perfectly centered in the channel. Safe to say the stock to action fit was jacked. 
Compound used was JB Weld thickened with micro beads. You'll notice a couple fair sized chips in the gel coat in the tang area. There were voids under the gel coat in those areas. Not a huge deal, but I suppose it would bother the perfectionists among us.
Here is a pic of the bedding all finished up. I may have gotten a bit carried away when milling clearance for the barrel set screws. Time will tell.
There is also a small void in the bedding itself just behind the tang. Gonna run with it for now.
Here is a pic of the bedding all finished up. I may have gotten a bit carried away when milling clearance for the barrel set screws. Time will tell.
There is also a small void in the bedding itself just behind the tang. Gonna run with it for now.
While it's not a huge deal, it seems worth mentioning that this stock doesn't have quite as much strength in the forend as the other t4's I have on my 300WM and 6.5 Creed. Friend and fellow member Xdeano swung by a couple weeks ago to have a 6.5 Gap barrel fitted to his Bighorn and he agreed that there was a difference, but he also seemed to think that I was nitpicking. He's most likely correct as the rifle is showing promise on target. I'm not going to speculate why this is. For all I know it's nothing more than fluke and not typical for these.
I've not yet seen one of the CZ trainers with a Manners stock, but probably will before long, as one of the guys who will be shooting a 22RF Precision Rifle match with us has one.
I bought a Manners T4A Elite that was a left-over from Euro Optic's run of Stiller 2500XR/Bartlein trainer builds, and bedded my 2500XR/Krieger build into it. The Elite weighs 1/2lb less than a std shell T4A with the same KMW clampbar cheek piece & other options, and is at the very least as rigid as the std shell stock.
I bought a Manners T4A Elite that was a left-over from Euro Optic's run of Stiller 2500XR/Bartlein trainer builds, and bedded my 2500XR/Krieger build into it. The Elite weighs 1/2lb less than a std shell T4A with the same KMW clampbar cheek piece & other options, and is at the very least as rigid as the std shell stock.
I have a few more things to add to this thread, but those of you interested in how this rifle is currently shooting can check out the 6x5 sticky.
Still have some stuff to add to this thread. I've added a knob and done a few other things.
I'll update after some more accuracy testing.
I'll update after some more accuracy testing.
Time do dust this shit off and get back to it.
A pic of the bolt knob I installed. It's nothing more than a short chunk of 3/4" cold rolled round stock that was chucked in the lathe and then counter bored with a 3/4" drill bit to form a socket for the factory knob to locate itself in.
Used a mig and a series of warmish tack weld to burn it together, being careful not to overheat the handle. Used the belt sander to rough out the weld and finished up with emery cloth. The whole show took around 45minutes and didn't require me to make any fixtures. A bit simplistic, but strong and functional.
Forgive the crude drawing. It's obviously not to scale, but conveys the idea well enough.
Similar threads
- Replies
- 9
- Views
- 626
- Replies
- 42
- Views
- 2K
- Replies
- 9
- Views
- 1K
