Ok, brains trust.
I'm looking at building a new woodworking bench for my garage. I have drawn up a design that will fit the space and maximise my storage space as well as an undershelf and top shelf that I can also mount an LED work light to the underside.
What I'm looking for ideas, is the most suitable joins for the horizontal bench/shelf beams to the vertical legs.
Originally, I was going to butt joints it or possibly use pocket hole screws, but falling down the endless youtube rabbit hole, has me thinking of different joints to make it stronger.
My original plan has all the structure made from 90x35mm pine (roughly 3.5" x 1.4") but to do any serious joints such as a lap joint, I will need to change out the vertical posts to much larger square posts around 100mm (~4") to allow or the removal of the lap recesses.
View attachment 8583704
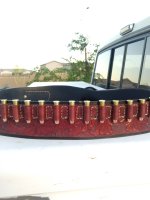
This is the design idea that I am drawing from for reference.
View attachment 8583705
Now, keeping in mind, I don't have a full blown wood shop like the creaters on youtube, so am just limited to what I can do using a compound mitre saw, router and hand tools at this moment if you can keeo that in mind when throwing ideas. I would also like to keep the ideas simple so please no fancy Japanese hoity-toity joints either lol