Maggie’s The Wood Shop

Ok, brains trust.
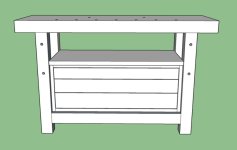
I'm looking at building a new woodworking bench for my garage. I have drawn up a design that will fit the space and maximise my storage space as well as an undershelf and top shelf that I can also mount an LED work light to the underside.

What I'm looking for ideas, is the most suitable joins for the horizontal bench/shelf beams to the vertical legs.
Originally, I was going to butt joints it or possibly use pocket hole screws, but falling down the endless youtube rabbit hole, has me thinking of different joints to make it stronger.

My original plan has all the structure made from 90x35mm pine (roughly 3.5" x 1.4") but to do any serious joints such as a lap joint, I will need to change out the vertical posts to much larger square posts around 100mm (~4") to allow or the removal of the lap recesses.

View attachment 8583704

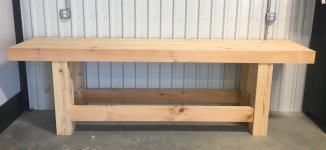
This is the design idea that I am drawing from for reference.

View attachment 8583705

Now, keeping in mind, I don't have a full blown wood shop like the creaters on youtube, so am just limited to what I can do using a compound mitre saw, router and hand tools at this moment if you can keeo that in mind when throwing ideas. I would also like to keep the ideas simple so please no fancy Japanese hoity-toity joints either lol
Will you be using hand planes? Chiseling? Will you be mounting a vise? That bench looks terrible for woodworking. It might be ok for some assembly projects though.

I guess it also depends on what you’re making.
 
To me a work bench is just that a work bench. You can get carried away with all sorts of fancy joinery but in the end it is a work bench.
I would build something very similar to what you pictured and change the legs to 4x4's. glue and screw all the joints and use it. My big assy bench is 4'x8' and consists of six 4x4 legs 2x6 frames and 2 layers of 3/4 for the top. and a 3/4" shelf underneath.
Now I have seen some beautiful benches made by master craftsmen but is it any better?
I was more looking for the most structural joints as opposed to just a couple of screws to allow for a fair bit of abuse, as I would like this project to be something that will last for years.
 
I’ve been building and using these for years. Rock solid, and can be scaled to make it larger or smaller.

IMG_5237.jpeg
IMG_5236.jpeg
IMG_5235.jpeg
IMG_5234.jpeg
IMG_5233.jpeg
IMG_5232.jpeg


Simple lag bolts and 4x4 frame. Plank top.
 
Will you be using hand planes? Chiseling? Will you be mounting a vise? That bench looks terrible for woodworking. It might be ok for some assembly projects though.

I guess it also depends on what you’re making.
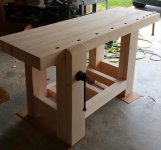
It'll be used for a mixed bag. I was thinking of a vice on it later on. But mostly it'll be planing, to put the thicknesser on when I get one, hammering, routing, assembly etc.
The assembled picture I posted was just as reference for the idea I took from for my design and modified to fit in the pace I will put it, and hence looking to make it a bit stronger than just basic butt joints and a couple of screws.

The back wall of it will have a pegboard installed and it'll also act as a sort of shield in front of the rear glass doors of my garage when I'm turning stuff on the lathe.

My measurements will fit this space here in front of the glass...

1736041125179.png


I can if I want change it to a freestanding island bench in the middle here and move the lathe bench against the glass and just put a ply wall behind it, but was wasn't quite sure how everything would fit in with regards to future machine purchase plans, such as a table saw and thicknesser (which will just sit on the bench when i use it) In the future I plan on upgrding this 20yrs old budget lathe to a decent possibly freestanding model.

1736041299395.png
 
  • Like
Reactions: HPIguy
Ok, change of plans. I've reorganised this half of the garage to change to a centre table.
So me your designs for a simple decent design. My measurements will stay the same as my previous design of 1800x600 (70x23")
Once I get things started, I will sort of that organised chaos to the left lol. It might even be a cabinet making project for me.

@Bigfatcock do you have some other angle photos of those stringer joints?


1736048438752.png
 
Ok, change of plans. I've reorganised this half of the garage to change to a centre table.
So me your designs for a simple decent design. My measurements will stay the same as my previous design of 1800x600 (70x23")
Once I get things started, I will sort of that organised chaos to the left lol. It might even be a cabinet making project for me.

@Bigfatcock do you have some other angle photos of those stringer joints?


View attachment 8583851
I will take more photos for you this evening. My bench is heavy, doesn’t move at all, and has storage underneath. You can install flip up castors if you want to be able to wheel it around. This current one is 5 feet long by 24 inches deep. It extends to 6 feet long with the end vise fully extended.

I designed this bench to not require any type of joinery, be sturdy, and be put together fast. You can put it together in a couple of hours if you take a bunch of smoke and coffee breaks. This current one is 4 years old and has zero racking, wiggle, or movement after steady use with hand planes, chisels, etc. All supplies can be purchased with one trip to the hardware store.
Thanks, my hardware store I'll be buying the stuff from is 200Km away, so I'll have to get it in bits and pieces lol
 
Ok... at it again. Another fine English gun that some twat-waffle fitted with a Pachymeyer recoil pad... and butchered the heck out of it.

So I've very carefully cut the stock back and will be fitting a horn buttplate from Galazan. Fortunately, I had two because the first one started to de-laminate when I started to work it. This will be set to 14 3/8" LOP... and need a new pair of proper screws (which are inbound) and will need engraving after fitting, polishing, etc.

Fortunately, got a great deal on the gun. I started down the road of re-stocking, but that ended in a couple of dead ends. So I finally made some good repairs at the action and now putting on the buttplate. Going to be a wonderful bird gun once I get it back together. One of a composed pair with case! Some of these great old vintage bird guns can be a deal if you can do some of the (careful!) wood repairs and restorations yourself.


View attachment 8582769

View attachment 8582770

View attachment 8582771

View attachment 8582773Rough fitting is done... but the scary part begins with the final fitting....

Well, patience, sharp chisels and careful masking and hopefully I won't nick or otherwise screw up an otherwise beautiful stock!

Cheers,

Sirhr
What happened to the other trigger?
 
Screenshot_20250105_102035_Gallery.jpg


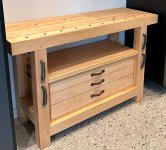
This is a bench I built for my CNC machine. Rock solid and really just butt joints and screws. If you zoom in at the top corners, you'll see how I built the legs.

Just my opinion: Unless you're wanting to test your skills or perfect/master your joints, spending more time on a project and less on the bench. Having a plan is always the best way but don't need to go overboard.
 
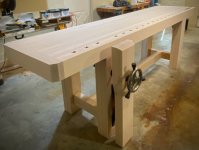
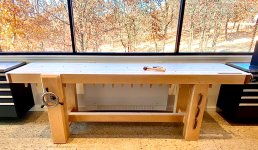
I’d suggest borrowing elements from traditional woodworking benches. Weight is your friend…..something to clamp your project to. Doug Fir or Pine is acceptable for a bench even though I prefer either hard or soft Maple.
 

Attachments

  • IMG_6286.jpeg
    IMG_6286.jpeg
    950.8 KB · Views: 26
  • IMG_6287.jpeg
    IMG_6287.jpeg
    603.8 KB · Views: 26
  • IMG_6288.jpeg
    IMG_6288.jpeg
    964.7 KB · Views: 29
  • IMG_6289.jpeg
    IMG_6289.jpeg
    1.3 MB · Views: 28
  • IMG_6290.jpeg
    IMG_6290.jpeg
    1 MB · Views: 28
  • IMG_6291.jpeg
    IMG_6291.jpeg
    81.1 KB · Views: 30
I’d suggest borrowing elements from traditional woodworking benches. Weight is your friend…..something to clamp your project to. Doug Fir or Pine is acceptable for a bench even though I prefer either hard or soft Maple.
As much as I would like to make a laminated heavy top like those, the level of quality of the wood available at my hardware store is far too low, and I don't have a thicknesser to tidy them up yet, but its on my future plans to buy.

This is the top I was going to use in the meantime. It can always be upgraded later on. it is 18mm thick (bees dick smaller than 3/4")
It is sturdy and rigid enough to act as a starter bench top.

1736150387437.png
 
Just a small no-frills project I made up today.
As part of cleaning up and reorganising my garage to fit in my woodworking gear, I'm going to be moving some steel shelving in my garage that currently is being wasted with heaps of left over material from my old hunting/military manufacturing business.
So instead of the rolls lying down on the shelves, it will take up a lot less real estate if they are vertical.
SO using what offcuts I had on hand in the garage, I came up with this simple box rack to keep them tidy. WHile loading it up I made a massive cull of all my other materials that wouldn't fit in this rack or that I would absolutely never use again even for small projects.
I'll eventually take most of this material to the tip, but for now, it'll stay.

Now to p[lan for this weekend to do a major overhaul and reorganise of the garage.


My afternoon cabinetry project. In my work ute, my auto leccy tool bag has just been sitting on top of my hydraulic crimper tool squeezed between my toolbox and pull-out bench vice. I wanted to make it neater. I measured it up and got to work. Luckily I had enough scrap wood in the garage to make it happen. I measured out where I would have to cut some boxes out to fit around the slide rails that the toolbox is bolted to, and I needed to allow a slot for my extra-long breaker bar and pry bar to slide into. I went all out on the finish of this one, taking the time to sand it right back(mainly because of the nasty construction ply I used for the top panel) and even ran my router over the edges to roll them. Normally for something to live in my ute like this, I would leave it raw, but I had a tin of clear varnish, so I gave it a good coating. Now all fitted perfectly between the toolbox and vice.

If I had a router table or a jig, I would have liked to take the time to use finger joints to build it.

20250109_195755.jpg
1736495334431.png
1736495420006.png
1736495363608.png
 
Has anyone here done a wooden cheek piece for an ARC Xylo chassis? I already started a thread in the Bolt Action Rifle forum, but someone suggested posting here as well. Mainly looking to soften up the angular/faceted cheek piece that comes on that chassis, and match the look of the walnut grip.

Most of what I have is hand tool (hand saws, planes, chisels, etc.) but I do have some basic stationary power tools (drill press, band saw, lunch box planer, bench top jointer, hand-held router) as well. Any tips or pointers for this kind of work would be welcome. Or if someone has a CNC router and needs a project... I'm open to that as well ;)
 
I finally finished the bowl that I've had on the lathe since Xmas.
I finished it with a couple of coats of food-safe mineral oil and a run of beeswax.
Eventually, when I get a sacrificial pot for the stove, I'll melt the beeswax and add the mineral oil so it's a single-dose application.


I've also glued up the next few layers of 33mm thick pine board to make the next bowl. This time I made sure that all the surfaces were flat as the centre pine pieces I used for this bowl were slightly cupped and left small gaps once I got to those spots on the lathe.