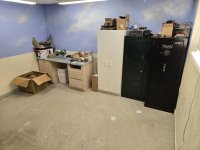
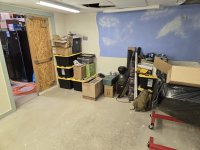
Well my original post in this thread was probably 9 or so years ago when I just had a small table in the closet of the spare bedroom in my apartment in Washington state. Now out of the Army and just bought my 3rd house, it has a 15x12 room off of the shop that is going to pull double duty as an engine assembly (clean) room and gun/ reloading room. Let the work begin. It's pretty beat up right now and just has a temporary bench in it but here is what I'm starting with. The last owner used this room for model trains, first thing I'm doing is painting the walls and that will happen this weekend.
Join the Hide community
Get access to live stream, lessons, the post exchange, and chat with other snipers.
Register
Download Gravity Ballistics
Get help to accurately calculate and scope your sniper rifle using real shooting data.

Install the app
How to install the app on iOS
Follow along with the video below to see how to install our site as a web app on your home screen.
Note: This feature may not be available in some browsers.
You are using an out of date browser. It may not display this or other websites correctly.
You should upgrade or use an alternative browser.
You should upgrade or use an alternative browser.

Building the Perfect Reloading Room
- Thread starter sirhrmechanic
- Start date

lights.
I completed my room a couple of years ago since I am in New. York I added some extra security measure I took a 12x12 space in a basement corner so two walls were concrete the other two I lined with diamond plate then I put in a combination lock fire metal door. I have an eight foot bench the only equipment installed on the bench are a Dillon 650 for pistols and an RCBS jr - 60 years old now and still going strong. I prefer than for rifles; since I weigh each charge. I had room for a 50 gun safe the accommodates picking ,a wooden gun cabinet and enough shelving to handle components and finished ammo. The other tools trimmer etc are in a cabinet above the bench. Since the other tools are only used when needed where the presses are used almost daily I didn’t see the need to mount them. I try to keep a maximum of free space. This has worked out very well. A few other things I did was to tie it into the house sprinkler system and a ring camera. The only thing I have yet to do is paint the floor white to find small parts. Lastly for added security I have my three pet Dobermans.So because AJ called me a slacker... because I took last weekend off to go and pick up a live cannon in Cheboygan (no, really...) instead of working on my reloading room.
Here's a couple of pictures of today's progress. Got the pocket door in (decided to make my own 'barn door' not buy some Chinese thing from Home Depot. And insulated about 1/3rd of the ceiling and got my ceiling panels up. Instead of sheetrocking, I'm going with metal roofing. Looks great. Goes up in a snap. No taping, no joint compound, no sanding, no painting. Damn this stuff is GREAT for interior spaces! $22 a sheet 3 x 8 at Home Despot.
I'll have the ceiling in by tomorrow in one of the two rooms and I'll get the wall insulation up on the dividing wall. By the end of next weekend, I'll be starting on planking the walls. Progress... lots of progress!
Love some of the bench pictures above. I'm going to make my own and those are some beautifully built (and rugged-looking) benches!


Cheers,
Sirhr
P.S. Who's the slacker now, "Mister" AJ????
Did I miss anything?
Last edited:
I forgot to mention the computer mounted from the back shelving the TV I need to correct a typo the safe accommodates pistols. Not picking sorry about that
Thank you for your service! Can't wait to see the progress as you move along. Hoping to steal a few ideas, lol!Well my original post in this thread was probably 9 or so years ago when I just had a small table in the closet of the spare bedroom in my apartment in Washington state. Now out of the Army and just bought my 3rd house, it has a 15x12 room off of the shop that is going to pull double duty as an engine assembly (clean) room and gun/ reloading room. Let the work begin. It's pretty beat up right now and just has a temporary bench in it but here is what I'm starting with. The last owner used this room for model trains, first thing I'm doing is painting the walls and that will happen this weekend.
Paint the floor White so any thing springs primers standout Try and seal off the bottom of the tables so nothing you loose goes somewhere hard to find.
You know I don’t know what we arr do up tight about these holes every hole I have seen mentioned is for a bolt that holds a vice or press or other tool I have 1 vice and 2 presses mounted with bolts through holes that are the filled with bolts permanently so no more hole right problem solved if you want to secure something like a case trimmer mount it on say a piece of 3/8 plate and clamp that to the table you only need that once in a couple weeks or longer so you can remove and store it anything else?This is what I'll do next ad to not have holes. Final design may change, but concept is the same especially for heavy work and presses.View attachment 8535557
The end
wait......what?Can't you clean up spilled powder with a propane torch?
Also, see my avatar.
i'm not ocd about this, just like a clean, smooth and 100% usable work surface.You know I don’t know what we arr do up tight about these holes every hole I have seen mentioned is for a bolt that holds a vice or press or other tool I have 1 vice and 2 presses mounted with bolts through holes that are the filled with bolts permanently so no more hole right problem solved if you want to secure something like a case trimmer mount it on say a piece of 3/8 plate and clamp that to the table you only need that once in a couple weeks or longer so you can remove and store it anything else?
The end
that's just a "re" anything roomWell my original post in this thread was probably 9 or so years ago when I just had a small table in the closet of the spare bedroom in my apartment in Washington state. Now out of the Army and just bought my 3rd house, it has a 15x12 room off of the shop that is going to pull double duty as an engine assembly (clean) room and gun/ reloading room. Let the work begin. It's pretty beat up right now and just has a temporary bench in it but here is what I'm starting with. The last owner used this room for model trains, first thing I'm doing is painting the walls and that will happen this weekend.
 ! rebuild, restock, reload and re-do! not 1 thing wrong with that! what's ya working on?
edit: i'm way behind on several bbc's
The ones that are currently in there are a 406ci Sb2.2 and a R07.2. At my main shop I have a couple of long bell housing 331/354 hemis and a all aluminum 4.5" bore space small block. Across the hallway from this room is a grinding room to work on cylinder heads and block modifications and then the gun room is the clean room.that's just a "re" anything room
edit: i'm way behind on several bbc's
009The ones that are currently in there are a 406ci Sb2.2 and a R07.2. At my main shop I have a couple of long bell housing 331/354 hemis and a all aluminum 4.5" bore space small block. Across the hallway from this room is a grinding room to work on cylinder heads and block9*66-----------------------------odifications and then the gun room is the clean room./
the project i want to do is a 396 or 402 bore w/ 454 crank then twin turbo it for my hauler p/u. or might just go with the newer 6.6 gas and TT it. i'll need to check the engine specs 1st. i used to drive an '81 crew cab dually w/454, 3.73's and turbo400 that would get 14mpg @ 85mph towing 30k cvw. engine wasn't stock, but not much over w/ ~ 390hp and 450# torque. oval heads w/ quattrojet.
the 406 sounds like a bpoc engine?The ones that are currently in there are a 406ci Sb2.2 and a R07.2. At my main shop I have a couple of long bell housing 331/354 hemis and a all aluminum 4.5" bore space small block. Across the hallway from this room is a grinding room to work on cylinder heads and block modifications and then the gun room is the clean room.
Sounds great I have a similar setup except the gun room has steel and concrete walls and a combination lock steel door!The ones that are currently in there are a 406ci Sb2.2 and a R07.2. At my main shop I have a couple of long bell housing 331/354 hemis and a all aluminum 4.5" bore space small block. Across the hallway from this room is a grinding room to work on cylinder heads and block modifications and then the gun room is the clean room.
Never heard that acronym before. It's a 400 small block chevy .030 over, splayed main caps, 3.75 forged canvas cut down to honda rod journal with 6.125" rods and 1.010 compression height pistons with sb2 top end. Built it for my road course nascar cup car.the 406 sounds like a bpoc engine?
Edit: forged crank not canvas.
Last edited:
B uickNever heard that acronym before. It's a 400 small block chevy .030 over, splayed main caps, 3.75 forged canvas cut down to honda rod journal with 6.125" rods and 1.010 compression height pistons with sb2 top end. Built it for my road course nascar cup car.
P ontiac
O ldsmobile
C adillac
BPOC
What are the thoughts of using two sheets of 3/4" plywood, glued together but no legs. Looking at keeping it "floating." Basically securing 2/4s along the wall, screw the bench into it and have a frame of angle iron made that supports underneath.
You can't but like what you are doing but you are overbuilding using steel. You don't need to build a bridge. The weight you need to support is not more than a couple of 100 pounds at max. When I built my table I used 5/4 construction scaffold planks fire proof! then I put two sheets of 3/4 plywood on top of that. And for a top I used 1/4 Masonite. That was 50 years ago and it is stronger now than when I put it together. I used double 2x4 studs to built the legs and interlocked them at the top with a frame that came around the rim of the table. It was assembled with nails. Then I put anchors in the concrete (basement) and tied the table to it.
You could "cantilever " the top but only so far and you'd need to anchor the back side very well and have some supports every 4 ish feet but it could be done. Honestly, I think you'd be better off just getting a butcher block top from somewhere and putting it in on a 2x4 frame and just have say 6 or 8" of the front sticking out past your frame.What are the thoughts of using two sheets of 3/4" plywood, glued together but no legs. Looking at keeping it "floating." Basically securing 2/4s along the wall, screw the bench into it and have a frame of angle iron made that supports underneath.
Cantilever is what escaped me in the description. Putting the supports on top of the 2x6 studs. Probably a small steel plate for more stability under the press(es).You could "cantilever " the top but only so far and you'd need to anchor the back side very well and have some supports every 4 ish feet but it could be done. Honestly, I think you'd be better off just getting a butcher block top from somewhere and putting it in on a 2x4 frame and just have say 6 or 8" of the front sticking out past your frame.
I'll have to look at the butcher block tops.
Appreciate it.
My bench has a 2x6 perimeter, screwed to the walls with huge screws. 3/4" plywood top. One leg down the center of the front. Don't make the bench a full 4' wide, or it's too deep to reach stuff in the back. I like the depth of mine, but I'm not at home to measure it right now. I have shelves across the back for storage, but it leaves plenty of room in front for a Dillon and lots of work space.
using bamboo for tops has worked for me on 2 benches from lowes/home depot that bare 1.5" thick and 6 and 8' long. just wish there were deeper than 20". don't feel like ripping and gluing back together for depth. making an island would be nice for getting all the way around for a 360* use is my next project.Cantilever is what escaped me in the description. Putting the supports on top of the 2x6 studs. Probably a small steel plate for more stability under the press(es).
I'll have to look at the butcher block tops.
Appreciate it.
You can get 26" deep butcher block that works pretty well. It's a good depth for meusing bamboo for tops has worked for me on 2 benches from lowes/home depot that bare 1.5" thick and 6 and 8' long. just wish there were deeper than 20". don't feel like ripping and gluing back together for depth. making an island would be nice for getting all the way around for a 360* use is my next project.
Appreciate the feedback. I'm thinking 30" deep. I'm 6'2" with a long reach so it should be perfect. Bottom of the bench will be 42". Figure I can stand if need be at the keyboard with proper form and not mess my wrist up. Also bought a nice rolling stool that fits perfect at that height.
I'll put together some drawings to show then pics afterwards (still several weeks from finishing).
I'll put together some drawings to show then pics afterwards (still several weeks from finishing).
Something you might consider in addition to the weight it can handle is the movement. I went with a free standing table. Even have a toolbox on one side of the top and I still get ammo boxes jiggling when stacked. Next time I will go with a wall secured or mounted setup.

Last edited:
Something you might consider in addition to the weight it can handle is the movement. I went with a free standing table. Even have a toolbox on one side of the top and I still get ammo boxes jiggling when stacked. Next time I will go with a wall secured or mounted setup.
Thanks. The movement is the main thing I'm thinking about. When resizing cases, especially 300NM size, it tends to move everything. The only items I plan on having on the bench at any given time are the scale, press and eventually annealer and case trimmer.
in 2016 when we built the bike shop, I envisioned it being a bike shop and a reloading shop. The lighting in it is good and being a wood structure, it seems warmer in cool, damp weather.
I have a table, I built for my drill press that I am proudest of. Obviously it is the right height for a drill press but a bit low for loading. Still, a nice looking work table. Very usable with a low seat or stool. I am not using my drill press much anymore, so I plan to move it to my regular work bench. then move the drill press table into an open area of the bike shop. Attach an RCBS tool plate and start moving much of why reloading to that area. Pictures to follow.
Might be time to move some bikes out. got some that I simply will not be using much anymore. My road bikes and time trial bikes are what really matter. The old mountain bikes, not so much. IK do have a couple of downtime bikes that I restored. Might be time for them to be a display at some commercial bike shop. priorities
But my first major restoration, I would hate to see it go.
Last edited:
My bench is 30” deep (only 35” to top-I’m not as tall as you) and it’s perfect for me.Appreciate the feedback. I'm thinking 30" deep. I'm 6'2" with a long reach so it should be perfect. Bottom of the bench will be 42". Figure I can stand if need be at the keyboard with proper form and not mess my wrist up. Also bought a nice rolling stool that fits perfect at that height.
I'll put together some drawings to show then pics afterwards (still several weeks from finishing).
30" deep, what is a good width, and, if using butcher block, how thick should it be for a reloading bench?
Take a piece of angle iron secure it to back of the bench then secure to the wall. It will make it rock solid obviously find a stud to anchor into.Something you might consider in addition to the weight it can handle is the movement. I went with a free standing table. Even have a toolbox on one side of the top and I still get ammo boxes jiggling when stacked. Next time I will go with a wall secured or mounted setup.View attachment 8577249
Mine is 10' but only because that is what I had, and I have the space for it. Dosen't need to be that big, but I like the extra room. Most of the big box store butcher block that I've come across is 1-1/4" thick, which should do just fine for a bench30" deep, what is a good width, and, if using butcher block, how thick should it be for a reloading bench?
30'' m o g ,mine bench is only 8'' deep30" deep, what is a good width, and, if using butcher block, how thick should it be for a reloading bench?
I'd just run a 2x4 across the back and set the top on it and glue and screw it. It will be super solid using a 2x4 as a ledger and it's way easier to screw to the studs in the wall.Take a piece of angle iron secure it to back of the bench then secure to the wall. It will make it rock solid obviously find a stud to anchor into.
Yeah that's very deep. Mine is 26" and is perfect for me but I also have a lot of bench linear footage so I guess it depends on how long of a bench and how much room you want to give up ect30'' m o g ,mine bench is only 8'' deep
That would work perfectly fine as well. I probably just had angle iron laying around that’s why I used that.I'd just run a 2x4 across the back and set the top on it and glue and screw it. It will be super solid using a 2x4 as a ledger and it's way easier to screw to the studs in the wall.
Yeah, if I had it I'd use it vs buying something. Definitely is strong.That would work perfectly fine as well. I probably just had angle iron laying around that’s why I used that.
I was also securing it to my basement concrete foundation so it being thinner instead of 2x4 kept me from having to buy new tapcon screws.That would work perfectly fine as well. I probably just had angle iron laying around that’s why I used that.
30" deep, what is a good width, and, if using butcher block, how thick should it be for a reloading bench?
Mine is 30" x 74" at 42" tall with a 9" x 74" shelf 23" above that. Was butcher block from Home Depot. It's 1.5" thick and I ripped that 9" from it. Think it was meant for use as an island. However wide you can go, is what I would do. I wish I would have gone lower at about 38". And while I could cut the legs down it would hamper my storage on the floor because of the cross bracing on the legs.
Been 4 years since I posted pictures of mine. (Post #648) And that is where I stopped because shortly after that, prices sky rocketed and things became unobtanium. Now that you can buy things again, I threw money at the bench this past Christmas. So I'll update my bench here next weekend.
Trying it out. Worked with several bench ideas, this was the first and it was terrible. Still the wooden bike shop with insulation on the walls and wired, was warmer/more comfortable for work. Also, offered more possiblities over my current set-up in the big shop. The tables are in the middle of the shop, under the main lights. I discovered that my bicycle building / repairing bench is rather dim at night. With the window right in front of it and the well being quite open, there always is plenty of light in the daytime.
Lots of light as you can see the sun shinning through the transom light above the double doors. In the background is my all time favorite Time Trial Bike. Has practice wheels on it. It’s fast, very fast. Depending on the situation, scary fast. Fastest I’ve ever been on two wheels. But its fun.

What I didn’t like about working in the big shop, the reloading area is in the far back. It feels like I’m working in a cave. Also, I never liked working with my back to the door(s). The one and only window is not accessible from this area. Wired, but not yet hooked up to the power grid. however, what I really like about t he big shop, is everything is right in front of me, and easily within reach. What I need is to remove some of the bikes (it’s crowded) and move my main table into the bike shop and the shelving that makes everything in reach.
(The big shop’s reloading area)

Lots of light as you can see the sun shinning through the transom light above the double doors. In the background is my all time favorite Time Trial Bike. Has practice wheels on it. It’s fast, very fast. Depending on the situation, scary fast. Fastest I’ve ever been on two wheels. But its fun.
What I didn’t like about working in the big shop, the reloading area is in the far back. It feels like I’m working in a cave. Also, I never liked working with my back to the door(s). The one and only window is not accessible from this area. Wired, but not yet hooked up to the power grid. however, what I really like about t he big shop, is everything is right in front of me, and easily within reach. What I need is to remove some of the bikes (it’s crowded) and move my main table into the bike shop and the shelving that makes everything in reach.
(The big shop’s reloading area)
That is a beautiful bench top, but something about the proportions fools the eye. I never would have guessed that the table is 6 foot 2 inches wide looking at the photographs.Mine is 30" x 74" at 42" tall with a 9" x 74" shelf 23" above that. Was butcher block from Home Depot. It's 1.5" thick and I ripped that 9" from it. Think it was meant for use as an island. However wide you can go, is what I would do. I wish I would have gone lower at about 38". And while I could cut the legs down it would hamper my storage on the floor because of the cross bracing on the legs.
Been 4 years since I posted pictures of mine. (Post #648) And that is where I stopped because shortly after that, prices sky rocketed and things became unobtanium. Now that you can buy things again, I threw money at the bench this past Christmas. So I'll update my bench here next weekend.
put a table together over the weekend
going to put all my reloading equipment in this room
need to do another table and couple set of shelves for this room
it's been slow going remodeling a house on the weekends

going to put all my reloading equipment in this room
need to do another table and couple set of shelves for this room
it's been slow going remodeling a house on the weekends
Happy to see some Sages support in here.
I need to buy more quick changes for my Dillons

Three years later....
I put a huge pause on this when components became unobtanium. Now things are more findable, I started chucking money at the bench.
Still need Area 419 Zero Headspace and Ogive Measurement kit. It's OOS everywhere.
My APW mandrel set from impact pro shop is lost somewhere over the ocean yet.
Got some 300BLK brass primed. May just go ahead and charge and seat those. See how things turn out. Not annealed, so doesn't matter. Just got the AGS today. It's pretty sweet for the cost. Not spending $1,800 for an AMP.
Similar threads
- Replies
- 103
- Views
- 4K
- Replies
- 36
- Views
- 1K
