Gunsmithing Another chamber flush question.

Twisted300Win MAG

Sergeant
Full Member
Minuteman
Apr 16, 2012
439
16
39
Michigan
Ok I've accumulated most if the parts needed to put together a chamber flush system. The only thing I'm having trouble finding is a bypass valve. The ones I found at Grainger where all out of stock. What are you guys using? Any help would be appreciated.
Thanks
Donald
 
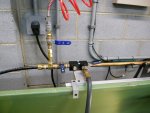
Donald: I used a standard ball valve for the pump/tank return bypass and the other "valving" on my system and they work great.

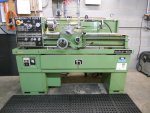
Some of you may remember the pics I posted of my flush system from few years ago. I have recently (2014) made a few changes/improvements to the system, specifically I went with a larger pump, external tank, new filter system, an "air injection" line purge, and larger ID tubing. It works fantastic. ....And for the record, I tried many different lubricants, coolants, and fluids but found none to work better that Re-li-on. I'll add a little detail to hopefully help save others a little time and a few bucks as I have arrived at my current configuration by trial and elimination.

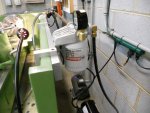
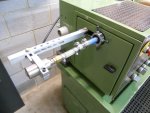
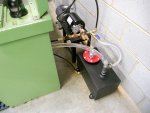
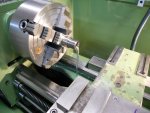
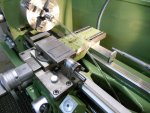
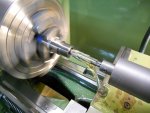
Following a drop of Re-li-on through the system: Beginning in the 4 gallon tank it flows through an in line screen filter, a vacuum gauge, and into the Shurflo GCBN33Y carbonator pump. From there I can direct/control the flow either to the flush system or back into the tank via a bypass valve. This adds greatly in the volume control and adjustability. It then goes up to a Baldwin filter base that I modified to accept Ford type FL1A filters. I drive a F150 (official vehicle of the conservative white male) and the filters are inexpensive and available everywhere. From there to a 4 port manifold block with a port tapped for a coolant line when threading etc. A set of ball valves controls flow to the bleed off line or continuing flow to the rotary union. I stole an idea from D. Tooley and added a purge line which incorporates an automotive fuel system check valve to prevent oil flow back up into the line. The air purge works great when checking progress on a chamber by pushing out all the fluid quickly and easily. We then travel through the Duff Norton stainless rotary union and into the barrel. No special taps or spring loaded gizmos are needed - just a simple nipple adapter that took 10 min to make and I can clamp onto most any barrel with simple hose clamps. No, it does not leak and does not come off under pressure. Through the barrel, into the lathe's chip pan we travel, past a few magnets and screens, and then gravity drain back into the external tank via a couple of fittings and clear 1.50" hose completes the journey. Everything was approx. $1000 and worth every penny. If I had to go back to the old way of dip-ream-clean-repeat ad nauseam I would take up golf.

I indicate, predrill, pre-bore to within .030" or so of shoulder dia, then taper bore, then ream with a JGS holder. Cuts like butta. Flip the pump switch, adjust the flow, and cut a great chamber in a fraction of the time.

I'll try and add a few pics for clarity.

Opinions by,
SR
 
Last edited:
Pic of the Nardini 1030TT1030E. Note that the flush system appears all integral with the lathe. My OCD won't stand anything less. Also a pic of the filter base.
 

Attachments

  • DSCN4046.JPG
    DSCN4046.JPG
    283.9 KB · Views: 94
  • DSCN4049.JPG
    DSCN4049.JPG
    289.3 KB · Views: 86
Rotary union and barrel attachment. Flow manifold and air injection. Tank and pump.
 

Attachments

  • DSCN4047.JPG
    DSCN4047.JPG
    284.5 KB · Views: 95
  • DSCN4048.JPG
    DSCN4048.JPG
    275.5 KB · Views: 105
  • DSCN4045.JPG
    DSCN4045.JPG
    264.7 KB · Views: 98
Last edited:
Adjust to a little or a lot. I have found that different chambers/cartridges will require different flow settings dependent on reamer length and diameter; a .223 will be much different than a .338L.
 

Attachments

  • DSCN4053.JPG
    DSCN4053.JPG
    285.1 KB · Views: 78
  • DSCN4055.JPG
    DSCN4055.JPG
    286.2 KB · Views: 78
  • DSCN4058.JPG
    DSCN4058.JPG
    280.4 KB · Views: 74
Thanks Apache. The pictures really help. I'm setting mine up very similar to yours. My biggest set back is i do not have a back splash on my old southbend. I have one drawn up but haven't had the time to fab it up. How much cutting oil ends up hitting your back splash during chambering? Thanks again for the reply.
Donald
 
I tried just using a ball valve to control the amount of bypass to regulate the pressure basically exactly how you are doing it. My issue was the pressure would crank way up as the restriction in the bore changed, I could not keep the pressure constant, not even close. Do you have to constantly adjust the valve on yours?

That conbraco valve is the only way to go imo, set it and forget it. Well sort of, I run it at 100psi until the micrometer stop hits the barrel, then back it down to 20 unless you want to lubricate the opposite wall of your shop.

su6yme9a.jpg

7epezyba.jpg


Galaxy S3 on tapatalk
 
Last edited:
Thanks Paul.

Donald: 99% of the fluid goes straight down into the chip pan. I say 99% because there is a small amount of splash that goes onto the backsplash but not a lot. You would be best to fab one up to avoid the mess and the hazard.

Jon: Well, to be honest, had I known about the Conbraco valve I would have likely given it a try and I still may do so. Yes, the pressure does rise when the pilot enters the bore. However, it really isn't an issue with me as 1) my goal is to cut a great chamber; 2) with the 90% length pre-drill-pre-bore method the pilot is out of the bore a large portion of the time anyway and there is little to no pressure; and 3) It matters not to me if the pressure does rise. The primary purpose of the flush system is to push the chips from the reamer and that mostly comes into play the last .050" of depth. At that time I just cut .010" at a time and back the reamer out a couple hundred and let it wash. 80+ chambers with this set up with beautiful finishes and .0002" or less runout and I am done by lunchtime. Still I never stop looking to improve and may just give the Conbraco a try. Thanks for the tip.

SR
 
Gotcha, yeah give that valve a shot you'll like it. My worry was only that the pressure would spike high enough to possibly cause filter rupture or blow the GTR flush adapter off the barrel and cause a huge mess. Although my pump is supposed to only be capable of 125 which is what everything else is rated to also I believe.

If you don't have a true sump in your lathe, I built this for my previous lathe and it worked well.

a7u4epu9.jpg


Galaxy S3 on tapatalk
 
I was considering how I'm going to attach the coolant line to the muzzle. I thought about turning a nipple to clamp on a hose. The headstock on my lathe is fairly long. Shortest barrel I can work in through the headstock is 24.5" anything shorter and I have to use a different fixture. My thought is drilling a and tapping the barrel for 1/4"npt and using a length of pipe or hose to reach the outside of the spindle bore to where my rotory union is supported. Any flaws with this idea? Hopefully this weekend I'll be able to fab up my backsplash and pump/motor mount. I'll snap a few pics along the way. Thanks for the info.
Donald

I sent you a PM but use 1/8" NPT and have a 1/4" hydraulic hose made up with a reducer bushing to 1/8". Very rigid. Mine has survived 2K RPM's many times.
 
Different subject (sorta) but something we've monkeyed with.

Pressurized through coolant via the tool. Carbide drill the backside of the reamer and cross drill down in the chip gullets with the holes oriented to direct coolant across the shoulder to evacuate the swarf and clear the gullets. Put a hole in your dead center/collet and run another hose. Kiff made us a handful of these a few years back for little stuff. (17 and 20 cal cartridges)

Working in tandem with a muzzle flush it's the shit.

Have fun!

C.