Badger Ordinance Dead Level not level?

j-moose32

Gunny Sergeant
Full Member
Minuteman
Apr 13, 2019
654
398
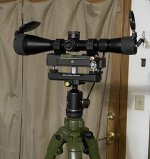
Anyone here use the dead level before and have it show as level, but when you check it with a level on the rail, it shows as off?

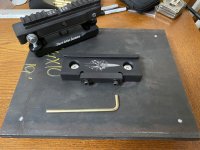
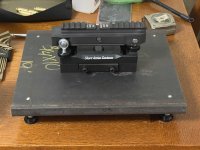
I checked with 3 difference small levels on the rail, and they all showed as off. When I adjusted it so the levels on the rail said it was level , the level on the unit itself reads as off.

Anyone have issues before?

Pic below as well
 
IMG_6111.png
IMG_6111.png
 
These days I just use it for more of a mounting fixture. I hang a plumb bob and align the reticle with that.
I do the same, just wanted the rail to be level. I usually do it on the rifle but got this out of storage recently and figured it would make the process easier. I was wrong , ha
 
  • Like
Reactions: 021411
Something else you can try to double check your bubble levels; if you don't already have a level app for you cell phone download one. Most have a process to calibrate itself, do that first. Then find a flat surface line a counter top and put your phone on it. Put your bubble levels next to the phone. You might be surprised at what you see.

You can also put the phone on the Dead Level to compare it's bubble level.
 
  • Like
Reactions: j-moose32
IMO, unless your spirit/bubble level comes with a certificate of traceability to NIST (and the associated high cost), then just pick one as your standard because they all suck to some degree.

Especially sucky are those little round levels.

I have an iGaging AngleCube and a couple of spirit levels that seem to match pretty good...and some spirit levels that don't. So, I just use the ones that do and decree that to be my standard. Then I check against a plumb bob because I'm anal lol

Edit: and my iGaging and the couple of spirit levels that match it also match my Send-it Level...so, right or wrong, that's my standard.


If you look around, somewhere on here @Lowlight and some others posted the math comparing cant of the scope on the rifle and actually canting the rifle. The later has a very greater impact on POI than a couple of degrees of cant on the scope mounting.

Cheers
 
Last edited:
  • Like
Reactions: Nik H and j-moose32
I can’t find the picture on
My phone but the leveling kits are shit and individual spirit levels suck ass

The electronic ones are better if you want to run them

Found it View attachment 8582530
Holy shit, that’s terrible.

And thanks for all the other feedback gents. I’ll level it for now and use the plumb bob for the reticle. As I get a better level I’ll recheck everything. I’ll probably end up getting a better torque wrench as well
 
It has been my experience that those round bubble levels are not very good, as installed.

Have you verified the accuracy of that straight bubble? See image below.

I recommend these Stablia pocket levels for the money but test it when you purchase. I have not found one bad yet. There are much more expensive machinists levels but these work well for this application.

Amazon Link ~~>
View attachment 8582518
Ordering the one you linked now. Thanks
 
  • Like
Reactions: Holliday
Some years ago I got fed up with inconsistent bubble levels, even from "brand name" sporting optics companies. I had an i-gage for wood working, as well as a couple of Stabila digital levels, and they were usually "good enough", but for (drum roll) "precision", I went on the 'Bay and picked up a lightly used Swiss made Wyler brand precision spirit bubble level. Like the stuff Starrett used to make (unfortunately mostly made overseas now). Around $80 used (new like $200); ~ 2-1/2" length, .3mm/m accuracy, which translates to .0172 degree resolution per scale division. Like close to 1/60th of a degree accuracy. Using it was like ripping out nose hairs, but in reverse...immediate relief, but then the sharp pain. I'd chase my tail forever trying to get everything "just right". Sometimes, too much "precision / accuracy" is just that...too much. I tried it out on the Badger Dead Leval I got just as they were first coming out. I found the base base plate had something like 1/10th degree or less "curve" from front to back. The rail was off just a touch more. This is easily explained simply from the raw material processing, and/or tightening the screws holding the rail down to the base plate, or maybe even from drilling the holes to mount the feet. It really is a miniscule difference. Using a certified machinist's surface plate (or other precise tools at that level, like ridiculously accurate spirit bubble levels) is extremely expensive, sometimes cost prohibitively so, and can set you up for frustration (and a lot of wasted time over "details"), just like anything else (who else gets tired of waiting for high-accuracy powder tricklers to "settle down" and slowly throw a charge - vs just using an old fashioned powder drop that is within .1 or .2 gr and is "good enough"). I'll still occassionally play with the .3mm/m spirit level, but have since picked up more "usable" 1mm/m (.057 degree or 1/18th degree) and 2mm/m (.1146 degree or ~ 1/9th degree) spirit levels and mostly use those. They are "good enough" or better.

In short, the Dead Level is "good enough" for what I need to do. YMMV, of course.


Sola, Stabila and Bethel acrylic mini spirit levels on eBay are listed as being 1mm/m accurate (approx 1/18th degree), and are under $20 bucks. Lots of similar items to be had, if the specs are to be believed.
 
Last edited:
  • Like
Reactions: j-moose32
It has been my experience that those round bubble levels are not very good, as installed.

Have you verified the accuracy of that straight bubble? See image below.

I recommend these Stablia pocket levels for the money but test it when you purchase. I have not found one bad yet. There are much more expensive machinists levels but these work well for this application.

Amazon Link ~~>
View attachment 8582518
They are great, another more reasonable source fyi

 
  • Like
Reactions: rcxrc
Once upon a time I compared the level in my iPhone built-in "Measure" app to a machinist's fancy level. They matched. Fwiw.

Easy button for leveling a scope to the rail is one of the "cheep" wedge levelers from Amazon or somesuch. I picked up a more expensive Arisaka wedge leveler off a prize table a couple years ago.

IMG_4500.PNG. 1736001107611.png
 
Last edited:
A little late to the party but I agree with most of what was already said. Bubble levels are bad, you need a high quality machinist level at least. Electronics are nice as you can do the calibration sequence to verify.
 
  • Like
Reactions: rcxrc
I normally try to level the rail (will use a better bubble level in future) and then align the reticle with the plumb bob.

Any video on leveling it with business cards?
 
After seeing this thread I had to check out the jig I made several years back. Pretty damn close…
Tried getting it perfect by shimming it with a piece of .002” tape and that was a bit too much.

Made up another device using a “bullseye” level. Went through a handful of them before I found an accurate one.

Ubqnez.jpg

GOPrd7.jpg

8mrIxV.jpg
 
  • Like
Reactions: rcxrc and j-moose32
After seeing this thread I had to check out the jig I made several years back. Pretty damn close…
Tried getting it perfect by shimming it with a piece of .002” tape and that was a bit too much.

Made up another device using a “bullseye” level. Went through a handful of them before I found an accurate one.

Ubqnez.jpg

GOPrd7.jpg

8mrIxV.jpg

Now spin the Stablia 180° to verify it reads the same……

Sweet looking rig. You should go into production on those.

What is the gray base material?
 
  • Like
Reactions: rcxrc and hangunnr
I was looking at a Badger but they were out of stock at the time so I built this using the SAC Final scope Level and the Arca mounting base. QD orange handles added after this picture.

This plate of steel is heavy and stays put. The feet are adjustable and the SAC Final scope Level section pops off via the Arca and the QD handles so it can be used on a tripod as well.

I started trying to use the Starrett but went to a Stablia. I still need to round the edges on the steel and give it a paint job.
 

Attachments

  • IMG_0535.jpeg
    IMG_0535.jpeg
    588 KB · Views: 43
  • IMG_0591.jpeg
    IMG_0591.jpeg
    534.6 KB · Views: 40
  • IMG_6432.jpeg
    IMG_6432.jpeg
    300.5 KB · Views: 41
  • IMG_0582.jpeg
    IMG_0582.jpeg
    468.5 KB · Views: 41
  • Like
Reactions: rcxrc
After seeing this thread I had to check out the jig I made several years back. Pretty damn close…
Tried getting it perfect by shimming it with a piece of .002” tape and that was a bit too much.

Made up another device using a “bullseye” level. Went through a handful of them before I found an accurate one.

Ubqnez.jpg

GOPrd7.jpg

8mrIxV.jpg
Real life picture of a unicorn. :cool: LOL. Very nice!
 
  • Like
Reactions: rcxrc and hangunnr
Now spin the Stablia 180° to verify it reads the same……

Sweet looking rig. You should go into production on those.

What is the gray base material?

The base is made from a piece of Corian (sp?) countertop.

I have made one other as a gift to a buddy, wouldn’t feel right selling them as I clearly copied Badgers design.
 
  • Like
Reactions: rcxrc and Holliday
The base is made from a piece of Corian (sp?) countertop.


I suspected that was what it was. I was a cabinet maker when that became popular.

I chose heavy steel because I wanted to be able to place it on the concrete bench at the range and have it rock solid. Especially with our Wyoming wind.
 
I suspected that was what it was. I was a cabinet maker when that became popular.

I chose heavy steel because I wanted to be able to place it on the concrete bench at the range and have it rock solid. Especially with our Wyoming wind.
I was about to say that being heavy makes it suitable for doing scope tracking tests as well as leveling a scope.

The Target USA ones are very nice....and very expensive.

Cheers
 
I was about to say that being heavy makes it suitable for doing scope tracking tests as well as leveling a scope.

The Target USA ones are very nice....and very expensive.

Cheers
Well my turned out to be pretty damn expensive. A lot more than the Badger. But that’s what always happens when I make things. 😎
 
Personally sold on everything Stabila.
I was a carpenter/ builder for 25 years of my younger life. When Stablia came on the scene they were the gold standard.

I have the small 2” one, a 30” (if memory serves) and a 72” (again from memory). Had the two larger ones 30 years now and they still look work like new.

The 72” I bought for hanging/tweaking doors. What a dream to use. Had an old masons mahogany 4’ that I never replaced it has one vial marked as being off. Even though it served me well, I regret not replacing that with a Stablia too.
 
  • Like
Reactions: rcxrc and Edsel
Well my turned out to be pretty damn expensive. A lot more than the Badger. But that’s what always happens when I make things. 😎
Ah yeah...more than Badger but the Badger isn't really hefty enough for scope tracking, IMO.

And your fixture....it wasn't more than this, right? haha They are really nice fixtures and I'm glad my good friend bought one so I get to borrow it for scope tracking tests. 😜 :ROFLMAO:


1736043916819.png
 
Ah yeah...more than Badger but the Badger isn't really hefty enough for scope tracking, IMO.

And your fixture....it wasn't more than this, right? haha They are really nice fixtures and I'm glad my good friend bought one so I get to borrow it for scope tracking tests. 😜 :ROFLMAO:


View attachment 8583805
That’s nice! Actually I believe it was more….. Those SAC parts are pricey.
 
  • Wow
Reactions: Baron23
So I have a thought here and I have done it this way and it might be better/easier/more accurate if I am following what you are trying to accomplish. You are trying to level/square the scope to the rail, correct ?

I have used a surface plate with a machinist square and lined up the vertical cross hair to the square, same thing I believe and a lot less error possibilities, no ?

You are trying to level the jig and then use a plumb bob to line up the cross hair, why not eliminate the leveling error ?
Now to be fair I do run CNC grinders and make linear motion bearing blocks to within 7 microns so I might have better materials, resources to accomplish this.
I can surface the plate mount the rail and surface the rail to the plate within 4 microns easily.
 
  • Like
Reactions: rcxrc
So I have a thought here and I have done it this way and it might be better/easier/more accurate if I am following what you are trying to accomplish. You are trying to level/square the scope to the rail, correct ?

I have used a surface plate with a machinist square and lined up the vertical cross hair to the square, same thing I believe and a lot less error possibilities, no ?

You are trying to level the jig and then use a plumb bob to line up the cross hair, why not eliminate the leveling error ?
Now to be fair I do run CNC grinders and make linear motion bearing blocks to within 7 microns so I might have better materials, resources to accomplish this.
I can surface the plate mount the rail and surface the rail to the plate within 4 microns easily.
Ok sending you my steel plate 🤠
 
  • Haha
Reactions: Baron23
So I am thinking correct ? as to what you are trying to accomplish ?
The subject is indeed leveling a scope to the rifle (or really the scope rail).

The USA Targets fixture I posted above can be used for that but it’s prob overkill. But to do scope tracking tests you really need a fixture that can be leveled and is heavy enough to not budge as you rotate the turrets. And that sucker is heavy.

The one my buddy has “Snipers Hide” on it and was an early model. He says he paid a lot less than the $400 they now want.

But, it’s really the sort of item that can be easily shared by a group of shooters, or a gun club, as it’s not something that’s used all that often.

Cheers.
 
  • Like
Reactions: ironpony52