Been awhile since I posted so what the hell. Folks get a kick out of watching actions being chewed on right?
Step one: tear down.
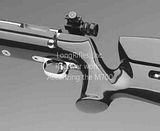
Pulling the old barrel off. Nothing too exciting. Just clamp the snot out of it and grunt that bugger off the receiver. Then strip the action to its base component, the receiver.


Setup. Here we clock the receiver, set the initial work height offset, and eventually indicate the action to the spindle bore axis.
clocking/height offset: The screw and gauge block just puts the action at the approximate height. Typically within .02" This is a very "flexible" location as the machine can easily adapt to wherever Remington felt like drilling a hole that day.

Having the screw against the jaw puts the action "pretty close" to the raceway being parallel to the "X" axis of the machine. We'll tune that up a bit here in a moment.
As the indicator shows "pretty close" isn't near close enough. Were out about .02" across the length of the setup gauge I made. Basically this thing is nothing more than two mill vise parallels soldered together at a right angle. I attached a magazine box spring with solder to apply pressure to ensure the vertical piece lays up against the receiver raceway. The objective here is to have the action clocked for positioning of the recoil lug and for customers running multiple action/barrel combinations. I've been able to ensure repeatability from barrel swap to barrel swap by having the thread clocking position (start position) in the same spot on the receiver.


Now were parallel to the X axis and the real fun can start; getting the receiver "straight up" with the spindle.
Mandrels. Lots of mandrels. . . These are hardened/ground units I made. they are in .001 increments as Remmy's tend to vary a bit due to wear and general manufacturing tolerances. It's pretty simple. Find one that just fits and call it good.

From here we can begin to adjust the fixture to manipulate the alignment. The four jack screws have large pads fitted into the base plate. The pads elevate the table and adjust to center the action. Just picture a 4 legged bar stool with adjustable feet. Basically the same principle.

Step one: tear down.
Pulling the old barrel off. Nothing too exciting. Just clamp the snot out of it and grunt that bugger off the receiver. Then strip the action to its base component, the receiver.
Setup. Here we clock the receiver, set the initial work height offset, and eventually indicate the action to the spindle bore axis.
clocking/height offset: The screw and gauge block just puts the action at the approximate height. Typically within .02" This is a very "flexible" location as the machine can easily adapt to wherever Remington felt like drilling a hole that day.
Having the screw against the jaw puts the action "pretty close" to the raceway being parallel to the "X" axis of the machine. We'll tune that up a bit here in a moment.
As the indicator shows "pretty close" isn't near close enough. Were out about .02" across the length of the setup gauge I made. Basically this thing is nothing more than two mill vise parallels soldered together at a right angle. I attached a magazine box spring with solder to apply pressure to ensure the vertical piece lays up against the receiver raceway. The objective here is to have the action clocked for positioning of the recoil lug and for customers running multiple action/barrel combinations. I've been able to ensure repeatability from barrel swap to barrel swap by having the thread clocking position (start position) in the same spot on the receiver.
Now were parallel to the X axis and the real fun can start; getting the receiver "straight up" with the spindle.
Mandrels. Lots of mandrels. . . These are hardened/ground units I made. they are in .001 increments as Remmy's tend to vary a bit due to wear and general manufacturing tolerances. It's pretty simple. Find one that just fits and call it good.
From here we can begin to adjust the fixture to manipulate the alignment. The four jack screws have large pads fitted into the base plate. The pads elevate the table and adjust to center the action. Just picture a 4 legged bar stool with adjustable feet. Basically the same principle.