• Get 30% off the first 3 months with code HIDE30

    Offer valid until 9/23! If you have an annual subscription on Sniper's Hide, subscribe below and you'll be refunded the difference.

    Subscribe
  • Having trouble using the site?

    Contact support

CR-Mod 0 Build thread

LRI

Lance Criminal
Full Member
Minuteman
  • Mar 14, 2010
    6,316
    7,479
    52
    Sturgis, S. Dakota
    www.longriflesinc.com
    Our latest efforts this week. Gent in Finland ordered one of these up and his import license is only good for so long.

    Time to kick it into high gear!

    Little variation on this one as were cooking it up with a Deviant Action and in a 243 Winchester. Apparently the foxes in Norway are quite vicious... :)


    Here's the stock laid up along with the action being measured up for barreling. More to come as this progressess along. Were going to attempt an almost "real time" build thread with this one just to better illustrate the process.

    DSC_0015.jpg


    DSC_0017.jpg


    DSC_0016.jpg
     
    As the inletting program is running I'll go ahead and prep the pillars. Our pillars are SS and made in house via 4x cnc mill.

    Little different in design from most. Off the machine they have a few burrs and nicks to take care of. First step is to finish ream the hole to 5/16". Then a quick run over a Kratex wheel to clean all the edges. Now they're ready for final lapping and fitting to the stock. Soon as the inletting is done I'll do a quick prefit, bondo up any big holes in the stock filler, rerun the inlet program one more time, and were off to the bedding table.

    DSC_0031.jpg


    DSC_0030.jpg


    DSC_0029.jpg


    DSC_0032.jpg
     
    Barrel channel is about done. .035" stepover on a revolved surface. Perfect mirror image of the channel enlarged for clearance so that the barrel fully free floats in the stock.

    2.5 hours and were about ready to bed. Right on track! Nice when stuff works.

    DSC_0033.jpg
     
    Barrel channel is all wrapped up. A few small pin holes here and there. So, just whip up some filler, patch the little holes, and run same program right over it. EASY.

    I like easy.

    DSC_0034.jpg


    Clearly shown is the tool running the same path. Not removing anymore stock, only machining away the residual filler, leaving little blue dots all over the barrel channel.
    DSC_0035.jpg
     
    Out of the mill and onto the bedding table. Stock's been masked up and were walking through the trial fit prior to masking up the action with sculptor's clay. I used to use Klean Clay exclusively but unfortunately that company died. I had to go all the way to France (blech!) to find a product similar. It's pretty good stuff and the big quantity of it that I bought a few years ago has lasted well.

    This particular Deviant action has the "mower" tang (I call it that cause it reminds me of a single sickle blade used to cut alfalfa for hay bails. As a standard practice we always knock the paint off and go back down to the substrate. This way any body work we end up doing is adhered directly to the stock and not a layer of paint. Long term adhesion of materials being the thought process behind it.

    Little more fussing and we'll be onto bedding this bugger up.

    DSC_0039.jpg


    DSC_0040.jpg


    DSC_0038.jpg


    DSC_0042.jpg
     
    Tuesday, 7:56 am:

    Back at it. Bedding is fully cured and were onto tearing the B/A out of the stock.

    DSC_0044.jpg


    First tool is my little chisel. Seems rather risky to use such a tool on an action, but I've dulled the edge so that it won't tear up the underlying parts. Little taps chip away the edges so that nothing tears out once we pop it loose.

    DSC_0051.jpg


    Next, back off the nuts on the bedding studs. Last year my Matco rep had a killer deal on these wrenches and I'm a tool whore. He's like my drug dealer....

    DSC_0047.jpg


    DSC_0048.jpg


    A wore out Dewalt drill makes quick work of pulling the studs from the pillar bores. The pillars, as mentioned earlier, are bored/reamed to 5/16". Using a .250" stud allows a layer of masking tape between the stud and pillar to make tear down much easier.

    DSC_0049.jpg


    DSC_0050.jpg


    Once were done here, its a matter of picking some of the clay back to ensure nothing creeped into the receiver. Assuming it all looks good, were onto pulling the B/A.
     
    Little help from the Bedding Jack and were rewarded with a nice casting of the action. Now for cleanup!

    DSC_0052.jpg


    DSC_0053.jpg


    Once the clay gets dug out were onto decking the stock to knock down the edges. A big ol belt sander makes quick work of this. (takes a little practice though, real easy to knock it down too far and make a mess of the stock)

    DSC_0054.jpg


    DSC_0055.jpg


    DSC_0056.jpg


    Now it's time to wash everything up and move it back into the mill for the 2ndary inletting portion of this fiasco. :)

    Back soon!
     
    Happy to see you 've got European customers!
    i'll contact you early next year for my new hunting rifle,we have a lot of foxes i need to take care of!
    i follow all your building threads and love their results!
     
    Thanks! Always happy to help out folks across the pond!


    Lyn has the Haas tied up with another inlet so I jumped on the bolt handle. I'm slowly switching this process to an automated one, just have not taken the time to program a Defiance action just yet. So, I knocked this out by hand.

    Tools:

    Dremel fitted with a 1/8" carbide rotary file/burr
    Tube of Prussian Blue Hi Spot paste
    Little paint brush
    Pencil
    Square cross cut rasp 1/4 and 3/8
    Coffee
    "Tool" blaring out of the office at high volume.


    And so we get on with it:

    This process is slow. Geological slow. You stain, you mark, you grind, you repeat. (several hundred times)

    Then you clean it up with the files/rasps, fill pin holes, and repeat. When your done the handle should fall into battery with no stock contact. I like to verify the clocking by looking at the lugs. 6 to 12 is what were after.

    In the end the idea is a form fitted inlet with just enough room for the handle once its coated and the stock is painted. Handles need to float in this inlet. They should not touch. If it does, fliers and off call shots can result.


    DSC_0059.jpg


    DSC_0057.jpg


    DSC_0061.jpg


    DSC_0060.jpg


    DSC_0064.jpg


    DSC_0065.jpg
     
    Last edited:
    I wrapped up the handle prior to the other stock being finished, so were going to bang out the forward rail mount on another machine. Years ago (like 10 years ago) we used to do this at Nesika while inletting the barrel channel however we later changed it up because of alignment issues. When machining the top side features, were using the show line edge of the stock to qualify everything. Stocks often have taper built into the forend. This would cause rails to align poorly with the threaded inserts. So, no we flip them over and level off of the bottom surface. Makes the installation/assembly much easier and were not binding anything up.

    I make these brass inserts here. Fastenal charges a ridiculous amount of money for the same thing. Having material on hand to run them in batches of 100 is much easier. Plus I get exactly what I want. The ones they sell don't bite the stock the way I like. The stamped "T nuts" aren't products that I've ever cared for. Not saying there's anything wrong with them, but it just seems kinda poor to me to build a rifle of this level with stamped out hardware store parts. I prolly sound like a pompus jerk for that statement.

    We all have our quirks I guess. :)

    DSC_0067.jpg


    DSC_0068.jpg


    DSC_0071.jpg
     
    Accy rail complete, onto the 2ndary inlets:


    First order is getting the stock aligned back up in the fixture. I made this simple device for this purpose. It registers off the reamed pillar bores. Dance an indicator down the side of it and adjust the fixture till it reads zero. From here its a snap to sweep each screw hole to spot the head of the pillar with a 3/8" carb EM.

    This CB feature is something I really like. It puts a safety margin between the bedding and the screw so that nothing is ever chipped or eroded away on this delicate edge. Once done here, we move onto the trigger inlet. Just move a pointer (wiggler) to where "X zero" is for the trigger program and press the big green "GO" button. A well rehearsed program takes care of it from there.


    DSC_0072.jpg


    DSC_0074.jpg


    DSC_0080.jpg


    DSC_0079.jpg


    DSC_0082.jpg


    DSC_0084.jpg
     
    Onto prolly one of my most favorite things to do:


    Cleaning up the barrel channel. A gaping pile of resin lumped in front of the recoil lug is often a byproduct of bedding an action into a stock. Its something I've never cared for as I feel a well built rifle is as nice "under the hood" as it is on the outside. This little pursuit rewarded me with this:

    DSC_0093.jpg


    DSC_0091.jpg


    A surfaced cleanup of the bedding forward of the lug. One that matches the already machined barrel channel perfectly. Crisp lines and a seamless transition. I've devoted a bit of time to this. The programming is pretty simple. The tool paths however need to be adjusted slightly as your entering into very dissimilar materials. Bedding is delicate along the edge of the showline. If you go blazing away you'll likely tear a good chunk out of it. So, I crawl through that part and progressively speed up the program till were running over 100ipm, then slow it back down again once were close to the other side. Works really well and this is what were left with:

    DSC_0095.jpg


    As you can see were right where we were started prior to bedding. The original channel inlet (seen by the tool marks) are still preserved. It's a seamless transition.

    This concludes the top side inlets with this fixture. Onto Phase III for the day.

    More to come...
     
    With the stock fixture removed, we setup for the ejection port inlet. I do this with a 4th axis fixture that I made. The compound angles on some receivers make it tough to match the angles exactly. For years I stubbornly attempted to match it with surfacing, the problem was knowing exactly where the action was going to sit. Vices squeeze the sides of the stock and cause it to ride higher than when installed. So, it was always guesswork and lots of rework.

    This fixture eliminates all of this and does another valuable task. By rotating the stock I can use the side of the tool and generate some surface speed. -Something rather valuable with composite materials. The shearing action promotes much cleaner machining in materials like carbon fiber and fiberglass.

    I can also duplicate the corner radius features on the receiver's ejection port. This is something I should have done a decade ago. . .


    Onto the floor metal inlet, then were ready to start prepping for paint!


    DSC_0096.jpg


    DSC_0098.jpg


    DSC_0097.jpg


    DSC_0099.jpg


    DSC_0100.jpg


    DSC_0101.jpg
     
    Floor metal: We had some walk in traffic this afternoon that pulled me off the machine. Managed to snap some pics, but I blazed through the inlet just to get us back on schedule.

    Here's the setup/execution:

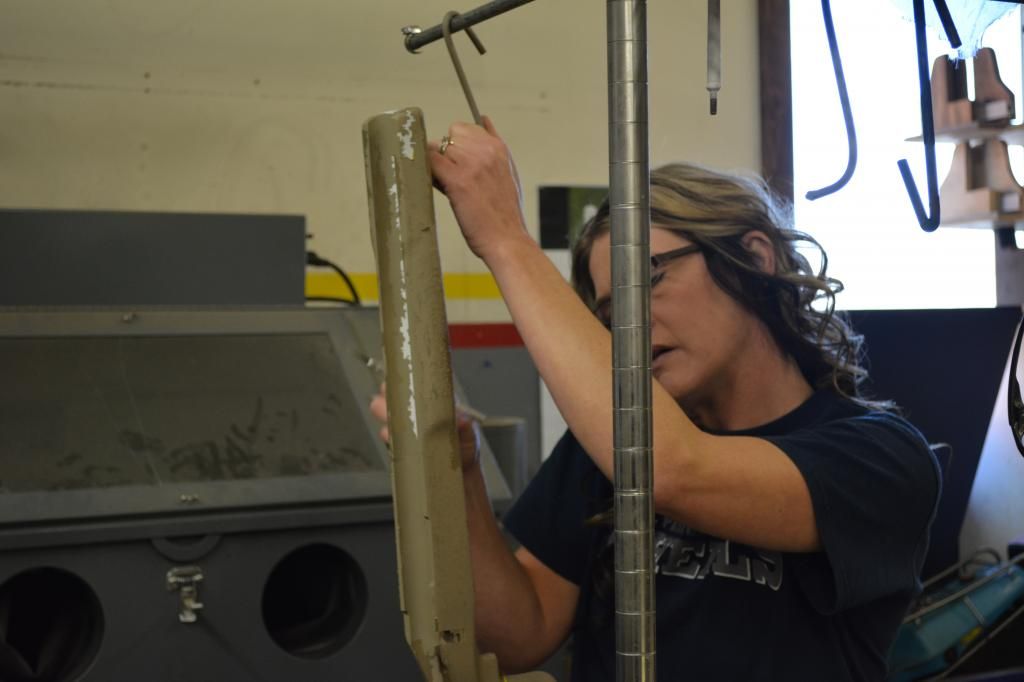
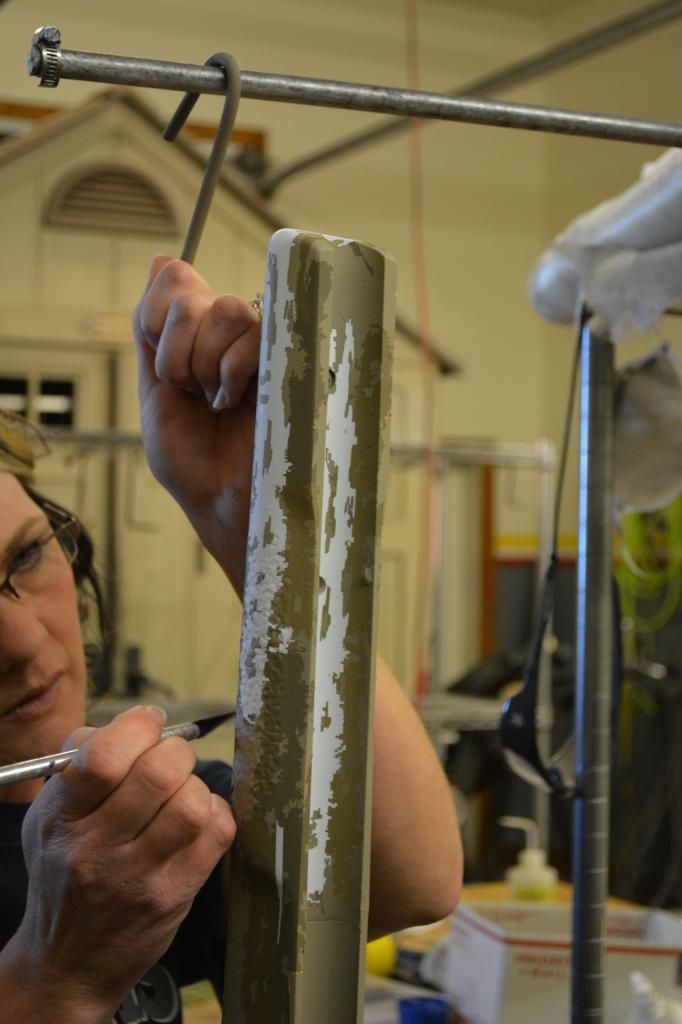
    First: Finishing up the bolt release. Simpler just to bang this out in the manual. Little dental mirror action makes alignment/depth easy:

    DSC_0103.jpg


    Onto the floor metal:

    Gotta start off by plugging this little guy. This is a battery powered 1/4" drive impact from Matco and it ROCKS! You can feather the trigger to use it like a drill, or you can go full boogie and snug some shit down. It's got enough torque to keep things in place without destroying threads and fasteners. For fixture setup I rarely reach for an allen wrench anymore. As the mileage builds (I turned 43 Sunday) I'm discovering that my hands aren't as nimble as they used to be. Uncle Arther is starting to appear and this little tool has been a god send over the last year.

    DSC_0107.jpg


    Well worth picking one up as it's bad ass (when used thoughtfully) in a machine shop.

    DSC_0108.jpg


    DSC_0111.jpg


    DSC_0110.jpg


    DSC_0112.jpg


    Basic setup. The alignment pins get us close to registered with the fixture. Years ago I'd spend a bunch of time tapping away to get the stock straight with the machine. Now I put software to work. You sweep both holes and notate the difference in Y axis position. Draw that point in space and a few lines. BOOM. You have an angular change you can reference to. Now you just rotate your entire CAD model to suit and regenerate the tool paths.

    It's a 10 minute solution. Whats nice is its repeatable. If I have a new floormetal that I don't have notes on, I can pull the stock and check the feeding. Then toss it back in and the numbers repeat so there's no double tracking on the inlet.

    Makes this a much simpler task now.

    For truly flat bottomed inlets like P64 Winchesters I can rotate the fixture to act like a Sine Plate. This makes it easier to fit those types of trigger guards because there's no need to comp for corner swarf with tools. On M700 Style floormetals with multiple angles I still surface machine the inlets. I've started revising those programs so that the radius feature in the back of the mag box (where it transitions down to the guard bow) is also mirrored into the stock. This preserves as much of the stock as possible and adds a neat appearing touch. -Again trying to keep "under the hood" nice like the outside.

    DSC_0115.jpg


    DSC_0116.jpg


    So, floor metal is installed, now its onto a trial assy to fit the jewel trigger safety linkage to the trigger guard, double check the feeding, and a quick trial assembly and test fire.

    Then were squirtin paint!
     
    Last edited:
    As Lyn and I are wrapping up the stock work, Don's been getting his arse kicked with metric thread program writing. :)

    So, Jumping onto the lathe for a second I banged out a tennon program as the client emailed a print of the European can manufacturer he plans to use. M18 x 1 x 16. The shop bought ring and plug gauges for this pitch last year so were in good shape. No Pee Dee wires this time (YAY! as I often drop the damn things in the chip bed and waste an hour searching for them...)

    DSC_0113.jpg


    As he's running that, Lyn has the guard screws fitted, the trigger bow clearanced, and the trial assy knocked out. Were in good shape. Soon as the barrel comes out of the lathe, were going to flute it.

    DSC_0118.jpg


    Then one more quick assy and its time to wrap this bugger up.

    DSC_0117.jpg


    DSC_0114.jpg


    Going to press hard to have this ready to ship by tomorrow afternoon.

    C.
     
    Last edited:
    Last year my Matco rep had a killer deal on these wrenches and I'm a tool whore. He's like my drug dealer....

    DSC_0047.jpg

    I hear ya about the tools. If you like those I think you would appreciate these. They are a little pricy but after using them for a few years they are worth every penny!

    Matco Tools - 10 PIECE METRIC FLEX RATCHETING WRENCH SET customer reviews - product reviews - read top consumer ratings

    Great thread (as usual) I enjoy seeing the process of building a rifle, but more so how you are always trying to become more efficient and proficient at what you do. Well done.
     
    Update. Were onto the final stages now. Barreled action is coated and in final assembly. Stock has one color remaining to apply.


    We'll have this wrapped up today around lunch time. So far were looking good. Yesterday was a wash as we had quite a few walk ins. It's always a dance between production and customer service. There's times you just want to start locking doors and yanking phone cords out of the wall. -BUT that's suicidal so you roll with it.

    DSC_0124.jpg


    DSC_0123.jpg


    DSC_0122.jpg


    DSC_0121.jpg


    DSC_0119.jpg


    I took a moment to whip up a little engraving for this one. Just to try it out. I like it. Not so "glaring" as some of the others we've done. I think from here out this is what we'll stick with.