• Get 30% off the first 3 months with code HIDE30

    Offer valid until 9/23! If you have an annual subscription on Sniper's Hide, subscribe below and you'll be refunded the difference.

    Subscribe
  • Having trouble using the site?

    Contact support

CZ 455 pillar bedding questions

brake17

Private
Minuteman
Jul 9, 2018
20
0
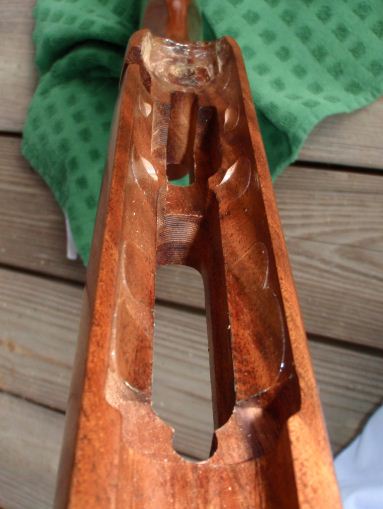
So I decided to pillar bed my CZ 455 Varmint with Thumbhole stock to improve accuracy as much as possible. I wanna use devcon steel for gluing in the pillars and "glas" bedding the action. I found the action can move 2-3mm front to rear. Rifle is in .17 HMR and im getting like 1 MOA groups which is not acceptable for me. So I'm not quite sure what to use for the pillars yet. First option is lamprod M10 thread or aluminium tubing with 1mm wall thinkness. So the problem is the action screw holes are like half open as you can see in the picture. I'm affraid I may ruin the stock because I don't got a drillpress that drills really straigt holes. Will the 1mm aluminium tubing be sturdy enought to withstand the force from tightening the action screws? That way I could just use some sand paper to open up the hole in the stock because the outer diameter of the tube ist just 8mm and the action screw hole is 7mm. Any help would be apreciated. Thanks guys!


Attachments

  • 20180713_204829_cleaned.jpg
    20180713_204829_cleaned.jpg
    104.4 KB · Views: 275
Thanks! But there is no way to get them to europe. But I know someone that could make some for me on a lathe if really needed. As already said I'm affraid to drill such a big hole in the stock
 
Was also thinking about using a forstner bit if I really have to drill. If I use a normal metal drill it might help center itself a little but it wanders out of the hole I think.
 
33/64” piloted counterbore, make sure the spacing is correct, and drill it. Be sure to face the pillars off at the proper angle as the guard inletting to prevent aftermarket guards that are solid from bowing. Do it right or don’t do it at all!
 
  • Like
Reactions: Dolomite
33/64” piloted counterbore, make sure the spacing is correct, and drill it. Be sure to face the pillars off at the proper angle as the guard inletting to prevent aftermarket guards that are solid from bowing. Do it right or don’t do it at all!
I won't use a aftermarket guard so does it really matter? I would just make it flush with the wood. Getting such a counterbore in that size will not be easy here. Maybe a forstner bit and some lamprod will also do? I might can also get steel tubing in the same dimentions as the aluminium tubing. The guy in that thread linked below used steel tubing with even less was thickness however this seems really thin.

@want2learn

I saw this post but I need to enlarge the holes anyways the tube he is using is almost 8mm outer diameter the holes only got 7mm.
 
It should but its way more sensitive from the sides than steel. I really see no point in using carbon tubing. Weight savings also don't matter. Steel or aluminium is also more shock resistent I think. But still interesting idea.
 
Was also thinking about using a forstner bit if I really have to drill. If I use a normal metal drill it might help center itself a little but it wanders out of the hole I think.

If you have a drill index and a drill with a good chuck, you can drill out the stock holes 1/16" at a time until you reach the proper diameter. Support the stock well, drill from the bottom, use slow rpm's. Each time you move up in bit size, slowly run the drill in reverse for a few turns. This will bevel the hole a bit and help prevent material tear out. Go slow and let the bit self center, very mild down pressure. On the final pass, increase rpm's and make a couple of passes, this will clean up the hole.

Sharp clean bits are a given.
 
Any good quality set of bits with a 118 degree cutting angle should work. I'd suggest you not use the drillstand, the bit will self center if you go slow and let it follow it's own path. Some practice on scrap would give the feel of it.

In regards to your drill. it's the chuck that's important. Chuck up a bit and spin it at different speeds watching the tip of the bit. If it wobbles at all, stop. Buy, beg or borrow better equipment. If you stay with the DIY path, a good drill and bits will be used a lot. Good equipment pays for itself many times over rather then junk that just gets one in trouble.
 
Last edited:
Good point. You can:
1). Front hole, try slowly spinning bits by hand
2). Use a round wood rasp on both front and rear, go slow and check size often
3). Take your chances with gear on hand
4). Take to somebody who is properly set up with a mill and knows how to use it.

I've done all of the above with varying degrees of success. Finally bought a good heavy duty drill press, life got better.

I'm out of ideas, maybe someone else has more thoughts on the matter.
 
It ain't hard to accomplish.
I used 1/4 inch inside diameter brass nipple.
Belt sander and file to size nipple to length needed.
Opened up the screw hole using 100 grit sandpaper wrapped around a small steel rod.
2 part 5 minute heavy duty epoxy to set.
I've done it 3 times, easier each time.

6inchnipple.jpg


uRPUdD49ZuFqiUA_JeEFzl3T0c9YJ8mRocp5QKLvsrqTT3fcN1T5IVZFHrqueFHtlmrG-YfIXuV_cFuxJA=w146-h220


-lMaCQIodI-O7N0xZYGgSmDE1NQ62GGCkQ9TorXbiEboAhgnLCWaXgC13m4zp79ClhFEB3u1cBDxP1T4Nw=w303-h220


g2mwVJcxpV0rR3RvdC3o8WdRrnY0w-kiJAR3kir8U4WSeeW9lzd4mmAJgcRLdS0FE3EOydvR1CtjBaMdwA=w242-h220


fe_OFITOifVwM2rxfWtoYzyB3u5kIbDSklxYTmMA7qRk4VTV_JpLdeXKzkjDS2cStsembKI5zhLc8YQp9Q=w430-h220


Take your time, check fit constantly until satisfied.
 
Last edited:
  • Like
Reactions: Nodakplowboy
That looks really good. And I think sanding the hole bigger is the safest way. What outer diameter are those brass things? I also orderd some lamprod. Maybe I can get some steelpipe also so I don't need to enlarge the holes as much. I also orderd something similar to devcon a that I can get in europe...
 
Need to see if I can get something like this at the local hardware store. Do you attach the pillars to the action first I guess? I wanna pillar and glas bed it in one step.
 
I epoxy dot shimmed the action before doing the pillar job.
That let me establish the position of the barrel in the channel
and the final location of the receiver before doing the pillar work.
After pillaring did final bedding of receiver, dot shims peeled out.

This was the 455 American...dot shims are visible

tgUdCmrGi3VxVM91Co5IyNh8cK0HBWNIC2V146NjeZuTx-141aiR5FbDi5mmCrskgdVMgI_mYknVk7yqwg=w587-h220
 
Epoxy dot shims are a fast and easy way to stabilize a receiver.
5 minute epoxy applied at the exact point of support wanted.

DOT1.jpg


With the barrel tape wrapped thick enough to center in the channel
just before the epoxy sets the waxed receiver is set in place and the action screws tightened to 10 inch-lbs.

SHIM1.jpg


The dot of epoxy flattens and exactly fills the void making a perfect fit shim.
The dot shims can be done one at a time or several at once.
By waiting for the epoxy to start to gel, there is no drippy mess to deal with.

With the receiver tightly fitted to the inletting by the dot shims, it's easier to create and install the pillars.
Add a couple dots at the rear corners of the tang and the receiver won't shift position each time you remove and install.

corner-shelf.JPG


This is a 455 American with the open inletting before pillaring.
Dot shims along both sides of the inletting ensure an exact fit before fabricating the pillars.
Dot shims alone do improve accuracy on the 455 stocks due to the slop created at the factory.

side-shims.JPG
 
Last edited:
Actually, as long as you don't sand the finish of the barrel channel or inletting
the epoxy shims peel right out using a sharp edged pry. They look like fake fingernails when removed.
 
Have done it now used just a dremel tool and it worked great. Did turn out better than expectet for the first time I did this. Hope it improved accuracy but I will see.
vpt4nuq-jpg.6927346