

First off (disclaimer) - The DIY / Review is not a paid endorsement or advertisement, nor have I any affiliation with any of the companies of the topic product(s) or any other product(s) shown.
On a recent Rem 700 SA “budget build” I wanted to go with a DBM, and for a limited time PTG was offering their SA DBM stealth model, so it was a no brainer to order one. Being a “budget build” I figured I’d inlet the stock (Choate Tactical) at home. I’m not a gunsmith, and doing it myself added risk to ruining the stock, but proceeded anyway.
Though I’d call the install a success, some afterthoughts had me believe it would have been better to just send the stock off to be inletted for the M5 profile. Time & effort expended plus risk to ruining the stock along with not having a 100% trued machined contact surfaces lead me to that conclusion, though it’ll work, this really shouldn’t be “bubba-ed”.
First off, make sure to have a rotary / dremel style tool (I don’t believe a drill will have the kind of control you will need). Next is a proper bit, after trying and chewing up several in the beginning I tried a bit that looked like a router bit both on the sides and the bottom – should of went that way from the start as it did make short work of the aluminum bedding block.
Make sure to wear safety glasses, there is plenty of debris.
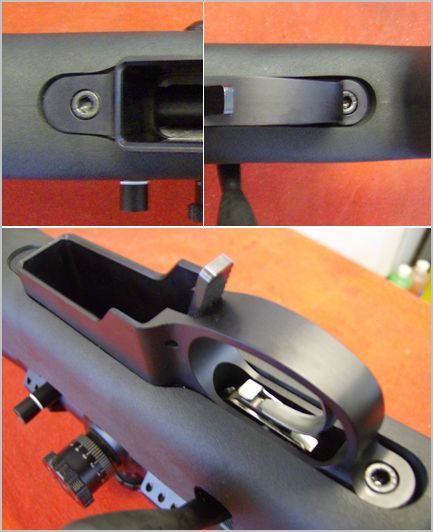
Picture B4 modifications:
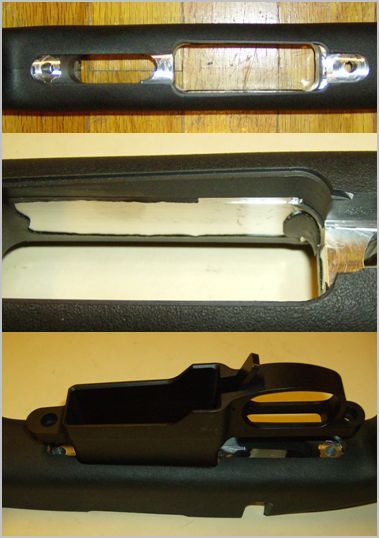
Next is to take your DBM and test fit. Take a good hard look of where you need to shave off either the synthetic material or aluminum in the stock. Do this several times; you will need to trim out the corners of where the traditional floorplate lays on the ledge of the surrounding inlay, along with opening the channel lengthwise at least a good ¼ inch toward the front action screw hole, all the way to where the “meat” of where the taper of the floor plate body starts. The rear of the mag well needs to be trimmed out too, but not nearly as much as the front. I traced the outside of the PTG DBM with a pencil onto the stock to give me an idea of how much to trim out, while using the old action screws and a Phillips screw driver to keep the DBM action screw holes aligned with the stock mounting holes.
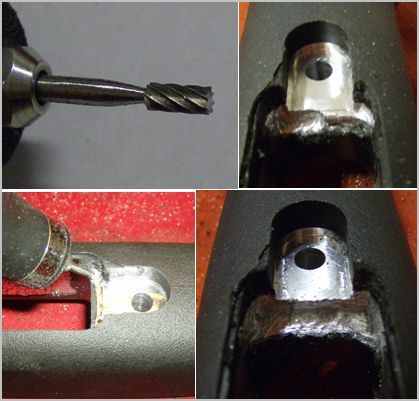
At first I treaded lightly, leaving a lip toward the top of the bedding block so as not to go too far up into the action. I later realized toward the end of the install that the back of the action and the feed ramp prevent the Stealth from going too far. However, to get to where it “bumps up” against those points, you will have to shave off material around the action screw holes too. If you take out too much material off the bottom of the mounting hole’s “mating surfaces” you’ll have a gap between the DBM and bedding block creating a less than optimal result.
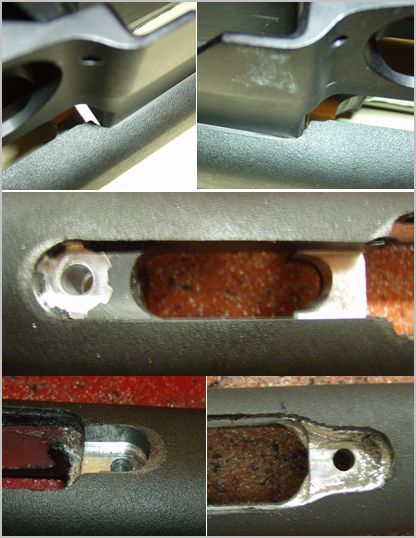
Jumping ahead in the install – The above is especially important toward the rear of the stock. As the Stealth has a little bit of pitch to it from the rear mounting bolt to the front of the trigger guard, this took some trial and error fitting - and shaving off little by little, each time trying to keep the mounting surfaces as level as I could. At the end of the install I actually had a gap of which I had to shim, and will add some bedding material then torque down while still not cured to self level as much as it could to give a more flat surface.
Getting back to earlier in the install - as I trimmed, I made sure to fit several times as I went along. There was a lot of synthetic material that had to be removed into the trigger guard area and the pitch of where it goes into the well. If you trim a little in one spot, it fits differently in another – trim a little, fit, trim a little, fit. The trigger guard inletted area of the stock has to be lengthend, widened, and made deeper with a pitch to macth the angle of the trigger guard; pay extra attention in this area. The sides of the bedding block - along where the synthetic material is overlayed - needed to be opened up, but just slightly. As this is a thin point of the block, I used a sand paper bit and only removed a little at a time for fit.

Use the front of the Stealth where it mates with the action screw mounting hole and how the DBM fits around the floor plate ledge. This will give some idea of how much material you still have to remove.
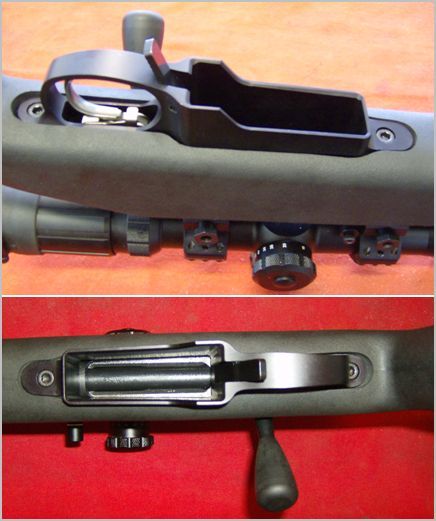
As I got closer to it fitting fully, I wanted to make sure there were no feeding issues so I mounted the action, with a dummy round in the magazine, and cycled the bolt. Everything worked fine, this is where I realized the DBM can only go so far before the action stops it from going too far.
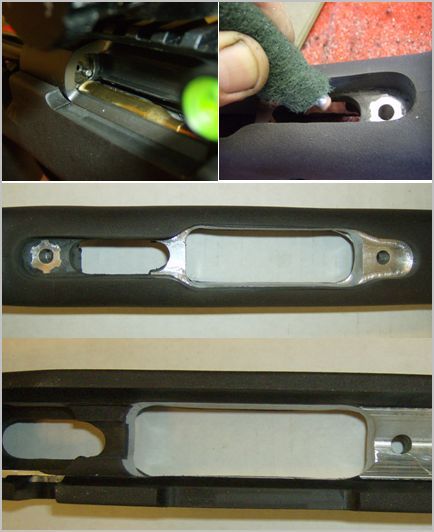
Once satisfied with the fit (and shimming from the “oops” described earlier) I put it all back together, torqueing the action screws provided with the Stealth to check for fit before final finishing of the aluminum and synthetic burrs.
The major aluminum and sythetic burrs inside where sanded smooth with the dremel using a sanding drum, but the edges that are visible around the edge of the stock were removed with a scotch brite pad wraped around a pencil – it seemed to give the best results without creating additional burrs.
Pieced together the rifle looked good IMO and functions flawlessly. With the front of the Alpha 10 round magazine being rounded it butted perfectly against the feed ramp and rounds fed smoothly into the chamber. The magazine lips just barely, if at all kissed the bottom of the bolt.
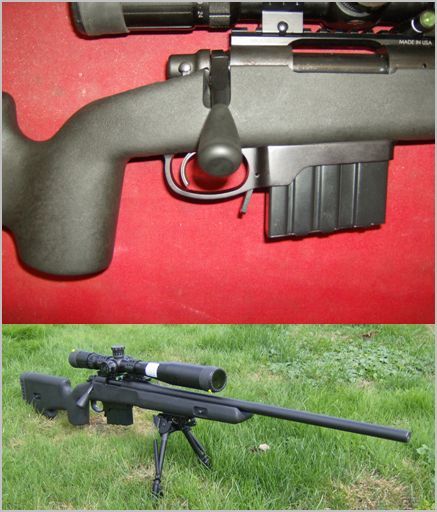
Though it’s not a hard project, it’s rather tedious to complete, and cumulatively took 14 hours, taking my time to the first time around, probably would only take around 8 hours to do it again if elected to do so, which I probably would not. Again, as stated at the beginning, definitely send it off to get done as by hand you can’t ensure that everything mates properly against all surfaces, if only for that reason – it is improbable to get this anywhere near as precise as an experienced smith with the proper tools can get it.
On a recent Rem 700 SA “budget build” I wanted to go with a DBM, and for a limited time PTG was offering their SA DBM stealth model, so it was a no brainer to order one. Being a “budget build” I figured I’d inlet the stock (Choate Tactical) at home. I’m not a gunsmith, and doing it myself added risk to ruining the stock, but proceeded anyway.
Though I’d call the install a success, some afterthoughts had me believe it would have been better to just send the stock off to be inletted for the M5 profile. Time & effort expended plus risk to ruining the stock along with not having a 100% trued machined contact surfaces lead me to that conclusion, though it’ll work, this really shouldn’t be “bubba-ed”.
First off, make sure to have a rotary / dremel style tool (I don’t believe a drill will have the kind of control you will need). Next is a proper bit, after trying and chewing up several in the beginning I tried a bit that looked like a router bit both on the sides and the bottom – should of went that way from the start as it did make short work of the aluminum bedding block.
Make sure to wear safety glasses, there is plenty of debris.
Picture B4 modifications:

Next is to take your DBM and test fit. Take a good hard look of where you need to shave off either the synthetic material or aluminum in the stock. Do this several times; you will need to trim out the corners of where the traditional floorplate lays on the ledge of the surrounding inlay, along with opening the channel lengthwise at least a good ¼ inch toward the front action screw hole, all the way to where the “meat” of where the taper of the floor plate body starts. The rear of the mag well needs to be trimmed out too, but not nearly as much as the front. I traced the outside of the PTG DBM with a pencil onto the stock to give me an idea of how much to trim out, while using the old action screws and a Phillips screw driver to keep the DBM action screw holes aligned with the stock mounting holes.


At first I treaded lightly, leaving a lip toward the top of the bedding block so as not to go too far up into the action. I later realized toward the end of the install that the back of the action and the feed ramp prevent the Stealth from going too far. However, to get to where it “bumps up” against those points, you will have to shave off material around the action screw holes too. If you take out too much material off the bottom of the mounting hole’s “mating surfaces” you’ll have a gap between the DBM and bedding block creating a less than optimal result.
Jumping ahead in the install – The above is especially important toward the rear of the stock. As the Stealth has a little bit of pitch to it from the rear mounting bolt to the front of the trigger guard, this took some trial and error fitting - and shaving off little by little, each time trying to keep the mounting surfaces as level as I could. At the end of the install I actually had a gap of which I had to shim, and will add some bedding material then torque down while still not cured to self level as much as it could to give a more flat surface.
Getting back to earlier in the install - as I trimmed, I made sure to fit several times as I went along. There was a lot of synthetic material that had to be removed into the trigger guard area and the pitch of where it goes into the well. If you trim a little in one spot, it fits differently in another – trim a little, fit, trim a little, fit. The trigger guard inletted area of the stock has to be lengthend, widened, and made deeper with a pitch to macth the angle of the trigger guard; pay extra attention in this area. The sides of the bedding block - along where the synthetic material is overlayed - needed to be opened up, but just slightly. As this is a thin point of the block, I used a sand paper bit and only removed a little at a time for fit.

Use the front of the Stealth where it mates with the action screw mounting hole and how the DBM fits around the floor plate ledge. This will give some idea of how much material you still have to remove.
As I got closer to it fitting fully, I wanted to make sure there were no feeding issues so I mounted the action, with a dummy round in the magazine, and cycled the bolt. Everything worked fine, this is where I realized the DBM can only go so far before the action stops it from going too far.

Once satisfied with the fit (and shimming from the “oops” described earlier) I put it all back together, torqueing the action screws provided with the Stealth to check for fit before final finishing of the aluminum and synthetic burrs.
The major aluminum and sythetic burrs inside where sanded smooth with the dremel using a sanding drum, but the edges that are visible around the edge of the stock were removed with a scotch brite pad wraped around a pencil – it seemed to give the best results without creating additional burrs.

Pieced together the rifle looked good IMO and functions flawlessly. With the front of the Alpha 10 round magazine being rounded it butted perfectly against the feed ramp and rounds fed smoothly into the chamber. The magazine lips just barely, if at all kissed the bottom of the bolt.


Though it’s not a hard project, it’s rather tedious to complete, and cumulatively took 14 hours, taking my time to the first time around, probably would only take around 8 hours to do it again if elected to do so, which I probably would not. Again, as stated at the beginning, definitely send it off to get done as by hand you can’t ensure that everything mates properly against all surfaces, if only for that reason – it is improbable to get this anywhere near as precise as an experienced smith with the proper tools can get it.
Last edited:

