Finally painted the stick

EchoDeltaSierra

Slightly above average
Full Member
Minuteman
Jun 1, 2013
578
351
Minnesota
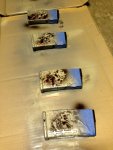
Maybe I went a little overboard, but this is what happens when you ask a couple of teenage kids how to paint a gun; my daughter had some great ideas, like finding the right netting and stencils, plus it was a reason to take dad to the craft store. My goal was to do a distinct breakup pattern for winter in Minnesota. I taped the necessary things, sprayed it with a warm grey base coat, covered it with netting and did a flat tan overspray, then added flat brown using a 8x11 airbrush stencil bought off amazon. The wife was really impressed, which was a pleasant surprise. As the environment changes (e.g. changes from brown to green) and the paint wears, I can just layer on more paint using the mesh and stencil.
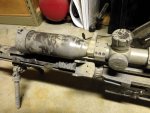
riflepaint1.jpg

riflepaint2.jpg
 
Looks good! I have always been amazed and JEALOUS with people and their artistic ability. AWESOME JOB!

Thanks. It was actually super easy.

1: wipe the rifle down with a solvent. I used an acetone thinner).
2: tape up or remove anything you don't want painted. I kept the taping really simple and just taped the markings on my optic. I also put cotton balls under my scope caps to protect against any possible over spray on the lenses.
3: spray (rattle can) the entire rifle with the base coat, what you want to show through mesh.
4: After about 30 minutes of dry time, lay the mesh over the rifle, it better if is imperfect (higher in some areas than others), then spray second color. I used tan on for this. The second layer is the predominant color.
5: Use a stencil or vegetation and spray the third accent color. This is where I got a little out of control and used an airbrush skull stencil. This was just a simple single swipe over an area on the stencil with the brown.

All in, I spent about two months worrying about 'ruining' my rifle, and then about two hours to tape and paint it. I was shocked how easy this was and will be doing this again.
 
Maybe I went a little overboard, but this is what happens when you ask a couple of teenage kids how to paint a gun; my daughter had some great ideas, like finding the right netting and stencils, plus it was a reason to take dad to the craft store. My goal was to do a distinct breakup pattern for winter in Minnesota. I taped the necessary things, sprayed it with a warm grey base coat, covered it with netting and did a flat tan overspray, then added flat brown using a 8x11 airbrush stencil bought off amazon. The wife was really impressed, which was a pleasant surprise. As the environment changes (e.g. changes from brown to green) and the paint wears, I can just layer on more paint using the mesh and stencil.

View attachment 21548

View attachment 21549

How did you get around the barrel? Did you take it off?

Thanks.
 
How did you get around the barrel? Did you take it off?

Thanks.

I found one of the kids round wooden pencils, wrapped a couple of loops of masking tape around it and stuffed it into the end of the barrel. This was a trick I read / saw somewhere on the interweb and thought it made complete sense. It seemed to work and everything functioned fine today when I took the gun out and shot the 30 round SHOOTOUT.