
OK, maybe not so new, but it worked for me.
NOTE: Arts and crafts DOES pay off in precision shooting.
My wife has a cricut cutter system for arts, crafts, cards, whatever. She also has a stock pile of BRIGHTLY colored paper. I explained my idea to her, and she had some excellent ideas for the target. She used her cricut cutter system to cut me out a bunch of 3 inch circles out of 3 different color papers, plus a metric boat load of smaller circles to use as pasters.
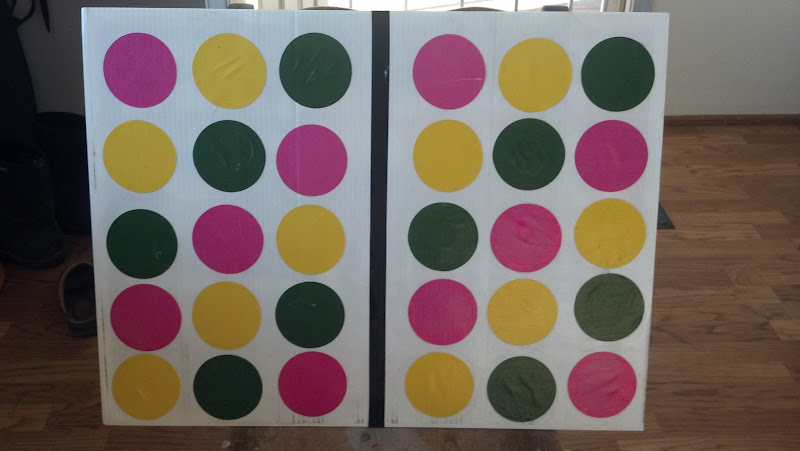
I wanted to put 30 3" circles on a plastic corrugated backer (I have a small supply of political signs at my disposal, but the corrugated plastic board is relatively cheap to buy from a sign guy). I wanted a total of 3 colors, so 5 circles of the 3 colors on EACH side of the target. Each side was separated by a strip of black electrical tape.
My next question was, how do I keep everything on the target board without them all falling off, but still keep a crisp edge for scoring hits/misses.
Gentleman, FINGER PAINTING IS BACK! My wife, in all her arts and crafts supplies, has a product called Mod Podge. It is quite similar to Elmers Glue (the stuff kids kids use in school), but dries clear with a light matte finish. I simply used a cheap foam paint brush to put a light coat of Mod Podge on the backer board, place a circle of cut out paper down, then painted another coat on top of the circle, one at a time.
The final product:
Now, the stage went like this:
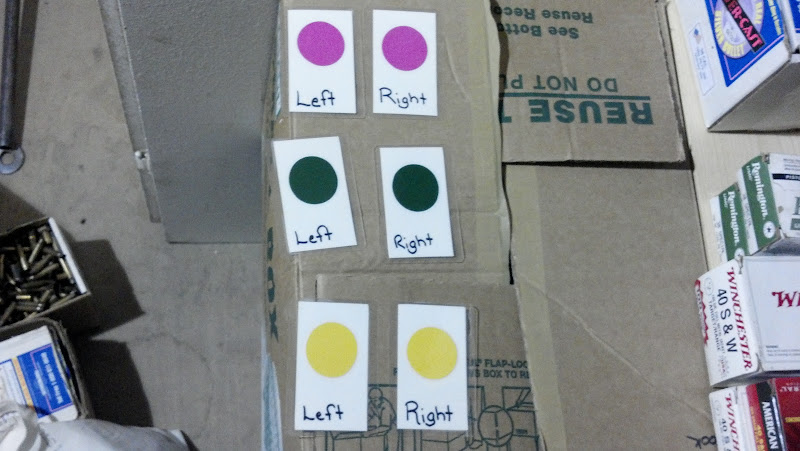
<span style="font-weight: bold">Starting position:</span> Laying prone behind your loaded rifle, both hands on the barrel. You will have six (6) target identification cards in front of you laying face down.
<span style="font-weight: bold">On signal:</span> Shoot 1 shot at a full size USPSA "head" inside a full size USPSA no-shoot (Hope that makes sense, can describe in more detail if you need).
After your one cold bore shot, turn over 2 cards (one at a time, or both at once, shooter choice). These cards are now your SHOOT targets. All other targets are now considered NO SHOOT targets with associated penalties.
I set up the cold bore at 100 yards. My original intent was to set the circles at 150 yards for a 2 MOA target. But, most people had very small optics, so to cater to my crowd, I move the target in to 100 yards also. Was still tough for most shooters.
In the future, next time I do this kind of stage, I will be utilizing TWO or more of these targets to keep the downrange time to a minimum. Going down 100 yards and back with each shooter kinda drug everything out.
Love my wife, love her arts and crafts!
NOTE: Arts and crafts DOES pay off in precision shooting.
My wife has a cricut cutter system for arts, crafts, cards, whatever. She also has a stock pile of BRIGHTLY colored paper. I explained my idea to her, and she had some excellent ideas for the target. She used her cricut cutter system to cut me out a bunch of 3 inch circles out of 3 different color papers, plus a metric boat load of smaller circles to use as pasters.
I wanted to put 30 3" circles on a plastic corrugated backer (I have a small supply of political signs at my disposal, but the corrugated plastic board is relatively cheap to buy from a sign guy). I wanted a total of 3 colors, so 5 circles of the 3 colors on EACH side of the target. Each side was separated by a strip of black electrical tape.
My next question was, how do I keep everything on the target board without them all falling off, but still keep a crisp edge for scoring hits/misses.
Gentleman, FINGER PAINTING IS BACK! My wife, in all her arts and crafts supplies, has a product called Mod Podge. It is quite similar to Elmers Glue (the stuff kids kids use in school), but dries clear with a light matte finish. I simply used a cheap foam paint brush to put a light coat of Mod Podge on the backer board, place a circle of cut out paper down, then painted another coat on top of the circle, one at a time.
The final product:
Now, the stage went like this:
<span style="font-weight: bold">Starting position:</span> Laying prone behind your loaded rifle, both hands on the barrel. You will have six (6) target identification cards in front of you laying face down.
<span style="font-weight: bold">On signal:</span> Shoot 1 shot at a full size USPSA "head" inside a full size USPSA no-shoot (Hope that makes sense, can describe in more detail if you need).
After your one cold bore shot, turn over 2 cards (one at a time, or both at once, shooter choice). These cards are now your SHOOT targets. All other targets are now considered NO SHOOT targets with associated penalties.
I set up the cold bore at 100 yards. My original intent was to set the circles at 150 yards for a 2 MOA target. But, most people had very small optics, so to cater to my crowd, I move the target in to 100 yards also. Was still tough for most shooters.
In the future, next time I do this kind of stage, I will be utilizing TWO or more of these targets to keep the downrange time to a minimum. Going down 100 yards and back with each shooter kinda drug everything out.
Love my wife, love her arts and crafts!
