Gunsmithing Pillar Bedding a Savage McMillan Stock, Completed

davkenrem

Private
Full Member
Minuteman
Sep 21, 2004
31
1
Toledo, OH
Guys,

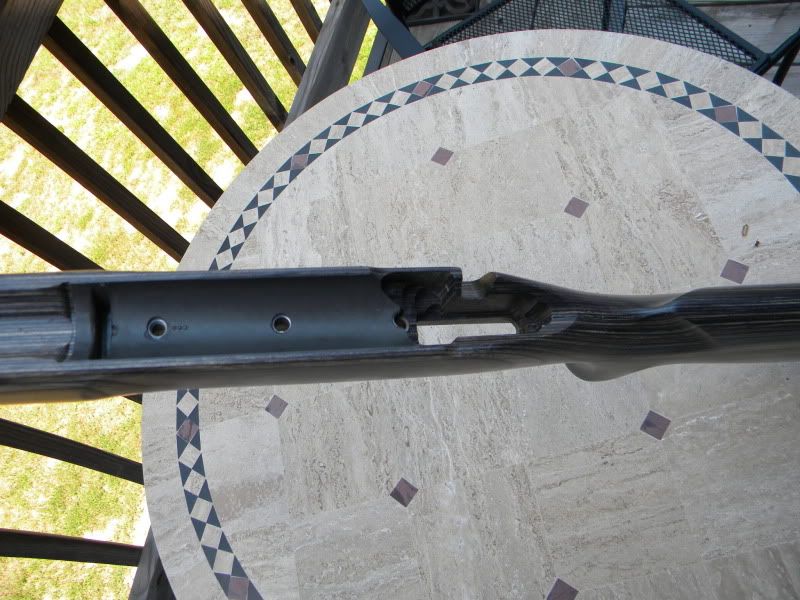
I have a new Savage 10FCP McMillan in .308. I am considering a Pillar bed Job. I'm pretty handy and the job does not scare me but I have some questions on doing the savage. Looking at my Gunsmithing books and videos on Youtube, most instruction is on 700 pattern actions. Bolts go in the front of the action and the tang. The Savage is different with a bolt at the trigger guard on in the front as you know. Looking at the stock, there does not appear to be a great deal of material there in which to bed a pillar.

Here are some photos of my stock:

DSCF7190.jpg

DSCF7189.jpg

DSCF7188.jpg

DSCF7187.jpg

DSCF7186.jpg

DSCF7177.jpg


Has anyone Pillar bedded one of these and do you have any photos to share of what you did?

Thanks in advance.
 
Last edited:
Re: Pillar Bedding a Savage McMillan Stock

Remember to "float" the action rear of the rear action screw. Dont put any bedding there or use some tape on the bottom of the action, again rear of the rear action screw when you bed so there is a gap and the rear of the action "floats"

The pillars will stay put because your hole for the pillar should be slightly larger than the pillar so bedding can surround the pillar.
 
Re: Pillar Bedding a Savage McMillan Stock

found the pic. this one has factory pillars in the laminate but
you can do the same thing. Just not enough room for a large
pillar.

Always had better results floating the rear tang and I have tried it both ways.


FTRBedding.jpg

 
Well after reading just about every post here on bedding and watching videos on Youtube, (best of which were Oz's (STR)) I felt confident enough to try it. I first purchased a bottom metal Kit from CDI Precision. I fitted it myself with a Dremel, Big mistake looks like I used a chisel. But none of the important surfaces were damaged and the ugly is only cosmetic.


DSCF6441_zpsa1ba302d.jpg

DSCF6442_zpsf1874336.jpg


I then drilled the stock for pillars. No drill press so I used drill bits in increasing sizes. I had to cut he pillars down, so I mic'd the length I needed, cut them long with a hack saw and filed and sanded the to exact length. I made some alignment bolts from stainless bolt with the heads cut off. Then I superglued the pillars to the action so they would not rotate. I used Johnsons paste wax as a release agent. Works great but it is very scary because your parts look like you have done anything to them.


DSCF6443_zpsc18c940e.jpg

DSCF6444_zpsbd18b4b8.jpg

DSCF6446_zpsd7a90c97.jpg

DSCF6448_zpsa6691d79.jpg

DSCF6447_zps936f85e0.jpg


Here it is after popping out three days later. Took a little work on the rear pillar and the bolt release to clearance the trigger assembly but it's all good now. Not very pretty but functional.

DSCF6450_zps8cdeabcf.jpg


DSCF6452_zps69450e41.jpg
 
Last edited:
Finally got back on this after a trip to Chicago for work.

So after the pillar bed I was not real happy with all the bedding around the recoil lug recess and front pillar. I filed most of that down and prepped for the bedding. Camera batter was dead so no pics of the prep.
Basically I waxed and clayed the action. I drilled some small holes behind the lug for the Devcon to lock into. sanded the stock on the sides of the action and glued her in. Wasn't going to buy a roll of plumbers tape for one rifle so I used a layer of foil duct tape


DSCF7472_zps06142333.jpg


After curing for two days, I'm ready to pop it out.

DSCF7473_zps5756ebc5.jpg


It doesn't look half bad.
DSCF7481_zps86e2a3e7.jpg

DSCF7483_zps7c66c321.jpg

DSCF7482_zps2149af4a.jpg

DSCF7484_zps533b300a.jpg


After a little clean up...
DSCF7486_zpse9c5136f.jpg

DSCF7487_zps0204418d.jpg

DSCF7488_zpsc7bef12d.jpg


I cleaned it up a little more and sprayed the Devcon'ed area with a high quality paint to seal it and give it a uniform look.

I'll be spraying the stock tomorrow, more pics to come.


Thanks Hider's for all the great posts and videos that gave me the confidence to try this. While it is not as pretty as professional work, I learned allot and I'm confident it will be absolutely mechanically as good as any.
 
Good job on the pillars and the bedding job. I just saw this thread, my buddy and I did mine a year ago. This after CDI inletted it for his bottom metal and then you really see how bad it needs them. I don't know why McMillan can't put pillars in these stocks for Savage like they do for others.
 
I agree, it would be great if they did put the pillars in. I agree that they are pretty thin in the area of the pillars. I wish I had, had Cdi inlet my stock, would've come out much better looking. It's not pretty but it is really solid now.
 
Ive never done this and am very nervous doing mine. I get my 338 lapua back from lri doing some custom work to it tomorrow and plan on bedding the action to my mcmillan a5... I am very nervous, I really hope everything goes well.
 
I was nervous too!! Watch and rewatch all of the videos in this play list.

Pillar Bed - YouTube

Most are by STR a member here. Read all the post on here you can. Best advice I can give is make sure you use a good release agent. I used Johnson Paste wax as Oz suggested in his videos. Don't let dry to hard because it will make it harder to buff off. When it's done it looks like nothing is there but it works. Take your time and you'll be fine.
 
Last edited:
Well it"s finished...

We, it's finished!!!


Here is the cleaned up and painted bedded area.

DSCF7492_zps935b2cd4.jpg

DSCF7491_zps5d3834d9.jpg


I painted the stock tan and then used some brown through some netting.

DSCF7489_zps2a8d1372.jpg


Barreled action in.

DSCF7494_zpsa43804c8.jpg


Some "Beauty shots on angles

DSCF7497_zpse727ecd4.jpg

DSCF7499_zps8db0225c.jpg


The glass is mounted.

DSCF7500_zps1725ba7f.jpg

DSCF7503_zpsd09407a3.jpg


Up close.
DSCF7506_zps3853f0b7.jpg


DSCF7507_zpsea8f13a0.jpg


I'm very happy with the results. I will be heading to the range Saturday to re zero and test it. I learned how to do this from this site and Youtube.
If you are at all handy, you can do this to. I've seen some photos for some professionally done jobs and they are much prettier. I would doubt any more functional.
I wish I could afford a Stiller action-ed, Bartlien barreled, Manners stocked, S&B Scoped beauty. but I can't so this will have to do.

P.S. During reassembly the factory trigger guard pillar pulled out. LOL. I mixed up some JB Weld and epoxied it back in. LOL
 
Last edited:
Any pics ?

Of the rifle? It's nothing 'special', just factory black on black (your paint job looks very slick, btw:cool:). My rifle is very much as it was when it left Savage except for the bedding. Factory bottom metal, crappy 4-round centerfeed magazines. Seeing your CDI setup... I may be going that route shortly;)
The 'quarter-minute accuracy, Thanks guys' script above is a hyperlink, there's pics in there of some groups