• Get 30% off the first 3 months with code HIDE30

    Offer valid until 9/23! If you have an annual subscription on Sniper's Hide, subscribe below and you'll be refunded the difference.

    Subscribe
  • Having trouble using the site?

    Contact support

Remodeling gunsafe interior?

Damn, this project turned out great so far, all sides of the safe have been covered, now to set up shelving and long guns.....


612DC6A6-F565-40CA-B68F-07A86D167173.jpeg
12FFD023-907B-464A-B8DB-26B7E9B22AB0.jpeg
6BE7A704-C95C-4A53-B3FA-F99C37A13242.jpeg
C6928C9D-713D-405F-921A-59D7A9ECC663.jpeg
 
Last edited:
It looks like he used the PL adhesive (home depot/ big box stores have it)
I am a fan of the "Magic" sliders to go under a safe. the knockoffs are $5 at harbor freight.... one person can slide the safe aroun and then bolt it in place.

For fire protection, I would more inclined to do 2 layers of 5/8 sheet rock on the outside, then to worry about the inside.
Supplement the internal with an external coat.

if in a closet, double the walls, ceiling and floor and the inside of the closet door....

Keeping a safe out of sight helps to keep someone from stealing it... 4 lag bolts into joists or into cement floor work too
 
What did you use to attach the laminate to the safe walls?

I used loctite construction adhesive, and that stuff worked great, all but the ceiling was very easy to adhere to the drywall, I didn’t want to use screws or nails so the glue worked great. After I placed the plankes on the ceiling I wedged in a long piece of drywall to firmly press and keep the plankes in place and left it for a day to dry. Gunna let it cure for 2 more days befor I start drilling holes for shelves
 
So finally got the time to work in the safe again, I decided to stick with how the layout was originally with the shelves but I moved the center joint over to the right a little so I can have more room to store rifles. So I decided to do V cuts and stagger the rifles so one row sits in front of the other, this way I’m able to fit about 10 rifles comfortably, and I made dedicated square cuts in the far left for the shotguns. This way seemed most efficient and makes it much easier to take the guns out and put them back in with ease. I may make a few more adjustment but looks good for now. The board im using for the rifle arrangement is only $10 so if it doesnt work out I can just scrap it and start a new design. I also purchased some dark brown suede material for the interior so we’ll see how that turns out as well.

A2F4CDBA-0D2B-41A6-83C5-8DAD7F9BCA8B.jpeg
E49ECD37-E634-4E7D-B3B6-F3C09DE0D517.jpeg
2425D7CE-AADA-4262-B339-DFD8DAB55DDF.jpeg
9FCF7A49-77A2-46EA-B80B-5D314356B8D8.jpeg
 
I might have missed it, but mind if I ask what the final number of 'long guns' (Chicago P.D. hook there ;) ) is going to be stored in there? Are you leaving an empty slot/slots for possible futures, or just customizing to "what you're putting in there right now?"

You're craftsmanship is good, and keep it up.
 
So I set it up to hold 8 rifles and the two shotguns. It sucks these safes are rated to hold 64 guns but we all know that’s not how it works. With scoped rifles like I have, and will be adding more, it makes it really hard to arrange them to maximize space because of the elevation turret and extended bolt handles that stick out. I could have made it an all rifle safe but I wanted to keep the shelves so I can keep other gun parts in it as well.
 
Finally got around to finishing the interior and shelves, overall I think it came out great, my trim and apolster job could behave been a little better but I can always redo it. I used a brown suede material that seemed to match pretty good to the wood plankes. So I have room to comfortably fit 2 long shotguns and 8 scoped rifles, I only have 3 rifles so far, 2 more are in the works and plan on adding more in the future. It may seem like I’m sacrificing space to store rifles this way but it really does maximize storage this way and makes it very convieneient to take guns in and out. When my collection exceeds 8 rifles I’ll just make it a dedicated rifle safe and by another. Let me know what yall think.

9105B00F-9C06-46E2-A804-EFDF94FE7BBA.jpeg
D479175E-3960-408A-904C-7B8F8B454892.jpeg
94318DD9-1A99-42CA-972A-0AC1B784F458.jpeg
F7E27592-A93E-42D0-ABC8-7F48974BFE49.jpeg
D6094B69-2A2B-4D39-928B-7017EE0E8038.jpeg
0ABC8EBB-FEEA-4981-AA65-40A3CEA28872.jpeg
 
That's one classy looking safe. Are you worried about the adhesive offgassing as it cures and what it might do to metals in a confined space? (Not suggesting it will do anything, just wondering). Are those pistol and accessories pouches on the door factory or aftermarket? I need to move some stuff to the door to open up some room in my own safe, and was looking at the Liberty door panels, but I like the look of your better....
 
That's one classy looking safe. Are you worried about the adhesive offgassing as it cures and what it might do to metals in a confined space? (Not suggesting it will do anything, just wondering). Are those pistol and accessories pouches on the door factory or aftermarket? I need to move some stuff to the door to open up some room in my own safe, and was looking at the Liberty door panels, but I like the look of your better....

So I used 3m spray adhesive and it was a little smelly but not bad and after I glued the fabric on the panels I left them outside to air out and dry for a few hours, didn't think much of it afterwards so hopefully it won't mess with any of the metals, but I opened the safe this morning and didn't get any glue smell so shouldn't do any harm. The accessory pouches are factory and I did not mess with those, they seem to work great so no need to do anything to them.
 
Probably the best safes I've seen are the Pendleton circular safes at SHOT:


I know of guys who showed their guns off to some "friends". When they deployed, the dirtbags backed a truck up into the garage, and took their time. Dollied the safe out into their truck, ate his food, drank his beer, and left with all his guns. Make sure your safe is bolted to a cement foundation from inside the safe when possible, using 1/2" threaded rods or larger if possible, embedded in the cement. Also look into these products if you want the finest in home guns protection.

Cheers!


At first glance..... the lazy susan management system seems to be the best to me. I don't care for the stark white, but that could be changed. I may even need to change the outer most set of slots into an open "U" shape. I would not need to fish my guns out of the slot that way. I could just withdrawal them straight out. I feel like some crack head is going to come in and steal my guns. The chance of fire is fairly low on my list of possibilities.

Shawn
 
Probably the best safes I've seen are the Pendleton circular safes at SHOT:


I know of guys who showed their guns off to some "friends". When they deployed, the dirtbags backed a truck up into the garage, and took their time. Dollied the safe out into their truck, ate his food, drank his beer, and left with all his guns. Make sure your safe is bolted to a cement foundation from inside the safe when possible, using 1/2" threaded rods or larger if possible, embedded in the cement. Also look into these products if you want the finest in home guns protection.

Cheers!


Make it so I can store guns muzzle down please......
 
  • Like
Reactions: OldSalty2
The steel long gun rack in my Sturdy safe is the most efficient thing I’ve found. I had them remove one of the bars and space out the rest, so my 48” wide fire lined safe has 5 racks that each hold 6-7 long guns. I can fit an honest 33 without difficulty, and a couple thin ones in the back of the 6 rifle racks. I used a small 26” toolbox and made a wood filler plate that goes under three of the racks, it spaces up the shorter AR/AK platform rifles. Sturdy is somewhat barren and industrial, but it’s the most useful interior I’ve found in a series of safes.
 
You may
Damn, this project turned out great so far, all sides of the safe have been covered, noView attachment 7024138

Looks very nice !!
You may have done it but for anyone else, I would suggest putting the wood on the top first. That way the side and back panels will act as supports should the adhesive fail. You can see in his safe how he arranged the ceiling planks, left to right. In the paint isle, you can find Loc-Tite multi purpose quick grab adhesive. I is
some really nice stuff. Water based. I would go with that especially if your concerned about off-gassing.

I would also wipe down the metal surfaces with denatured alcohol prior to starting the glue up. An adhesive like the Loc-Tite is much stronger than you may imagine and if you arrange the panels in a smart way the load will be on the wood itself. Think before you glue. !!

Shawn
 
I too was going to construct a rotary rack for more space. The problem with both my safes, is the front to back measurement (accounting for door protrusion when closed), isn't large enough. I made up a cardboard mock-up just to see how many rifles would fit in the circle? Not as many as you think, especially if you have AR's, rifles with glass, or AR's with glass. Plus you waste a lot of space in the corners. For me, Rifle Rods worked the best, you can fit many more rifles with this system, when they are all stored vertically. Another great space saver are the rubber coated bent wire hangers for pistols (gunstoragesolutions.com), they slip over the shelf ends, and the wire goes down the bore, they hang under the shelf, out of the way. If you want the best rotary rack gun safe, check out a Pendleton, very nice, big smoke.
 
  • Like
Reactions: rockdoc
View attachment 7807384I was inspired by this thread and did the thing this weekend. Thanks y’all!
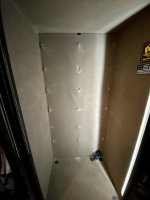
We are looking at revamping the interior of our safe as well after the anchors ripped out of the back wall panel that came with our safe. Does anyone have any pictures of them removing the interior of their safes by chance? (we arent very handy but seem to do well when we follow picture titorials, haha) We havnet been able to find any videos / pics of anyone removing the interior lining of a safe. I'm assuming the chalky drywall type substance that the original anchors were in is a flame retardant material but not entirely sure. We assumed the panel was wood and the fire retardant material was on the back side. We have a browning safe. We have been wanting to make improvements for a while to reinforce the sheliving in our safe to hold heavier weighted items like full ammo cans. Thanks for any tips!
 

Attachments

  • IMG_4517.jpg
    IMG_4517.jpg
    261.9 KB · Views: 102