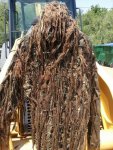
Bleach weakens fabric, but you can hit it with some bleach water, let it soak and rinse to lighten it to start if you like.
Then this is how you dye fabric with only two or three bottles of dye, but get 12+ different shades/colors:
Divide your burlap strings into bundles, make ten or so. Up to you. Drape them over a stick so they can be dipped but stay together.
Now take several buckets for dyeing in. In the first three, put 1/3rd or half strength of one bottle of dye. So half strength green, tan, etc. Dip 'em, remove 'em.
Then take 1/2rd of what you dipped, you are done with those for now, but only dry 1/3rd of 'em.
Now increase to full strength the dye in the buckets and dip the stick you didn't dry. Dry those now.
At this point you'll have a dark and a light of each instead of one shade only. You can repeat this or not, in other colors or the same. This is the basic idea, it can be made very complex or kept simple, either way, you get lots of different color. You can even "tie dye" which works out differently here. You simply randomly bundle lighter strips together, wrap them in a band, and then just half or partially submerge them in darker dye for a bit. Then undo. See? Lots of ideas here when you have time.
You can simplify what I'm saying here to just using a green, a brown and a tan, but also using those colors skillfully you can get a myriad of shades that give more depth and blending in to the surrounding. If skilled with color, and willing to experiment even deeper with it, bright blues and yellows and reds can be used to obtain specific colors if one so desired (even complex patterns like multicam, likely with correct color).
There literally is no limitation to the dyeing and making of the materials.
Dragging down dirt road, wearing in the dirt, not cleaning, all good ideas... Oh wait!, coat the SHIT out of it with fireproof and 3M Scotchguard beforehand, but after you've dyed it all and dried it out! Lighter when wet and more fire resistant when not.


