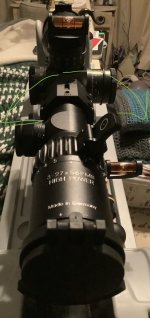
I just noticed yesterday? maybe the day before, I don't remember now, that my scope moved in my mount. I torqued the screws to spec when I mounted it and took it to the range and it was fine. I didn't even shoot a full box through it. Should I loosen it and retorque the screws to specs? Or could this be a mount defect?
Join the Hide community
Get access to live stream, lessons, the post exchange, and chat with other snipers.
Register
Download Gravity Ballistics
Get help to accurately calculate and scope your sniper rifle using real shooting data.

Install the app
How to install the app on iOS
Follow along with the video below to see how to install our site as a web app on your home screen.
Note: This feature may not be available in some browsers.
You are using an out of date browser. It may not display this or other websites correctly.
You should upgrade or use an alternative browser.
You should upgrade or use an alternative browser.
Rifle Scopes Scope Moves in Mount
- Thread starter cjs88
- Start date
What’s the scope? What’s the mount? What are the specs?
Also, we can’t answer any of that for you.
Also, we can’t answer any of that for you.

You shouldn't have to loctite the ring caps to keep them from loosening. I would try to torque them again and see what happens.
Did you degrease the screws and screw holes when you mounted?
Also you didn't lap them did you?
Did you degrease the screws and screw holes when you mounted?
Also you didn't lap them did you?
If the instructions on the ring screws do not call for loctite, then assume torque is for clean and dry screws.
If it was me, I would clean the screws and holes off any oils, and remount. If it slips again, RMA the mount.
What is your torque tool?
If it was me, I would clean the screws and holes off any oils, and remount. If it slips again, RMA the mount.
What is your torque tool?
What do you recommend to degrease it? Would some alcohol wipe work? I have an electronic wheeler.If the instructions on the ring screws do not call for loctite, then assume torque is for clean and dry screws.
If it was me, I would clean the screws and holes off any oils, and remount. If it slips again, RMA the mount.
What is your torque tool?
I use alcohol on a cotton ball and spin each screw in it. You can see the stuff come off. Then I use a qtip with alcohol in the holes. Works great.
Also degreasing the inside of the rings is a good idea. I do that also.
Degreased. We'll see how it goes.Also degreasing the inside of the rings is a good idea. I do that also.
OK, now I’m confused.
Mr Spuhr clearly has much more knowledge and time invested in the subject, but the only time I’ve ever had a scope slip is when I didn’t clean the oil off of the screws (not with a Sphur). They backed off within a couple uses of the rifle. I thought the scope was jacked because it couldn’t hold a zero. Some of the screws had zero torque on them when I realized it. Every screw was torqued properly with a Borka tool.
I have Spuhr mounts and I’ve read the directions about the wax they put on the screws, so I understand that and do not remove the wax from new screws, but I would have a hard time adding oil to them.
The best advice I could give is to spot mark the screws with nail polish. Then you’ll know if they’ve moved.
I have always been paranoid of scope slippage ever since
I don’t plan to change my routine.
I would not follow the Spuhr advice with other style mounts. In my opinion, there should be no oil. Just found it to be a strange recommendation to add oil to the screws
I would not follow the Spuhr advice with other style mounts. In my opinion, there should be no oil. Just found it to be a strange recommendation to add oil to the screws
ARC says to put a drop of oil on their ring screws before torquing.
I’m not as experienced as most of you so I did what Ted recommended and the M-10 rings have been super solid.
My small and insignificant contribution to this thread. Haha
I’m not as experienced as most of you so I did what Ted recommended and the M-10 rings have been super solid.
My small and insignificant contribution to this thread. Haha
The oil is so you get a consistent and proper torque reading. Dry screws grab, leading to you thinking you hit the torque value when you have not. Applying threadlocker is the same as adding oil, except the threadlocker hardens in any gaps providing adhesion , helping prevent the screw from loosening under vibration.
A properly torqued screw stretches under the load, which alone keeps it tight under most circumstances. Next step is threadlocking compound, followed by safety wire.
The inside of the rings do need to be clean and dry, as does the scope body. The addition of rosin is the same as threadlocker, the belt and suspenders approach.
Bottom line, if something is coming loose it was either not properly installed in the first place or it's out of tolerance and will never be tight.
My M10 rings for my other scope have no issues. Weird that this one has issues. Bought a manual torque wrench that will be here today since my electronic one freaks out depending on how its held and doesn't seem to give me the right torque.
No? Mount came in the box and went on the rifle and torqued to spec.Lapped?
Found the ARC reference in the M10 install instructions
I'm sure there is more professional quality tools available, but I'm quite happy with these torque limiters
"To ensure proper function, apply a small amount of oil or anti-seize to the threads
and to the underside of the heads of all screws included with the rings"
Maybe just me and I'm no machinist at all....but I won't use a digital, dial a value, torque wrench. Had too much trouble with a Wheeler Fat Wrench and bought a set of Fix-it-stick torque limiters.I'm sure there is more professional quality tools available, but I'm quite happy with these torque limiters
Maybe the ARC rings recommend that for some reason but with my Seekins or even Warne or Badger rings I always degrease and torque and don't use loctite. Never had to use rosin either. Only place I use loctite is on the base screws as they are tougher to get to to check if needed. I have had scopes in rings for years and moved them from one rifle to another to another to another and never had them loosen up so will just keep doing what works for me as you all should probably do.
What was the torque spec applied?No? Mount came in the box and went on the rifle and torqued to spec.
Since the PMII doesn't have much tube space anyway, I slid mine forward in the mount so it doesn't have anywhere to go under recoil. The eye relief is perfect and I can adjust length of pull if I need to get a little closer or farther away.

This. Dry screws will give skewed readings when torqued because of friction. I can’t remember who I read this from but it was an engineer who’s life work Involved fasteners I think. Also I always torque, back off, torque a couple of times as I’m mounting a scope or action. In my mind this gets rid of any “stretch” in the threads. Don’t know if this is what’s happening in reality but I’ve never had any ring/mount/action screws get loose.The oil is so you get a consistent and proper torque reading. Dry screws grab, leading to you thinking you hit the torque value when you have not. Applying threadlocker is the same as adding oil, except the threadlocker hardens in any gaps providing adhesion , helping prevent the screw from loosening under vibration.
A properly torqued screw stretches under the load, which alone keeps it tight under most circumstances. Next step is threadlocking compound, followed by safety wire.
The inside of the rings do need to be clean and dry, as does the scope body. The addition of rosin is the same as threadlocker, the belt and suspenders approach.
Bottom line, if something is coming loose it was either not properly installed in the first place or it's out of tolerance and will never be tight.
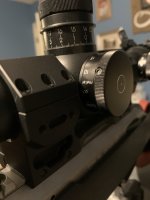
Something is way off if this is the case.So just retorqued them to about 24, max not to exceed 26. But the scope is still able to rotate when sitting in the rings.
Rings are out of spec.So just retorqued them to about 24, max not to exceed 26. But the scope is still able to rotate when sitting in the rings.
Well then you need to make a return. Get some Seekins rings. They will hold it. 
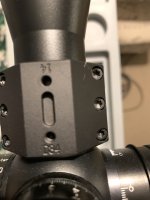
Or the base is somehow a 35mm. OP look and see if the halves line up perfectly when you take the scope out and look through the hole.Probably sounds stupid but here it goes,
Any chance a previous owner swapped the screws on the rings out. Put in longer ones and now your screws are bottomed out (usually they go through the bottom ring…but) before the rings tighten?
Likely just out of spec
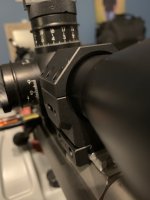
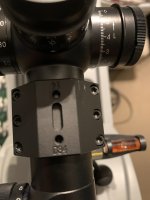
That mount is way bigger than 34mmTorqued rings
Or the scope tube is smaller than 34mm. What is the scope model?That mount is way bigger than 34mm
Similar threads
- Replies
- 4
- Views
- 387
- Replies
- 1
- Views
- 136
- Replies
- 212
- Views
- 13K
- Replies
- 5
- Views
- 493
