After spending about 6 months with two Vudoo V-22's in the KRG Bravo chassis that I built for my daughters I have personally grown to love the Bravo. So much so that I have sold all my other chassis and stocks. In this time I have added the weighted spacer in the butt for balance and the minimalist spigot to get the bipod a bit closer to the bore center and slightly further out, I keep thinking about adding the adjustable butt assembly but just haven't yet. These additions have really improved the function of the Bravo but I have always been a fan of being able to set the cheek piece off center slightly to allow a more vertical head position, something I think a lot of shooters overlook in their rifle set up. I feel it is one of the most critical aspects of building a reliable and accurate positions. The lack of this adjustment in the Bravo has been bothering me since the first time I set them up. I have been pondering how to resolve this complaint for a while and have had a few ideas but one evening while on the KRG site it hit me! Here is the simple solution:
Order these two items from KRG, yes I know they are not listed to work with the Bravo but they do!

Next remove your cheek piece and remove the plugs in the top covering the screws for the cheek piece rods. I used a small drill bit and they pulled right out. A 3mm Allen key removes the screws and the rods pull out.


Install the rods on the Adjustable Cheek Piece Mount. I used a little dot of Loctite 242 on the rod screws.


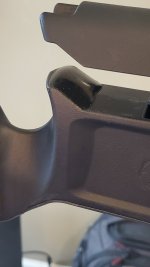
Then mount the Overmold Cheek Piece to the mount. As you can see there are several mounting options with many holes in both the new cheek piece to adjust fore and aft position and in the base to adjust side to side position and even the angle. You also have two profiles of the cheek piece to choose from depending on which way you mount it.


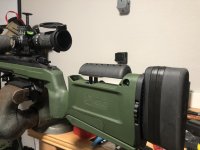
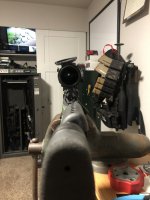
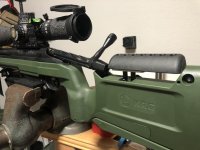
Here are a few pictures of it mounted on the rifle with some examples of the positions.


These are the extreme angle there are positions with less of an angle.


This is before, straight in line with the scope.

And after now it's offset to the right for a right handed shooter

I haven't had a chance to shoot it yet as I just installed it but I have to say it's a very nice upgrade. The Overmold Cheek Piece is a very comfortable soft rubber which should be great at keeping your face from melting in the hot sun or freezing in the bitter cold. While dry firing I find it's very easy to maintain a consistent stock weld as the rubber is slightly tacky as opposed to the slippery plastic of the original.
After I installed the first which I was taking these pictures I decided to see how long it takes to change out. So with the tools and rifle on the bench I started the clock by the time I had it installed on the rifle a whopping 3 minutes and 23 second had passed. So to say it's an easy upgrade is a bit of an understatement.
For like $70 shipped I highly recommend this so far guys. If I find any issues with it after we shoot it for a while I'll update this thread but I wanted to get the word out ASAP as I think this should be the FIRST thing you do to upgrade your Bravo (lockers before lights guys...)
Order these two items from KRG, yes I know they are not listed to work with the Bravo but they do!
Next remove your cheek piece and remove the plugs in the top covering the screws for the cheek piece rods. I used a small drill bit and they pulled right out. A 3mm Allen key removes the screws and the rods pull out.
Install the rods on the Adjustable Cheek Piece Mount. I used a little dot of Loctite 242 on the rod screws.
Then mount the Overmold Cheek Piece to the mount. As you can see there are several mounting options with many holes in both the new cheek piece to adjust fore and aft position and in the base to adjust side to side position and even the angle. You also have two profiles of the cheek piece to choose from depending on which way you mount it.
Here are a few pictures of it mounted on the rifle with some examples of the positions.
These are the extreme angle there are positions with less of an angle.
This is before, straight in line with the scope.
And after now it's offset to the right for a right handed shooter
I haven't had a chance to shoot it yet as I just installed it but I have to say it's a very nice upgrade. The Overmold Cheek Piece is a very comfortable soft rubber which should be great at keeping your face from melting in the hot sun or freezing in the bitter cold. While dry firing I find it's very easy to maintain a consistent stock weld as the rubber is slightly tacky as opposed to the slippery plastic of the original.
After I installed the first which I was taking these pictures I decided to see how long it takes to change out. So with the tools and rifle on the bench I started the clock by the time I had it installed on the rifle a whopping 3 minutes and 23 second had passed. So to say it's an easy upgrade is a bit of an understatement.
For like $70 shipped I highly recommend this so far guys. If I find any issues with it after we shoot it for a while I'll update this thread but I wanted to get the word out ASAP as I think this should be the FIRST thing you do to upgrade your Bravo (lockers before lights guys...)


