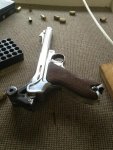
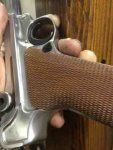
Gunsmithing Weird Luger project....

Spuhr

Gunny Sergeant
Full Member
Minuteman
Sep 25, 2009
1,136
78
53
Sweden
www.spuhr.com
Hi

I love lugers and have competed lots with them in the past.
In my previous years as a gunsmith, I made a lot of lugerjobs.
I decided to renovate my old competition luger and various other things
As the luger IS one of the worlds most accurate pistols I tought the subject might interetst Snipershide:)
24952_422497714407_3260875_n.jpg


The barrel is fitted to the gun.
339878_10151442607819408_2006029953_o.jpg


The barrel gets a elevation adjustable front sight and I fluted the corners to cut the weight down a bit.
65647_10151858201084408_667983725_n.jpg
 
Next part is the triggerpull.
Loads of lugers have been in long time use by competition shooters and many have their orignal parts destroyed by filing.
Apart from that the Luger have SUFFICIENT good parts for a perfect triggelpull so unlike other makes here is no need of makeing new parts really.

I start with blueprinting the parts according to orginal drawings.
I weld up the sear engagemant hook with hardening vire (Tig weld) and thus don't have to make a hardening process.
39167_483244224407_3923945_n.jpg


After welding I grind it in the toolgrinding machines to get it to orginal specs.
I NEVER hone sear engagement surfaces for other things than surface.
In my opinion SHOULD sear engagement surfaces be grinded and no honed.
39167_483244229407_2152237_n.jpg
 
tag.......

I want to find a good smith to work on this one

WWI001.jpg


WWI013.jpg


WWI002.jpg


WWI004.jpg


WWI005.jpg


I've got in mind maybe some Pachmyer grips, blue color would be great. I want to weld a Spuhr red dot mount forward of the toggle and perhaps tig weld a rail under the barrel for a flashlight. Might just unscrew and toss the barrel it's probably junk anyway.

What do you think?
 
Last edited:
The fit betwen frame and trigger needed some adjustment to.
So I turned down the spigots and soldered on new sleves that got fitted to the frame.
253210_10151942178694408_1051691013_n.jpg


943508_10151942197974408_1693394628_n.jpg


The triggerpull on a P08 gets really distinct and really good.
The only problem is that I am a to lousy shot to be able to shoot with perfect triggerpulls and I prefer to use a more "rubber" style or "glockized" triggerpull as that help me to better squeze of the triggerpull.
The secondstage on the luger is formed by the trigger against the connector.
By moving the small "hump" on the connector the triggerpull gets more rubberized.....

263359_10151942195029408_1686389369_n.jpg
 
In the past when I was a gunsmith and made a number of those lugers I normally used Bo-Mar sights and silversoldered the base on to the toggle.
The toggles movement is very violent and the bomars gets destroyed within 5000-10000 rounds.
That in combination with the fact that the toggles crack every now and then have got me to the conclusion to make an own toggle.
Here is the look on the sightsolution we used to do.
15439_239019434407_3521574_n.jpg


Here is a scetch of what I have planned instead.
One piece toggle with vindage only adjustable sightblade.
555790_10151858171009408_246526729_n.jpg
 
My material choise was Uddeholm Calmax and the idea was to drill startholes, hardend the piece to approx 50 HRC and then Vire cut out everything that could be virecut.
Hardening is done here in a furnace that is 960 degrees celcius/1760 Farenheit.
Steel is packed in into a package of paper and stainless steel folie to avoid to loose the carbon in the steel.
225774_10151899385459408_568148911_n.jpg


Here is a picture for cut number two in the Vire cutting machine.
942720_10151914514824408_1185777847_n.jpg


After all 3 cuts this is the look of the new toggle.
466560_362882670495968_282514696_o.jpg
 
Like our scopemounts of course everything could have been made in a five axis machine.......
But at the same time beeing a toolmaker and gunsmith I enjoy occasionally doing work in the manual machines.
So apart from the Virecutting, all work is going to be done manually.


Here is the gripsides formed in a toolgrinding machine.
309939_10151919940954408_2077295927_n.jpg


There was lots of milling and that is not the fastest in manual machinery in 50 HRC hardness.
But after some work comes finally the fitting to the gun.
923232_10151920559014408_2000949678_n.jpg


Almost finnished toggle with sightblade and screws.
393079_10151924359664408_614109569_n.jpg


Mounted in gun, with my "1911" style safety.
946593_10151922163434408_1913654454_n.jpg
 
Sigthview
428679_10151922165249408_888734226_n.jpg


I had some holes that must be drilled and I had no sufficient carbide drills in the workshop.
So i decided to make some of my own, "Cannondrills" but only 1,5mm and 2,6mm in diameter.
Works great!
934889_10151925401304408_1326158353_n.jpg
 
Nope, is blasphemi to make something like this on a good original gun, and I would NEVER do that.
This was a bastard with a Tikka Barrel made in the 50th or 60th.
The gun look like shit and was non matching.

This can be fully compared to a 1911 project.
Someone that takes a 1912 Vintage Colt 1911 in 99% condition and make a customgun out of it needs to get his hands treated by the "Fingergiljoutin" :)
But someone that take an average poor sad 1911 and make a customgun out of that makes something nice........

Håkan
 
Yeah, Pmclaine, Nice Try :)
The only thing I would do to your luger is remove that ugly paint in the "Gesichert" engraving.........

Håkan

Sir my post was dumb ass in nature and you picked up on that very well.

Your postings on this project are great as it is nice to see skills in action. The pistol you show and the one you are in the process of building are beautiful.

My gun was brought home by a family member from WWI. What I have been able to determine is that it was a commercial model from about 1910 or there abouts. It has a modification to provide last round lock back of the toggle. I am told this was required for any P08 to be accepted into military service. I'm figuring the pistol was given to some young serviceman as a parting gift or perhaps someone bought themselves a sidearm before going to the front. Either way the Luger ended up in the USA.

Regards the paint in the engraving. Is that not original? Considering its history and who owned it I dont think it was done after capture.
 
Wow Spuhr - that is great looking work, but.... you are known for that.

Thanks for posting this, shows us what craftsmanship is all about, glad it is still strong somewhere in the world.

Makes me want to get a Luger, had never even considered that a precision weapon, to be customized.
 
Sigthview
428679_10151922165249408_888734226_n.jpg

I just contacted Georg Luger on my Ouija Board and showed him this.

He says for more than one hundred "jahren" making a rear sight notch two cunt hairs wide and using one single CH for a front sight on his pistol has been more than adequate. He called me an American jack off because our army did not adopt his design and than he trashed my minty original 1970's vintage Ouija board. He is pissed.

Screw him, looks great.
 
So next step is Finnish, Stocklug issue, lanyardring and checkering.....
Frames after 1910 or something was machined for stock, but it's ofcourse nice, but it dosenst give the best grip in the hand.
So I prefer to remove it.
Some welding and some filing and the frame looks entierly different:)
39167_483244244407_3221292_n.jpg


30 LPI checkering on backstrap
943351_10151924241839408_810768574_n.jpg


30 LPI on frontstrap.
this is seriously difficult, the front strap is very thin and checkering a luger is far more difficult than a 1911!
my6ypaje.jpg

922854_10151930798249408_1074670277_n.jpg
 
To make the finnish on a Luger is pretty time consuming as there is so many hidden difficult corners and pockets everywhere.
I use powertools as much as possible but still loads of ours getting "lost"...
yhu7y6y9.jpg


The fit betwen the frame and fork could have been better so I squeze it togehter with a gaugeblock in betwen so it's not get overtightend.
944256_10151942220069408_2096702251_n.jpg
 
Very interesting watching this project take shape. Please keep the photos coming. I am eager to see the finished project and groups from test firing.

What finish do you plan to use?