Rifle Zero Target

Trigger Monkey

Ronin
Full Member
Minuteman
  • Apr 29, 2005
    4,494
    5,533
    Winchester Virginia
    The other day I realized that I have a target for this and a target for that so I came up with one in an effort to whittle my zero targets down to just one for all my rifles, be in magnified optic, red dot, or iron sights and share it with you all. The torso is mainly used to zero the piggyback red dot at 100 yards but it is sized to replicate a 300 yard c-zone at 100 yards so I can also use it for practice for sling shooting, tripod shooting, and the like.

    UPDATE: Updated target below.

    1732659124769.png
     
    Last edited:
    The 2 X 1 MRAD spacing was a happy accident while doing the layout which I can use to confirm reticle subtensions, mostly for my SFP optics. I've never felt there's much to be gained from a tracking test done on an 8.5" X 11" piece of paper, since even cheap scopes can accomplish that feat and appear to be good. In my experience, noticeable deviations in tracking start to show up once you get past five mils or so.

    I'll look into accommodations for IR lasers and WMLRF's, I don't have any so I don't need to zero them.
     
    • Like
    Reactions: Ronws
    Pardon a newbie question but why a special target to zero vs just using a 6” or whatever diameter circle target? If the space between the rings are known, any adjustments can be made off of that.

    I understand the scaling of what you made but why is this more beneficial?
     
    Mainly, I made the target out of my own personal preferences so the target is pretty beneficial for my purposes. I personally find the traditional large circle targets sort of limiting and kind of boring and out of the dozens of targets I've downloaded and used I always preferred to make my own.

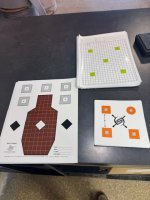
    Squares: The squares give me multiple defined aiming points vs a circle target. The smaller inner square works well with my higher mag optics while the bold outer square provides good visibility when zeroing my LPVO. Five of them let me do a 5X5 target to gauge the average accuracy of the rifle and ammunition. The gray provides contrast for LPVO use and helps me see impacts better at 100 yards vs. a blacked out box when using the riflescope vs. a spotting scope, which I don't have.

    Squares Layout: Having a 2 mrad X 1 mrad layout allows me to confirm the subtensions on my optics, specifically the SFP ones. The distance to the target needs to be precise but it can allow me to confirm that on 10X for example 1 mil equals 1 mil and find the true half power. When I need more field of view I know where along the magnification ring I need to turn to hit true 5X so the reticle can be somewhat accurate still, my holds are just 1/2.

    Diamonds: The diamonds can provide additional defined aiming points when using a magnified optic. At 50 yards the diamond over the C-Zone torso gives good contrast to make it easy to see when using my iron sights or red dot. The black diamonds give secondary points of aim for confirming zero.

    C-Zone Target: At 100 yards, this is the target for my piggybacked red dot. Put the dot center mass and let it eat. It being scaled 1/3 size means that it can also be pretty versatile for practicing positional shooting or sling shooting with multiple rifles. For example, at 25 yards it would make a pretty good target for my Appleseed rifle to practice offhand, kneeling, and sitting positions.

    For me, and again, I designed the target for me and my shooting preferences, it works to combine several targets I'd been using into one.
     
    I updated the target to resolve a couple of issues and taking the feedback from earlier I added a 1/2" grid to help in zeroing laser devices. There's too much variation between devices, rifles, and zero's for me to definitively add a point of aim on the target and call it good. The target would also get pretty cluttered so the grid should allow the end user to measure their offsets and add a paster, sharpie mark, etc..to create what they need to get zeroed.

    1732937335640.png
     
    Last edited:
    I made some minor tweeks to the target and tried it out today, I think I'm done. The revised target is on the right and stands out better at distance for zeroing the red dot and the diamonds were enlarged slightly also. Attached is the revised target for those interested.


    1737935981056.png
    1737935954900.png
     

    Attachments

    • WookieWerx Rifle Target - REV2.pdf
      1 MB · Views: 41
    What I like is precisely the contrasting squares and diamonds with corners. Refined point of aim is the phrase, I believe.

    Then, one can group. After the group or groups are analyzed, then you can make a final shift to zero point.

    It also depends on the job. For a hunter, as tedious as it is, there should be one shot with the rifle cold. Do whatever you want the rest of the day or work on other rifles you brought.

    Next time, another cold bore shot. Do this at least 3 times.

    Also, before each day of fire, practice at least 10 dry fires. This is to get all the wiggles out and find out where the natural center of aim is.

    That way, when hunting, you have confidence in what the rifle is going to do at assorted differences.

    Since I just hunt, I would assume others have advice about PRS and other competition shooting regimens and strategies.
     
    strange as it may seem, I've been using the IPSC for pistol more than anything. Just used to sight in a PCC with the 1x PA Prism, using the diamond. All around useful target.