Building the Perfect Reloading Room

Hi Myron,

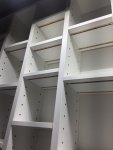
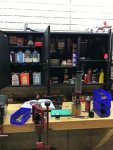
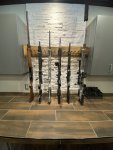
I made the wall storage units out of 3/4” white melamine board, with 1/2” thick melamine adjustable shelves. The shelves are only about 6” front to back, so I put 1/8” deep grooves into the bottom of them to lock them onto the shelf pins to keep them from sliding out. I’ll post a pic of the bottom of the shelves for clarity.

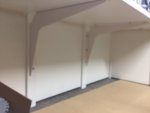
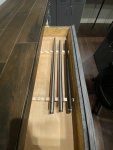
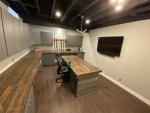
I’m currently working on a solution to better utilize all that space beneath the worktops as they are clear span under there.
 
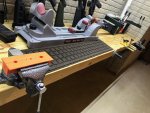
Top photo shows underside of adjustable shelves.

Bottom photo shows underside of work tops.
 

Attachments

  • 2A3F65D4-1029-4921-9209-ABBF4F4B3453.jpeg
    2A3F65D4-1029-4921-9209-ABBF4F4B3453.jpeg
    238.1 KB · Views: 354
  • C2A29257-0B2D-43AC-A825-C4C1A7EAB126.jpeg
    C2A29257-0B2D-43AC-A825-C4C1A7EAB126.jpeg
    251.8 KB · Views: 353
Still in the 'planning ahead' stage of my area. Currently using the shop cabinets that were in there when I moved in, as well as a couple of previous work tables.

At this point in time, I'm considering doing an 'L' shaped bench in the corner, with tall overhead cabinets (to the ceiling if I can manage it).

The part that is bugging me is efficient use of the corner area. In other shop cabinet builds (not necessarily reloading) I've seen people either a) leave it open, and tuck a shop-vac or waste bin under there, b) close it off or c) put in a lazy susan with an angled door face.

For those of you with an L shaped reloading area in a corner of the room... what's your preference?
If I had it do do again I would have installed my shop vac in the l shaped corner. That’s my only do over moment.
 
I’ve been working on this for awhile. Very happy with how it turned out.
46686069-7F70-46C1-B1AB-35DAC1DA43D9.jpeg

96” butcher block from Wayfair
Adjustable bench frame from Menards
Lots of Inline Fabrication press mounts and organizers.

Dillon 650 dedicated for 9mm
Dillon 550 and RCBS RockChucker share the 2nd press spot.

not shown is brass storage, a tool chest and shop vac under the bench.
 
Reading through this thread I saw some questions about benches in small spaces or places that kids can access. Here is my setup that is crammed into our utility room. I built it off of a set of Rockler plans.
View attachment 7227703

It is wall mounted So you can just fold the bench up and lock the whole thing closed.
View attachment 7227701

So many questions! How much did this cost you to build? It's there much flex in the bench? What kinda depth do you have for tool storage?
 
So many questions! How much did this cost you to build? It's there much flex in the bench? What kinda depth do you have for tool storage?
I can't remember for sure but it think it cost around $200-$300, most of that was in the 3/4" hardwood plywood and Rockler hinges/hardware. If I remember correctly, it is dimensioned so that the entire thing takes three sheets of plywood.

The bench is really solid. It consists of two 3/4" hardwood plywood layers topped with tempered hardboard. It is secured to the cabinet by continuous piano hinge. Hex lag bolts in the bottom of the legs can be turned in/out to keep everything level. I'm not afraid to set a couple of hundred pounds in the middle of the bench.

Inside depth is 13". The inner doors are recessed 1.5" so you can hang most tools and still close the cabinet. I'll see if I can find the link to the instructions.
 
Thank you. It’s an all welded steel frame, despite the look of the faux copper riveted gusseted corners. I used .120” x 1.25” angle w/ .080”x2x2 steel legs. In the corner area of the vise, I welded a steel plate for added support of the vise so I didn’t have to run such a thick wood top as most benches have. It’s a rock solid mount and I could literally lift the whole bench up with just the vice. It’s 5.5’ long by 24” deep and 40” to the top of the bench.

The wood panels are fir that I “aged” and joined together that are set in place from the inside of the steel frame. I handbuilt both doors and drawer faces. All wood was doweled together for strength and quality. The cabinet doors as well as the pull knobs are copper. The hinges and rivets are steel but dressed with a copper patina for aesthetic purposes. The drawer is about 5” tall and 20” deep to store dies, records, primers, etc so as to be close to the vice. Behind the doors is a shelf to maximize the internal storage. I personally don’t store many components in my bench so it’s filled with tools, cleaning supplies etc.

I tried to think ahead while designing the bench so there are welded mounts at the rear in case I wanted to install a removable pegboard/ shelfback later on or they could also double for screwing the bench to the wall. My best guess Is that it weighs less than 150lbs empty so it’s manageable to move but heavy and sturdy enough for vise purposes.
 
Last edited:
Reading through this thread I saw some questions about benches in small spaces or places that kids can access. Here is my setup that is crammed into our utility room. I built it off of a set of Rockler plans.
View attachment 7227703

It is wall mounted So you can just fold the bench up and lock the whole thing closed.
View attachment 7227701
Good choice for people who have kids!!
I made life simpler, no kids ever. Wife doesnt have access to reloading room either!!!
 
  • Like
Reactions: M1A1Abrams
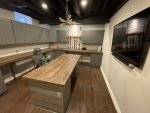
Just moved into an older house and I get my own room. The floors and walls really aren't flat, level, or plumb anymore. Ended up wall mounting everything to keep it somewhat level and keep it from rocking. Also mounted some cheap garage lights from Walmart to the ceiling so I can see what I'm doing. So far, I really like it.
83909815_1637991253008340_8583934587111997440_o.jpg
84451561_1637991319675000_3156363537320771584_o.jpg
 
Last edited:
Just moved into an older house and I get my own room. Too bad the only things straight in the house are me and my girlfriend. Ended up wall mounting everything to keep it somewhat level and keep it from rocking. Also mounted some cheap garage lights from Walmart to the ceiling so I can see what I'm doing. So far, I really like it.
View attachment 7239288View attachment 7239289
Looks great.

Way too clean though!! LOL Great job!
 
  • Like
Reactions: High Desert duck
Here is where I do all my work. Total cost to me $0.00, oh wait I forgot 10 bucks for that sweet cushion! The Ballistol stand (just got a shipment from Amazon lol) is an old metal desk that my basement inherited 20 or 30 years ago. Heavy as hell and gives lots of room to work on guns and process brass. Can't tell but under the sweet WalMart bag dust covers there are a FA Intellidropper and a Case Trim and Prep Center. Moving along to right is where I mount presses and various crap, that is a Black and Decker workmate that sat outside and the top rotted off. Some plywood and old 2x6's and we got a new top that is solid as a rock. And the fancy shelf there is one of my kids bookshelves they didn't have room for when we moved. MAYBE someday I'll come up with a nice setup like so many of the posts on this thread, definitely get some good ideas!

my grandmas
UNADJUSTEDNONRAW_thumb_18b2.jpg
 
End to end is 30'. Cut a couple pines out of my yard two years ago and milled them up. Let them air dry until last month and finally put them to work. The entire length is 2x4's on end stacked like a butchers block. Cost me 4# of screws and a bottle of glue.... And my time I guess.
 

Attachments

  • 1.jpg
    1.jpg
    99.9 KB · Views: 693
  • 2.jpg
    2.jpg
    131.9 KB · Views: 665
  • 3.jpg
    3.jpg
    66 KB · Views: 629
  • 4.jpg
    4.jpg
    91.6 KB · Views: 685
I’ve been working on this for awhile. Very happy with how it turned out.
View attachment 7227339
96” butcher block from Wayfair
Adjustable bench frame from Menards
Lots of Inline Fabrication press mounts and organizers.

Dillon 650 dedicated for 9mm
Dillon 550 and RCBS RockChucker share the 2nd press spot.

not shown is brass storage, a tool chest and shop vac under the bench.
Great set up! Question for you… I have a 60 inch table and I am going to be mounting a Dillon 650/case feeder and a Forster coax. I was going to put the two presseson either side of the table but I see you’ve placed yours... side-by-side - Do you mind explaining the rationale? Was it to provide a clean workspace the Dillon loads with a bullet feeder so doesn’t need a great deal of interaction… I’m asking, because I’m about to drill holes this weekend LOL… Thanks for the assistance!
 
ing to put the two presseson either side of the table but I see you’ve placed yours... side-by-side - Do you mind explaining the rationale? Was it to provide a clean workspace the Dillon loads with a bullet feeder so doesn’t need a great deal of inte

Two things, with the bench against the wall there's no way to put them on opposite sides of the table.

Side by side its just a space savings to keep the presses in the same area to not take up a lot of real estate. also, you may not be able to tell but he has two inline fabrication mounts, with quick change top plates. I recognize the wing nuts on the undersides of the top plates because I have a very similar setup myself. My 650 with case feeder stays put and the co-ax can be removed and replaced with other quick-change top plates that have a case trimmer and Dillon super swage should I want to use them. And a lot of people have the bullet feeders, me personally I don't because its expensive and I just put the bullet on myself each time.
 
  • Like
Reactions: Trek
Two things, with the bench against the wall there's no way to put them on opposite sides of the table.

Side by side its just a space savings to keep the presses in the same area to not take up a lot of real estate. also, you may not be able to tell but he has two inline fabrication mounts, with quick change top plates. I recognize the wing nuts on the undersides of the top plates because I have a very similar setup myself. My 650 with case feeder stays put and the co-ax can be removed and replaced with other quick-change top plates that have a case trimmer and Dillon super swage should I want to use them. And a lot of people have the bullet feeders, me personally I don't because its expensive and I just put the bullet on myself each time.

^ that is correct. I wanted to keep the presses on one side and leave plenty of room for charging cases on the other side, while leaving some work space. I swap out the rock chucker and Dillon 550. The 650 is pretty much dedicated to 9mm for USPSA.
 
  • Like
Reactions: cmoore806 and Trek
End to end is 30'. Cut a couple pines out of my yard two years ago and milled them up. Let them air dry until last month and finally put them to work. The entire length is 2x4's on end stacked like a butchers block. Cost me 4# of screws and a bottle of glue.... And my time I guess.
What is the boat winch for on the face of the bench?
 
  • Like
Reactions: Tnc
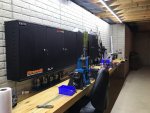
Just finished my room. I have threaded inserts on the bench to mount my 12” x 10” boards with my tools on them. I’m happy so far.
 

Attachments

  • 75FA6CAC-CECC-40C5-8FC4-B8361410A266.jpeg
    75FA6CAC-CECC-40C5-8FC4-B8361410A266.jpeg
    307.3 KB · Views: 729
  • C92516CB-50CC-4EE1-A9CC-8A96E9B990BB.jpeg
    C92516CB-50CC-4EE1-A9CC-8A96E9B990BB.jpeg
    310.7 KB · Views: 681
  • E43D15AF-24F3-456A-A5FB-3BA9E1FD96CB.jpeg
    E43D15AF-24F3-456A-A5FB-3BA9E1FD96CB.jpeg
    340.7 KB · Views: 674
  • B4F240FC-318F-4A34-A89A-E01F50054D22.jpeg
    B4F240FC-318F-4A34-A89A-E01F50054D22.jpeg
    460.3 KB · Views: 696
  • F69946CC-4541-423F-8A8A-F3C27FB42E60.jpeg
    F69946CC-4541-423F-8A8A-F3C27FB42E60.jpeg
    305.5 KB · Views: 723
So many people here with MAD skills!! I'm so jealous.

Thanks for sharing, everyone. You have all given me some ideas to work with for when I finally get around to creating my own reloading 'space'. It won't be a room. Lost my reloading room when the second kiddo came along. Mind you, that was 12 years ago, and I've spent MANY a cold night in the garage!
Wouldn't trade all those nights with frozen fingers for anything though! Little bugger outshoots me now...
 
  • Like
Reactions: jd138