This post concerns the bolt knob installation on the LOW BUDGET .22 TRAINER - start to "finish" project, and a few economical ways to get a tactical / oversized bolt knob on your rimfire.
What is a "tacticool" rifle without a tactical / oversized bolt knob?
....seemingly incomplete. Here a few ways to install one at home on your own, from the semi-involved to the "easy as sin to do" for those that aren't tool orientated. A tactical / oversized knob on a trainer adds advantages such as matching it's centerfire big brother, easier to cycle do to the extra weight and surface for gripping, easier to "find" the knob not only in a normal shooting position, but awkward ones also. The added weight and length also increases the ease of "throw" as leverage is increased.
A bolt knob can usually cost $50.00 and upwards at the gunsmith's shop. With a few tools and a little direction, it could cost less than $5.00. Yes, 5 bucks!
This very informative thread was sent to me by hotrod9mm (thanks), and is the "correct" way, idea #1: http://www.rimfirecentral.com/forums/showthread.php?t=321755
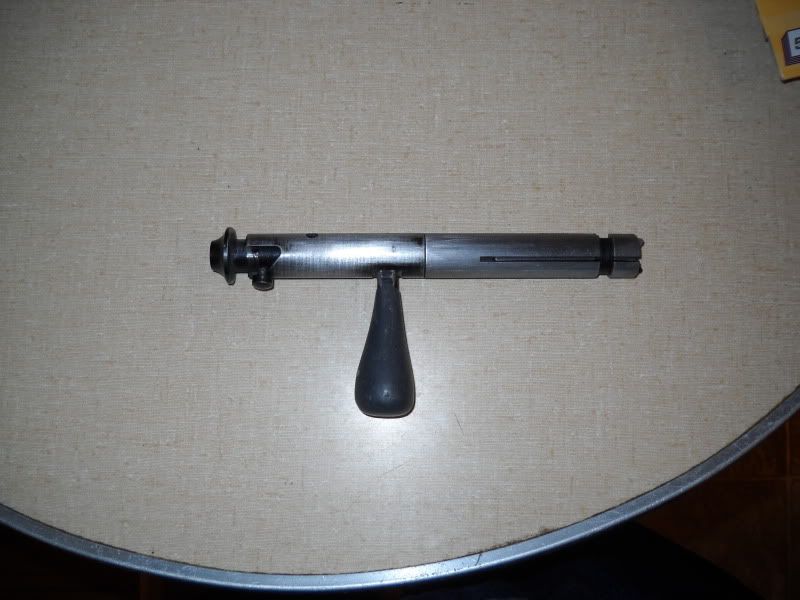
I originally was going to do that, then came up with idea #2; that perhaps I can find a suitable "knob" in the cabinet hardware section of Lowe's (pictured to the left of the bolt $4.97), and I also bought some Fast Steel epoxy putty for idea #3 ($3.98). The first photo is of suplies needed for idea #2 and #3, followed by instruction diagram for #2. The extra machine screw is to replace the one that came with the cabinet knob, as it is beefier. The broken screw driver is for "practice" and testing idea #3 using it as a simulated bolt handle.


Cabinet knob $4.97 (Lowe')s
Tap and drill bit $2.56 (Home Depot)
Tap wrench $2.47 (Home Depot)
Beefier machine screw for "coupler" .20
= $10.20
You will need a grinder to shape the existing handle to match to the form of the cabinet knob, and some loc-tite or clear nail polish to keep it from loosening.
I thought the cabinet knob, once installed and painted, would look like a regular knob, or can be replaced by at least 10 different options (probably more) that was displayed at the cabinet section.
I went with idea #3 first for a few reasons: a) seems easier and quicker, b) was cheaper, c) can form the knob however I wanted, d) somewhat easily reversable in case it was horrible, e) anyone could do it, all you need is a stick of the Fast Steel epoxy putty ($3.97), some sandpaper, black paint (I used Krylon indoor / outdoor flat, seems better for wear against ultra black).
I first practiced on the broken screwdriver, using it as a simulated bolt handle, and to test durability. Started by using about 1/3 stick of the putty. It has the consistancy of a Tootsie roll. Knead together until the color is uniform and apply. You have about 5 minutes before it starts to really setup, when it starts getting warm to the touch, you are almost out of time.

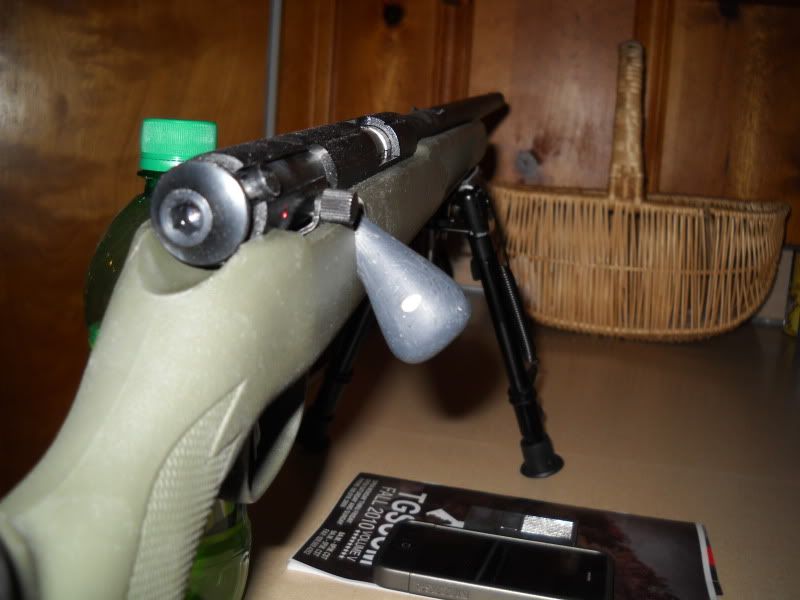
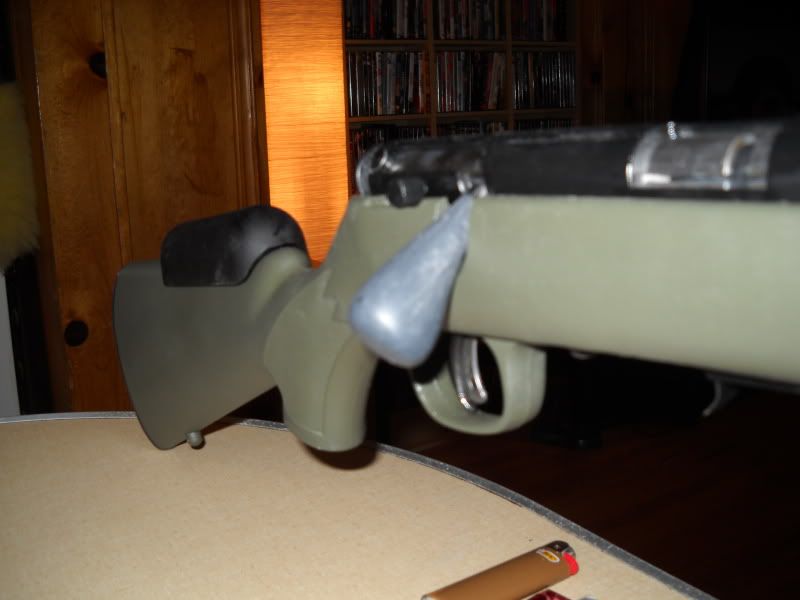
After sanding and painting:


To test the durability of the Fast Steel, I put it in the oven at 150 degrees for 1 hour, then in the freezer for 2 hours - no flaking, peeling or cracking. Dropped it 3 times to a concrete floor from 3 feet, a small chip happened, but nothing catastrophic. This is much more abuse than ANY of my rifles would be subjected to, no failure on the Fast Steel.
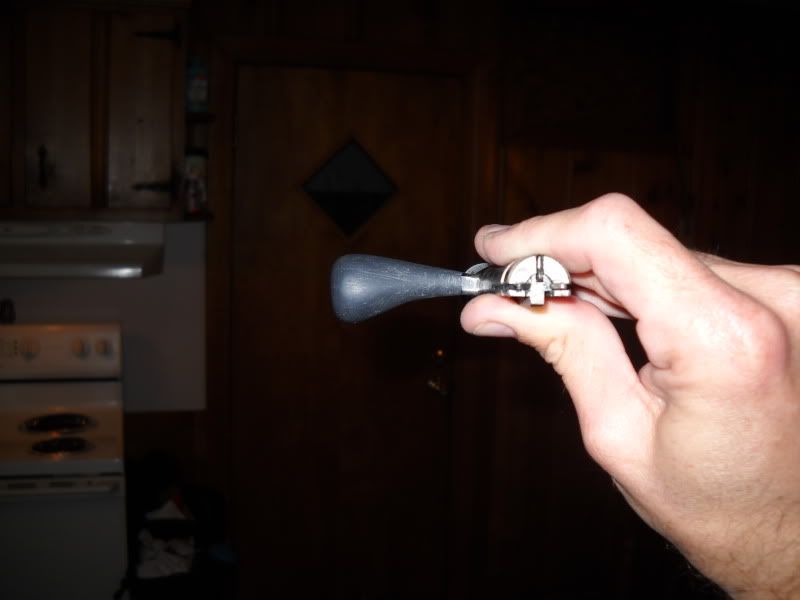
I put the Fast Steel on the rifle itself going for a comfortable automotive shifter / walking stick knob type of shape:

It looked a little too weird though, even for me, so I sanded it down to a more conventional shape:

Before:

Before:

After:

Additional views:
Before:
![url]](http://[url="http://i633.photobucket.com/albums/uu54/WALTERRO/BOLT%20KNOB/mkiif003.jpg"]http://i633.photobucket.com/albums/uu54/WALTERRO/BOLT%20KNOB/mkiif003.jpg[/url])
After:
![url]](http://[url="http://i633.photobucket.com/albums/uu54/WALTERRO/BOLT%20KNOB/mkiif027.jpg"]http://i633.photobucket.com/albums/uu54/WALTERRO/BOLT%20KNOB/mkiif027.jpg[/url])
Before:
![url]](http://[url="http://i633.photobucket.com/albums/uu54/WALTERRO/BOLT%20KNOB/mkiif005.jpg"]http://i633.photobucket.com/albums/uu54/WALTERRO/BOLT%20KNOB/mkiif005.jpg[/url])
After:
![url]](http://[url="http://i633.photobucket.com/albums/uu54/WALTERRO/BOLT%20KNOB/mkiif025.jpg"]http://i633.photobucket.com/albums/uu54/WALTERRO/BOLT%20KNOB/mkiif025.jpg[/url])
Before:
![url]](http://[url="http://i633.photobucket.com/albums/uu54/WALTERRO/BOLT%20KNOB/mkiif002.jpg"]http://i633.photobucket.com/albums/uu54/WALTERRO/BOLT%20KNOB/mkiif002.jpg[/url])
After:
![url]](http://[url="http://i633.photobucket.com/albums/uu54/WALTERRO/BOLT%20KNOB/mkiif028.jpg"]http://i633.photobucket.com/albums/uu54/WALTERRO/BOLT%20KNOB/mkiif028.jpg[/url])
Before:
![url]](http://[url="http://i633.photobucket.com/albums/uu54/WALTERRO/BOLT%20KNOB/mkiif001.jpg"]http://i633.photobucket.com/albums/uu54/WALTERRO/BOLT%20KNOB/mkiif001.jpg[/url])
After:
![url]](http://[url="http://i633.photobucket.com/albums/uu54/WALTERRO/BOLT%20KNOB/mkiif026.jpg"]http://i633.photobucket.com/albums/uu54/WALTERRO/BOLT%20KNOB/mkiif026.jpg[/url])
After the results (for under $5.00) of the "torture" testing and the look of the "knob" of the Fast Steel, I abandoned doing idea #2 as I liked the idea shaping the "knob" to however long, round, or position - high, low, straight, swept back. You can even shape the "knob" to fit your fingers and palm, put in texture (dimples like a golf ball using the tip of a drill bit, filing or etching in grooves, etc.). The Martha Stewart in me thought about inlaying an indian head nickel (it is a savage rifle), a state / bicentenial quarter, or etching my initials in the round outer part, for a little "bling", but then I thought not to. Just a few more ideas to kick around though.
FAST STEEL putty - $3.97
SAND PAPER (you probably have it on hand)
PAINT - Krylon flat black indoor / outdoor (puts it under $5.00 if on hand. add $2.99 if you have to purchase it)
TIME - 3-4 hours (excluding "practice knob")
Any of the methods mentioned to get the advantages of a tactical / oversized bolt knob is well worth it in my opinion. It definately helps with the cycling and the time between shots on a bolt gun. I, being a leftie with a rifle, find it very usefull using a rightie rifle. Plus it adds that certain eye catching custom "look". As most tactical centerfires has a tactical / oversized knob, it should be incorporated into a trainer for familiarity.
What is a "tacticool" rifle without a tactical / oversized bolt knob?
....seemingly incomplete. Here a few ways to install one at home on your own, from the semi-involved to the "easy as sin to do" for those that aren't tool orientated. A tactical / oversized knob on a trainer adds advantages such as matching it's centerfire big brother, easier to cycle do to the extra weight and surface for gripping, easier to "find" the knob not only in a normal shooting position, but awkward ones also. The added weight and length also increases the ease of "throw" as leverage is increased.
A bolt knob can usually cost $50.00 and upwards at the gunsmith's shop. With a few tools and a little direction, it could cost less than $5.00. Yes, 5 bucks!
This very informative thread was sent to me by hotrod9mm (thanks), and is the "correct" way, idea #1: http://www.rimfirecentral.com/forums/showthread.php?t=321755
I originally was going to do that, then came up with idea #2; that perhaps I can find a suitable "knob" in the cabinet hardware section of Lowe's (pictured to the left of the bolt $4.97), and I also bought some Fast Steel epoxy putty for idea #3 ($3.98). The first photo is of suplies needed for idea #2 and #3, followed by instruction diagram for #2. The extra machine screw is to replace the one that came with the cabinet knob, as it is beefier. The broken screw driver is for "practice" and testing idea #3 using it as a simulated bolt handle.
Cabinet knob $4.97 (Lowe')s
Tap and drill bit $2.56 (Home Depot)
Tap wrench $2.47 (Home Depot)
Beefier machine screw for "coupler" .20
= $10.20
You will need a grinder to shape the existing handle to match to the form of the cabinet knob, and some loc-tite or clear nail polish to keep it from loosening.
I thought the cabinet knob, once installed and painted, would look like a regular knob, or can be replaced by at least 10 different options (probably more) that was displayed at the cabinet section.
I went with idea #3 first for a few reasons: a) seems easier and quicker, b) was cheaper, c) can form the knob however I wanted, d) somewhat easily reversable in case it was horrible, e) anyone could do it, all you need is a stick of the Fast Steel epoxy putty ($3.97), some sandpaper, black paint (I used Krylon indoor / outdoor flat, seems better for wear against ultra black).
I first practiced on the broken screwdriver, using it as a simulated bolt handle, and to test durability. Started by using about 1/3 stick of the putty. It has the consistancy of a Tootsie roll. Knead together until the color is uniform and apply. You have about 5 minutes before it starts to really setup, when it starts getting warm to the touch, you are almost out of time.
After sanding and painting:
To test the durability of the Fast Steel, I put it in the oven at 150 degrees for 1 hour, then in the freezer for 2 hours - no flaking, peeling or cracking. Dropped it 3 times to a concrete floor from 3 feet, a small chip happened, but nothing catastrophic. This is much more abuse than ANY of my rifles would be subjected to, no failure on the Fast Steel.
I put the Fast Steel on the rifle itself going for a comfortable automotive shifter / walking stick knob type of shape:
It looked a little too weird though, even for me, so I sanded it down to a more conventional shape:
Before:
Before:
After:
Additional views:
Before:
After:
Before:
After:
Before:
After:
Before:
After:
After the results (for under $5.00) of the "torture" testing and the look of the "knob" of the Fast Steel, I abandoned doing idea #2 as I liked the idea shaping the "knob" to however long, round, or position - high, low, straight, swept back. You can even shape the "knob" to fit your fingers and palm, put in texture (dimples like a golf ball using the tip of a drill bit, filing or etching in grooves, etc.). The Martha Stewart in me thought about inlaying an indian head nickel (it is a savage rifle), a state / bicentenial quarter, or etching my initials in the round outer part, for a little "bling", but then I thought not to. Just a few more ideas to kick around though.
FAST STEEL putty - $3.97
SAND PAPER (you probably have it on hand)
PAINT - Krylon flat black indoor / outdoor (puts it under $5.00 if on hand. add $2.99 if you have to purchase it)
TIME - 3-4 hours (excluding "practice knob")
Any of the methods mentioned to get the advantages of a tactical / oversized bolt knob is well worth it in my opinion. It definately helps with the cycling and the time between shots on a bolt gun. I, being a leftie with a rifle, find it very usefull using a rightie rifle. Plus it adds that certain eye catching custom "look". As most tactical centerfires has a tactical / oversized knob, it should be incorporated into a trainer for familiarity.