• Frank's Lesson's Contest

    We want to see your skills! Post a video between now and November 1st showing what you've learned from Frank's lessons and 3 people will be selected to win a free shirt. Good luck everyone!

    Create a channel Learn more
  • Having trouble using the site?

    Contact support

Explain your load development process

ReaperDriver

Sergeant
Full Member
Minuteman
  • Sep 5, 2009
    1,331
    167
    60
    Vegas Baby!
    I'm looking for various techniques on how you do load development for a new powder, bullet, brass, etc from start to finish.

    Does everyone step their powder charge in .2, .3, 4, .5 grain increments? How many strings of the same combo do you fire to get an accurate reading?

    How about what do you do on the range once you decide on the loads you're going to shoot? Do you shoot at 100, 200, 300+? I've been doing 300 yd test groups, but I wonder how much any deviations are due to the rifle not liking the load vs the distance magnifying any shooter error? Is 100 yds too close for an accurate assessment?

    I'm just interested to see what other folks do to test/develop a new load. What's your regimen?
     
    Re: Explain your load development process

    I really prefer the fly by the seat of your pants method. I like to stay about a half grain under max so I leave room for error, if I dont get lucky and those dont shoot with the powder types I have on hand then I start asking who is having good luck with what and I try some or what has worked for others - not re-inventing the wheel. I dont have a chronograph so I just find what works. I know this is a half ass way of doing it but in the end its all about finding what works. I admire those meticulous souls with chronographs and portable loading equipment who perfect the ideal load but thats just not me. Im Ok with the fact that my R5 mil spec and my GAP gun shoot everything into just one hole.
     
    Re: Explain your load development process

    I always try to get the smallest possible grouping that I can get from a load at 100 yards for all of my calibers.

    I use the ladder test with an increment about .3 grains. Load at COAL recommendation. Once you have a specific load that you think is acceptable, then try to vary the COAL to get it close to, or jammed into the lands depending on the bullet you shoot. After that, I test my load at 300 and 500 yards. To save some money and time (ha ha!! if there is such in this hobby), I load 4 rounds per increment. My theory behind that is you do 3 rounds, but if you pull one then the data may not be as accurate. This way you have an extra round to see if your grouping deserves a second test. There are many ways to skin a cat. That' just mine.
     
    Re: Explain your load development process

    Reaper Driver -

    I start with a match/high quality case, pick a match bullet(ie Sierra 168s or 175s) and then load a reliable and known accurate powder (ie Varget) about 10% down from the max recommended load. My concept is to start by testing a single variable...in this case only powder charge/bullet speed and its impact on accuracy.

    I load 5 rounds at each weight, and step up by .5 grain increments. I bag them up into zip lock bags marked with the powder charge -- I'll put the spent brass back into the marked bags so I can closely inspect for pressure signs once I get back home.

    At the range I print 5 shot groups at 100yds on paper - and mark the paper with the specific load so I can do further analysis once I get back home. I shoot from sandbags (again - as few variables as possible) with about 1 minute spacing between shots and then about 10 min between groups. I check each case for pressure signs along the way to ensure I'm not going too far.

    What you should see, assuming you're able to shoot good shots without called flyers, is that one of the groups is tighter that the rest. Once I figure out which group that is, I'll repeat the process around that known charge (above and below) with .2 grain increments until I get the tightest group again.

    Using this technique I've been able to get .7-.8 groups on a good day out of a factory rifle (with trigger work done) and consistent sub-moa accuracy on any given day -- assuming I've done my job and I'm on my game.

    I hope that helps...it's worked well for me in the past on multiple occasions and in multiple rifles. You can go further and try different powders, etc. but I've been lucky and had success with my first try. I think it helped that I did my homework and started with a bullet/powder combo that I knew worked well for others in a similar rifle.

    Good luck.
     
    Re: Explain your load development process

    Loaded one up for the first time tonight. Did it in .5gr increments and then 3 stages of lengths. Total this time around was 36 rounds.
     
    Re: Explain your load development process

    I find I have best results doing whatever Kombayotch and SobrBiker883 do!
    laugh.gif


    Honestly, the key here is to not let yourself become paralyzed with indecision from the amazing amount of good advice and ideas you'll find here.

    The best idea I've found thus far is to follow the Optimal Charge Weight ( see Dan Newberry's work here, http://practicalrifler.6.forumer.com/viewtopic.php?t=878) protocol in testing loads. My own approach involves loading up 10 rounds of each weight of powder around a likely mean average load about 2/3rds up from minimum. Then I fire one of each at a 1" circle (such as Lowlights first practical target from last year) in a round robin fashion. This way I fire a total of five rounds of each specific load at it's respective circle over two targets. I find it compensates for any flaws in my pathetic shooting!

    I thus have two groups for each load to compare and make judgements about consistant vertical spread and then tight grouping. If I don't find what I need, I slide the mean farther up or down the scale and do it again.

    But as I said, it's far easier to just do what Kombayotch and SobrBiker883 do!
     
    Re: Explain your load development process

    I load six rounds of each increment, .3gr between increments, two 3rd groups each increment at 100yd. Odds of pulling a shot twice are less. Then nine rounds of the best increment, and nine each of increments .1gr and .2gr above and below the previous best increment. Three groups of 3rd each increment at 200yd, average the results.
     
    Re: Explain your load development process

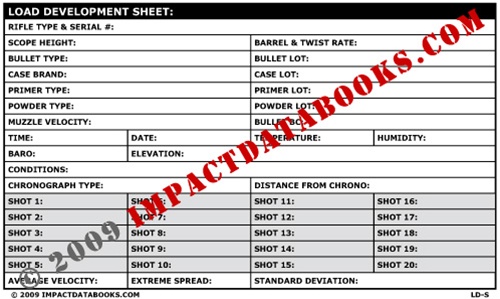
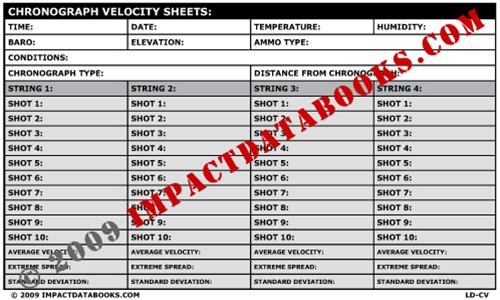
    Here are some good pages to use for your laod developement

    LD-CV-2.jpg


    LD-S-2.jpg
     
    Re: Explain your load development process

    <div class="ubbcode-block"><div class="ubbcode-header">Originally Posted By: queequeg</div><div class="ubbcode-body">I find I have best results doing whatever Kombayotch and SobrBiker883 do!
    laugh.gif


    Honestly, the key here is to not let yourself become paralyzed with indecision from the amazing amount of good advice and ideas you'll find here.

    The best idea I've found thus far is to follow the Optimal Charge Weight ( see Dan Newberry's work here, http://practicalrifler.6.forumer.com/viewtopic.php?t=878) protocol in testing loads. My own approach involves loading up 10 rounds of each weight of powder around a likely mean average load about 2/3rds up from minimum. Then I fire one of each at a 1" circle (such as Lowlights first practical target from last year) in a round robin fashion. This way I fire a total of five rounds of each specific load at it's respective circle over two targets. I find it compensates for any flaws in my pathetic shooting!

    I thus have two groups for each load to compare and make judgements about consistant vertical spread and then tight grouping. If I don't find what I need, I slide the mean farther up or down the scale and do it again.

    But as I said, it's far easier to just do what Kombayotch and SobrBiker883 do! </div></div>

    Lol! Thanks!

    However, most can't do exactly what I do unless they have a Pressure Trace system. First, I load up 4 or 5 rounds in 1.0 gr. increments and then fire them. I plot the velocities, pressures and barrel times in Excel and apply a trend line to each. Excel will give the equations for each one vs. the charge weight, and you can derive equations to relate pressure and velocity, etc... With these, I can calculate approximately where the maximum charge is and where the OCW nodes are. I choose the highest one.

    I then run an OCW test (round robin) around that area to pinpoint the node. I usually do three rounds at six different charge weights 0.3 gr. apart. Once I find the nodes, I confirm them by test firing at 300 yards. If I'm not loading to a fixed length (mag length), I may play with the seating depth to see where it shoots best and how sensitive the load is to this. Ideally, it shoots well over a wide range of seating depths. I choose the length closest to the lands so that the load shoots well for a while as the throat erodes. Then I just confirm by firing at 600 yards and 1000 yards. If I didn't have Pressure Trace, I would just work up the load doing a couple OCW tests while keeping an eye out for pressure signs. Same result, just Pressure Trace just gets me there much quicker and I don't have to guess whether or not the load is too hot.

    If the load stops shooting after a few thousand rounds and you've eliminated the cause being a carbon ring and/or hard necks, you can either run another OCW test around the charge you were using or try bumping the charge up 0.5 gr. or so to see if it tightens things up again.

    Things like high SD are often solved by changing primers, cleaning the insides of the necks better or annealing if the brass is getting hard. I polish the insides of my necks with either Flitz on a bore swab or with a brush with 0000 steel wool wrapped around it. Clean and smooth necks are one of the most important things for getting low runouts and low SDs, in my opinion.
     
    Re: Explain your load development process

    I try to start with a known load that works well for someone else in a similar rifle and gets me the velocity I need without pressure signs.

    I measure the distance to the lands and start there. If that works I leave it alone. If not, I back off .010 and .020, and crush .005. One usually works better than the rest.

    I'll sometimes do a ladder test at .5 grain increments, but ladder tests are tedious and one of the reasons I hate load development.

    I test at 300, no closer. I chrono and look for low ES and SD, to get as little vertical as possible.

    And that's it.
     
    Re: Explain your load development process

    With my new rifle, I started loading at .4 grains above book max and loaded down at .4 gr increments. Then at the range, I shot them at 300, starting at the low end loads and watching for pressure signs. After shooting all the laods, it appears that the book max load (7/8" @ 300yds) and .4 above (1 1/8" @ 300yds) are my best bets. So, I loaded 10 rounds of the book max, .2 above, and .4 above to shoot again this Thursday. I have a feeling that the .2 above will be pretty good with no pressure signs. We'll see on Thursday though.

    So, I guess I do the seat of the pants thing too. Just load some and shoot, then load more and figure out what works best. Once I get the powder load I want, I'll mess with the seating depth some.
     
    Re: Explain your load development process

    0.) The rifle has to be straight and rig put together right to begin with.
    1.) Decide first whether you want to shoot Secant or Tagent ogive bullets.
    http://www.riflebarrels.com/articles/bullets_ballastics/throat_angles.htm
    Tangent ogive bullets are tolerant of free bore jump. Secant, or VLD designs are not as tolerant of free bore jump. Matchkings are good Tangent bullets, Berger are good Secant bullets. Matchkings are less finicky, according to some.
    The barrel twist rate will help you choose bullet weight. Consult with a shooter who is an expert with your chosen caliber. Some have experienced secant bullets to shoot better kissing the lands, while some have experienced them shooting better with .030+- jump.
    2.) Next, decide on a powder. Varget is very stable and works in most non-magnum rifle loads, resisting ambient temp changes that affect velocity. Hogdon powders are more ambient temperature change resistant than others according to some tests.
    3.) Decide on a primer. Small rifles, right now, Rem 7 1/2 are working well. Some prefer primers that purport to be "match" grade. I don't.
    4.) Use good brass. Get Lapua and look forward, or the kind good shooters are using for your caliber.
    5.) Use a Redding or Forster Bonanza micrometer seater die (or custom die). Full length siz your brass without an expander button. If you insist on something sizing the inside, use a mandrel. Also, use the tool to monitor shoulder bump. This is how far into the sizer die you know to run the case. Ignore manuals instructing you to cam over the ram and proceed loading without regard to shoulder bump.
    6.) Load clean brass. Shoot clean ammo (absent sizing lube).
    7.) Measure your rifle's chamber length using a tool or seat a bullet in a sized case without powder and primer lubing the bullet with sizing lube barely into the case mouth, then completely seat bullet by chambering the dummy round, closing the bolt completely. With a caliper and an ogive measuring tool such as a hex nut from Sinclair, measure the overall length of this round and record it. Keep the dummy too. Open the seater die, insert the dummy round by raising the press ram. Screw down the seater stem of the seater die until it touches the bullet nose cone and then seat the bullet about .005" deeper into the case mouth. Because you jammed the bullet into the lands with the caming of the bolt, seating the bullet .005 shorter will likely put it still kissing the lands. Load five rounds at this cartridge over-all length with your chosen powder and beginning, safe charge weight. Then load five more rounds with .5 grs charge weight more and so forth until you get pressure indicator(s). Stop! At some point, on the target you will see a group from one of those charges that appears to exhibit superior accuracy. Load that charge again to confirm it using the same cartridge overall length. If the group repeats itself, go to the seating depth step in load development.
    8.) Begin seating the bullet .0500 deeper into the case, five rounds each up to .1500 deep unless pressure is encountered along the way. Again, a group on the target should exhibit superior accuracy. Return to that seating depth and confirm it. Seat bullets .0010 deeper and go up in increments of .005 up to about .0015 over the accurate group depth. Once again, you should see a group that is better than others.
    9.) Conduct a ladder test. Read about that on 6mmbr.com.
    10.) Shoot allot and resist the temptation to continue load testing after finding a load unless you want to become a load tester instead of a shooter. I'm always chasing a load. Just go shoot the gun and enjoy. I'll try and do the same.
    Get this book:
    HANDLOADING FOR COMPETITION; MAKING THE TARGET BIGGER, by Glenn Zediker, and read everthing else he writes on handloading and ammo.
    Other good handloaders are ChadTRG, Rich Emmons and WmRoscoe that I know of.
    Avoid some benchrest loaders' advice unless your shooting bench rest. They accept powders intolerant of atmospheric stability because they often load at the range according to current conditions. We can't do that in tactical or hunting.
    It helps if you do this stuff at the range. At least seat the bullets long and then seat them deeper at the range with your seater die and press as you fire the loads to get that done in one trip to the range.
    Use a chronograph that works well.
    Test the load at the distances you plan to shoot the gun.
    This is one way to develop loads. Variations are innumerable, but this will probably get you there without wearing out a barrel.


     
    Re: Explain your load development process

    This week:
    58 gr max on Hodgdon web site.

    Start at 62.8 gr ..ok
    65 gr ..ok
    66. 5 gr.. ok
    67.5 gr... The only pressure sign I can find is that the brass has easier primer insertion after this load ....stop work up

    I fired 4 shots, and I now know that the real max load is between 66.5 and 67.5 gr

    The next step is to find an accurate load that is at least a safety margin below the real max load.
     
    Re: Explain your load development process

    A follow up question..... it seems like there are different schools of thought as to whether to test at 100 yds or 300 yds. My precision shooting mentor suggests 300 and that's what I did with my initial load development. The longer range DID illustrate very well whether the load held the verticle or not, but I was getting a lot of horizontal stringing. Some of it was due to wind, probably, although it was a fairly calm day (wind < 7 mph) - but I'm also sure that my ability (lack of) contributed to some of it as well. End result, it was hard for me to determine if I had hit an accuracy node or not as the shots were often > MOA in the horizontal even when I was literally getting 1/2 or better MOA in the verticle. All its telling me is my handloads are consistant (the ES and SDs bear that out too) but not necessarily accurate.

    Do you guys think I should go back to 100 yds to reduce the environmental effects/shooter error or is that too close to accurately gauge an accuracy node?
     
    Re: Explain your load development process

    I do all initial testing at 100 yards. Then when I find what I think is an accuracy node and it's in the velocity area that I want then I will start testing at 200-300 depending on how many rounds I need to test that day.

    If I had a private range where I could go down range any time I wanted then I would likely focus on 300-400 yards after I found something that grouped well at 100.

    Edit: I'm a newbie compared to most reloaders here so take what I say for what it's worth.
     
    Re: Explain your load development process

    What Kombayotch said works for me as well as alot of people I shoot with, life got a lot simplier when I found the OCW method or a variation, test shot at 100 then prove at 300.

    A friend of mine shoot this test for his AI 155L Varget http://practicalrifler.6.forumer.com/viewtopic.php?t=862 it was his first try at this method and shot the test at 300 yds by mistake, but he is a fair shot. He now shoots the test at 100 before moving to 300.

    For OCW method www.optimalchargeweight.embarqspace.com/ and www.practicalrifler.6.forumer.com/index.php has alot of loads that might be of help
     
    Re: Explain your load development process

    Found this method of load workup by Lee Euber
    Working Up a Load …. by Lee Euber

    1. Polish bullet with steel wool. Initial seating depth achieved when bullet is marked by all lands. Tony Boyer likes to see a square.

    POWDER

    2. Load 3 cases in a low grain load. Increase each 3 case load by .5 of a grain, and then shoot. Increase loads until primers show pressure.

    3. Identify shots that grouped well, not so good, and then good again.

    4. Pick load that shot the best. Load 3 cases with .1 grain less, and 3 with .1 grain more, for another comparison.

    5. After picking charge for use, load 30 cases with the same powder charge.

    SEATING DEPTH

    6. Load the 30 cases in groups of 3, increasing the seating depth from touching the lands to jumping about .040 of an inch, in increments of .005 of an inch.

    7. Shoot all 30 rounds without cleaning or clean after each 10.

    8. Use ONE fouling shot after each cleaning.

    9. Select load that shot best. Load 5 cases with that powder charge and seating depth.

    10. Load 10 cases, 5 with seating depth .005 less than benchmark figure and 5 with .005 more.

    11. Can compare more than once or change seating depth by .001 or .002.

    12. Once you’ve picked the best seating depth, load 15 cases at that depth.

    POWDER

    13. Check first test by varying charge by .1 grain, for each 5 shot group.

    14. Shoot in a medium wind condition, letting the gun do the work.

    SEATING DEPTH

    15. After picking the best load jumping the lands, compare it with the load that touches. Compare these loads again and again, on different days, in varying conditions, deciding which one is best.

    16. If it doesn’t shoot to your satisfaction, restart with a different powder.

    NECK TENSION

    17. If you decide on the load that puts the bullet in the lands, be sure neck tension is tight enough to hold the bullet uniformly.

    18. Its hard work if you want to go to matches and be in contention.
     
    Re: Explain your load development process

    Pick three powders and a good loading manual slow, medeum and fast burn rates.Load 4 of each at(for argument sake)2700fps saami specs for coal.Go shoot!Take smallest group work load up and down by .5grns.Go shoot,chase the little group.when the group starts to open back up go back to the tightest and start working the coal out and then in from saami specs.Bullet determination is a factor and this same process is repeated for a bulleet change.It wont take long to find a sweet spot,having a range out the front door helps speed up the process.
     
    Re: Explain your load development process

    I just went hunting 900 miles from here.
    I kept missing antelope.
    My range near Seattle has only 100 and 50 yard shooting.
    I built a 6' wide 8' wide target and put it on the public hunting land.
    I got a roll of butcher paper and put (3) 24" vertical strips of paper on the target.
    What I learned from my 500 yard target was that I could zero at 100 yards and use my trajectory chart from Quickload/Quicktarget, but that 100 yard zero must be very accurate.

    Then I went deer hunting.


    The 5 deer I killed in 2008 and 2009 were all between 400 and 500 yards.
    In 2008 I just used hold over and Kentucky windage.
    This year I put a turret on the elevation.
    In 2009 I dialed up 5 moa elevation for 400 yards, but still faked the windage.


    One deer I killed in 2009 was at 429 yards with a 8 mph wind.
    The deer was facing into the wind and the bullet drifted back and hit the liver. I was bang flop.

    The other deer I killed this year was at 400+ yards with 13 mph wind.
    The deer was facing down wind.
    I the first bullet missed.
    I fired again aiming at the center of the animal.
    The second bullet hit the heart at the very front of the animal, and the animal ran 50 feet before collapsing.

    Next year I will put a turret on the windage.