KRG Bravo Chassis

tikkakrg.jpg


Posted the pic in the Tikka thread but have a question about the bravo chassis so i figured I would ask that in this thread.

The cheek riser, when positioned for my correct scope/eye positioning, contacts the bold shroud. I can put it down a couple milimeters which solves the bolt contact issue but isn't exactly where i want it. I am being ultra picky here and it really isn't that bad - just wondering if anyone has taken a dremel to that portion of the cheek riser (it is where the cut out is on the front of the cheek riser but the shelf that remains is actually what the bolt shroud contacts)?

I can take some better pics if the description isn't enough.
 
View attachment 7382056

Posted the pic in the Tikka thread but have a question about the bravo chassis so i figured I would ask that in this thread.

The cheek riser, when positioned for my correct scope/eye positioning, contacts the bold shroud. I can put it down a couple milimeters which solves the bolt contact issue but isn't exactly where i want it. I am being ultra picky here and it really isn't that bad - just wondering if anyone has taken a dremel to that portion of the cheek riser (it is where the cut out is on the front of the cheek riser but the shelf that remains is actually what the bolt shroud contacts)?

I can take some better pics if the description isn't enough.
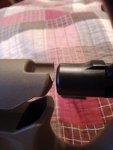
I’m pretty sure @ThreeBravo had to do the same thing on his Howa KRG Bravo set up.
 
I’m pretty sure @ThreeBravo had to do the same thing on his Howa KRG Bravo set up.
15955597238211233373620314940379.jpg
I had the same issue where the bolt made contact with the cheek riser if it was too high in my bravo with a howa 1500 action. The pic above is the end result after taking an orbital sander to it then a little hand sanding to smooth it out. Definitely worth it as I now have zero contact when I run the bolt.
 
View attachment 7382078
I had the same issue where the bolt made contact with the cheek riser if it was too high in my bravo with a howa 1500 action. The pic above is the end result after taking an orbital sander to it then a little hand sanding to smooth it out. Definitely worth it as I now have zero contact when I run the bolt.

That is probably a better solution. I was thinking about just dremeling a recess in the portion that is already notched out for the bolt to ride above. Just having put it together i haven't had much time to really think about how I might want it to come out. May just play with things a bit more before removing any material.

another thought I had was just adding a piece of foam or weibad cheek cover to it which may resolve all the problems without removing anything from the cheek riser at all.

Thanks for the responses
 
  • Like
Reactions: ThreeBravo
View attachment 7382056

Posted the pic in the Tikka thread but have a question about the bravo chassis so i figured I would ask that in this thread.

The cheek riser, when positioned for my correct scope/eye positioning, contacts the bold shroud. I can put it down a couple milimeters which solves the bolt contact issue but isn't exactly where i want it. I am being ultra picky here and it really isn't that bad - just wondering if anyone has taken a dremel to that portion of the cheek riser (it is where the cut out is on the front of the cheek riser but the shelf that remains is actually what the bolt shroud contacts)?

I can take some better pics if the description isn't enough.

rubber washer on the stems, tape on the stems, or whiteness mark. That way you just pull it up and off.
 
View attachment 7382056

Posted the pic in the Tikka thread but have a question about the bravo chassis so i figured I would ask that in this thread.

The cheek riser, when positioned for my correct scope/eye positioning, contacts the bold shroud. I can put it down a couple milimeters which solves the bolt contact issue but isn't exactly where i want it. I am being ultra picky here and it really isn't that bad - just wondering if anyone has taken a dremel to that portion of the cheek riser (it is where the cut out is on the front of the cheek riser but the shelf that remains is actually what the bolt shroud contacts)?

I can take some better pics if the description isn't enough.
Don't know when you bought your Bravo, but more recent examples should include a spare cheekpiece that mitigates the issue.

ifeRbWB.jpg

From left to right is my home-file-job on the original piece, the 2018-era "long action/Tikka" piece from KRG, and the rightmost one is the Tikka mitigation piece they send currently.
 
  • Like
Reactions: OGER and MarinePMI
You have to remove the butt plate and dick around holding the the two threaded clips in place while you align and thread in the supplied screws in to place. Your fingers will be of little help in that small channel.
A pair of long tweezers came in real handy for holding the flat backer nuts in place when I attached my rail to the buttstock. After I figured it out it was a piece of cake.
 
  • Like
Reactions: MarinePMI
Tossing up whether I like the enclosed forend on the Bravo or not - some times I look at it when I like it, other times I think it looks a bit odd.


Really depends on whether your scope with attachments is short enough, whether it will accomodate your barrel contour, whether you intend to add a T-slot weight to the forend, or not, and whether you intend to shoot where it gets extremely hot, or cold, or in temperate climate. For me my scope length exceeded the space to the incorporated pic rail at its front end, I also intended to utilize a T-slot weight, and where I live can get both extremely hot in the summer, and extremely cold in the winter, so an aluminum forend, or complete aluminum chassis was not my first choice and I stuck with the regular Bravo forend , added the spigot mount with L2 MOE pic rail for the bipod, NVMC, T-slot weight, QD plate, and an ARCA rail, and heavy barricade stop on an ARCA clamp instead. Personal choice! For me going without the enclosed forend offered more options. It also saved me from having to have it cerakoted to blend in with the rest of my Bravo.
 
Personally the enclosed aluminum enclosed forend was perfect for me. The plastic forend that the Bravo comes with is too flexible and not reliable. I think it needs to be redesigned with a better material or adding material to stiffen it up.
 
Personally the enclosed aluminum enclosed forend was perfect for me. The plastic forend that the Bravo comes with is too flexible and not reliable. I think it needs to be redesigned with a better material or adding material to stiffen it up.
No flex on my regular Bravo, with the aluminum backbone, the T-slot weight, and the ARCA rail, and spigot mount even He-Man the Librarian would not be able to get flex out of that forend. Just the aluminum and steel of the ARCA rail, T-slot weight, and spigot mount without the aluminum backbone adds up to 19.8 oz., the enclosed forend is only 17.6 oz. , in my opinion it would flex more. In any case please no material re-design the Bravo is perfect for my purposes.
 
If you have flex in yours maybe you need something different, as I said my set up has no flex, period. For my purposes the enclosed forend's incorporated front pic rail was a hindrance to my scope and attachments, and it did not allow for the added weight to achieve the balance I desired, the regular forend did not have these problems. Glad you like your set up for your purposes though. I don't need to take anything off I deem necessary, my gun, not yours, savvy?
 
I recently purchased a bravo for my tikka and am consider getting the spigot for it. For those that have the KRG minimalist spigot, could you post up a picture of how I think mounts/interfaces with the stock?

TIA

Bikejunky
 
I apologize for not digging through 28 pages for this, but I am only getting about 1 rotation on my front action screw. This seems really shallow for me, so I need to get a longer screw?

And it's right after 1 turn? That's not right. I would give KRG a call, they helped me out when my action screws weren't working right. I couldn't get my front screw tight even though it was bottomed out, but I'm pretty sure I had some bedding compound in the hole left over from the pillars I did in the last stock.
 
Thanks that's good news, I don't mind doing a bit of modification to the feed lips.

I was worried the floor plate might hit the bottom of the mag well and stop it from seating properly.

A three rnd polymer mag will be much nicer to carry in the mountains especially if it sits close to flush with the bottom of the mag well.
 
my experience a couple months ago was a tikka t3x in a bravo would not strip the last round from metal Ruger mags. The mags didn’t seem to seat high enough.

Worked fine with AI and MDT.

I hope your experience is better.

Bikejunky

My Krg Bravo in the wild...

This may have come up in another thread but does anyone have a solution for running 3 rnd mags with the tikka aics chassis?

Ideally I am after a factory option so I don't have to modify my steel AI mags.

Looks like Ruger make one in the aics pattern but has anyone tested if they seat / feed properly?

View attachment 7522618
 
I currently use the 5rnd AI mags and do rate them highly. For hunting I often carry my rifle under the mag well (that's just how this set up balances nicley) and I would prefer a mag that sits more flush. It's a little thing but after hours of climbing and sweating these things start to nag me.
 
My Krg Bravo in the wild...

This may have come up in another thread but does anyone have a solution for running 3 rnd mags with the tikka aics chassis?

Ideally I am after a factory option so I don't have to modify my steel AI mags.

Looks like Ruger make one in the aics pattern but has anyone tested if they seat / feed properly?

View attachment 7522618

I know that @LongRifles Inc. is/was working on flush-fit mags but I’m not sure where that project landed.